Add live chat to your website
Campaigns for chat allow brands to easily create and manage digital engagements, targeting customers based on engagement attributes or entry points and routing them to a desired skill. These buttons or banners can then be placed on your website to offer chat to your visitors. For an overview of campaigns in the Conversational Cloud and their terminology, click here.
1. Planning and thought starters
(completed by contact center manager, project manager or program manager)
Answering these questions will help you prepare and streamline your campaign creation process:
- Do you want one chat button available on all pages of your website?
- Is there a dedicated place on your website that you’d like the button to display?
- Will you offer chat only to specific audience? How will you target this audience?
- What skills will be answering your chats? How will you do the routing?
- Are you offering service transactions? Will you need to authenticate the conversations?
- Will you utilize chat for sales? Specific campaigns? Do you expect to track the conversations made over chat?
2. Configuration
Engagement attributes
Engagement attributes help you to collect more in-depth information about your visitors, such as products viewed, errors encountered and more. To collect visitor information from your web engagements, you first need to validate your engagement attributes. For more information on individual engagement attributes, you can refer to the Developer Center.
Set up sales & conversion tracking
If you are planning to create campaigns tailored for tracking sales and conversions, ensure you define the following settings:
- Define your currency - you can define what currently you would like to track your sales and conversions in. This currency will reflect in your reports. For more info, click here.
- Cross session period - Often your consumers will not purchase on the first visit to your website. You can define how long a ‘cross session’ applies. For example, a cross session of 2 weeks means that if a consumer visited your site, had a chat conversation, and came back to purchase only 2 weeks later - that sale will be attributed as a conversion following that specific conversation.
- Conversion Attribution model: In the case that more than one agent or bot handled the conversation, define who should get the conversion. First agent? Last agent? Split?
3. Creating a campaign
Before you can start creating your buttons or banners, you need to set up your campaign. In the Conversational Cloud, engagements can be added to either new or existing campaigns.
To create a new one, simply click Add campaign at the bottom of the Campaign Builder, or select an existing campaign to add your engagement to.
When creating a campaign, you first need to define the following:
Click on each of these links for a more in-depth explanation. Once these items have been defined, you can begin creating your web engagement.
4. Designing web engagements
You can now begin creating banners or buttons to add to your website. These engagements are created in the engagement studio, where a campaign wizard will guide you through the process.
To add a new web engagement to your campaign, click “add engagement” and select web as the engagement source. This will open the template gallery within the campaign wizard. There are six stages for creating web engagements: gallery, settings, studio, window, entry point and behavior.


Template gallery
The template gallery page allows you to choose the format of your engagement and whether you are trying to create a chat button or content banner. Learn more about choosing your engagement format here.
Engagement settings
On this page, you can define the conversation channel, authentication, routing, window presentation and language settings for your engagement.

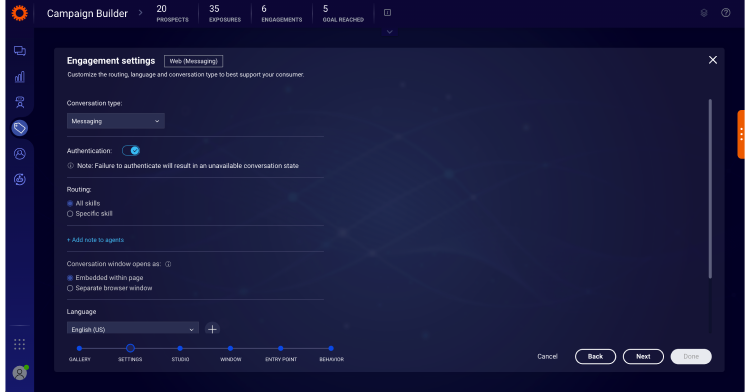
Conversation channel
Select if you want the engagement to lead to a chat conversation or to a simple link. From the conversation type drop down, select Live chat.
Authentication
You can select one of two security methods for your conversation.
- Authenticated: Conversations can have a layer of security, or authentication, for brands looking to add chat to pages within the logged in area of their website. To ensure your engagement will target authenticated chat conversations, enable the authentication toggle.
- Unauthenticated: For unauthenticated chat conversations, disable the toggle. Unauthenticated engagements will display on both authenticated and unauthenticated pages.
Routing
Under routing, you may select the skill that your engagement should be assigned to. To route to all skills, select ‘All skills’ (default), to select a specific skill, select the ‘Specific skill’ option and choose from the dropdown menu.
Window presentation
Select the mode in which the conversation window will be presented to the consumer, either embedded in the page or as a separate browser window.
Language
The engagement language selected in this step will only affect items in the Agent Workspace - namely Automatic Messages and Predefined Content - during an active conversation.
Once your settings are complete, click next.
Engagement studio
The engagement studio page is where you design your button or banner to suit the look and feel of your website. By clicking on your engagement you can adjust the text, style and design of the engagement, and add additional buttons, images and text. To learn more about designing engagements, click here.
Conversation window
The engagement window studio allows you to customize the chat conversation window to match your site. You can click on different parts of the window to change their design, and add additional elements like surveys. For more information on the conversation window design, click here.
Surveys
Surveys are the perfect tool for collecting feedback from your consumers and improving service. To read more about the types of surveys available for chat and how they can be enabled, click here.
- Pre-chat survey: The pre-chat survey provides agents with information about the visitor prior to the onset of the chat. The details are displayed in the Agent Workspace allowing them to better understand the needs of the visitor.
- Post-chat survey: Post-chat surveys boost consumer satisfaction and help you to improve your business. In these surveys, your visitors are asked to rate the service provided in the chat. You can subsequently use this information to evaluate the performance of your agents.
- Agent survey: The agent survey is an important tool that allows you to gather data and insights from your agents about their conversations with consumers. Gathering data from the agent's perspective helps you determine and analyze the nature of the chat and understand its outcome.
Entry point
You will now reach the entry point library. An entry point is the section within your app where the engagement will be displayed. You can choose the engagement entry point from the existing items, or click “Add new” to define a new entry point. For further information on creating a new entry point, please refer here.
When you are finished defining your entry point, click next.
Behavioral targeting
The next page is the behavioral targeting library. Here you can decide when to display engagements according to your consumers’ behavior by selecting the consumer behavior conditions you wish to impose on the target audience. From the behavioral targeting library, you can choose the desired behavior from the existing items, or click “Add new” to define a new behavior. For more information on creating a new behavior, click here.
When selecting the condition, look for a globe icon next to the word “Supported,” which indicates that this engagement attribute is applicable for web engagements.
When you are finished defining your behavioral targeting, click next.
5. Publishing your campaign
Your new mobile app engagement is now complete. From the Campaign Summary page, you can give your engagement a name, edit all aspects of the engagement, enable or disable the engagement and publish.To learn more about publishing and unpublishing campaigns, click here.
Missing Something?
Check out our Developer Center for more in-depth documentation. Please share your documentation feedback with us using the feedback button. We'd be happy to hear from you.