Setup of customer hosting
Overview
Analytics Studio, by LivePerson, is a groundbreaking solution that enables data-driven enterprises to leverage the hidden potential in their omni-channel call recordings and text conversations. This analytics platform seamlessly captures and collates asynchronous messaging, synchronous chats, and speech through LivePerson's Conversational Cloud and VoiceBase platform. With Analytics Studio, businesses can quickly convert conversations into actionable data, providing valuable insights in a matter of minutes.
Through the Customer Hosted Analytics Studio offering, LivePerson gives you the power to host your own data and to visualise it in the BI platform of your choice. You may also map your LivePerson data to your own custom fields for a more personalised analytics experience. All this and more is made possible through the Customer Hosted Analytics Studio feature which we shall now further explore here.


Customer hosted analytics studio overview diagram
All the data from the screenshots or mentioned elsewhere in this tutorial come from a test/playground dataset called ThriveAir which resembles real world interactions between an airline customer service representative and their customers.
Setup
The setup consists of two parts-- Amazon S3 and LivePerson Analytics Studio platform.
Currently,
This page focuses on the AWS S3 with Azure blob storage being added soon (Q4 2023).
AWS S3 Setup
- Access & Admin controls
- AWS Stack Creation
- AWS S3 Bucket Folder Creation
- Fetching details from AWS for Analytics Studio
- Setup AWS IAM Roles & Policies
Access & Admin controls
Make sure you have the right credentials and IAM roles to create and setup S3 buckets and assign roles and permissions. If not, contact your IT Support staff.
Once cleared, sign into AWS as root user.
AWS Stack Creation
This section deals with setting up your AWS account so that it's ready to ingress data from LivePerson Analytics Studio platform.
- In your AWS account, Head over to the Cloudformation Console and click on the yellow "Create Stack" button

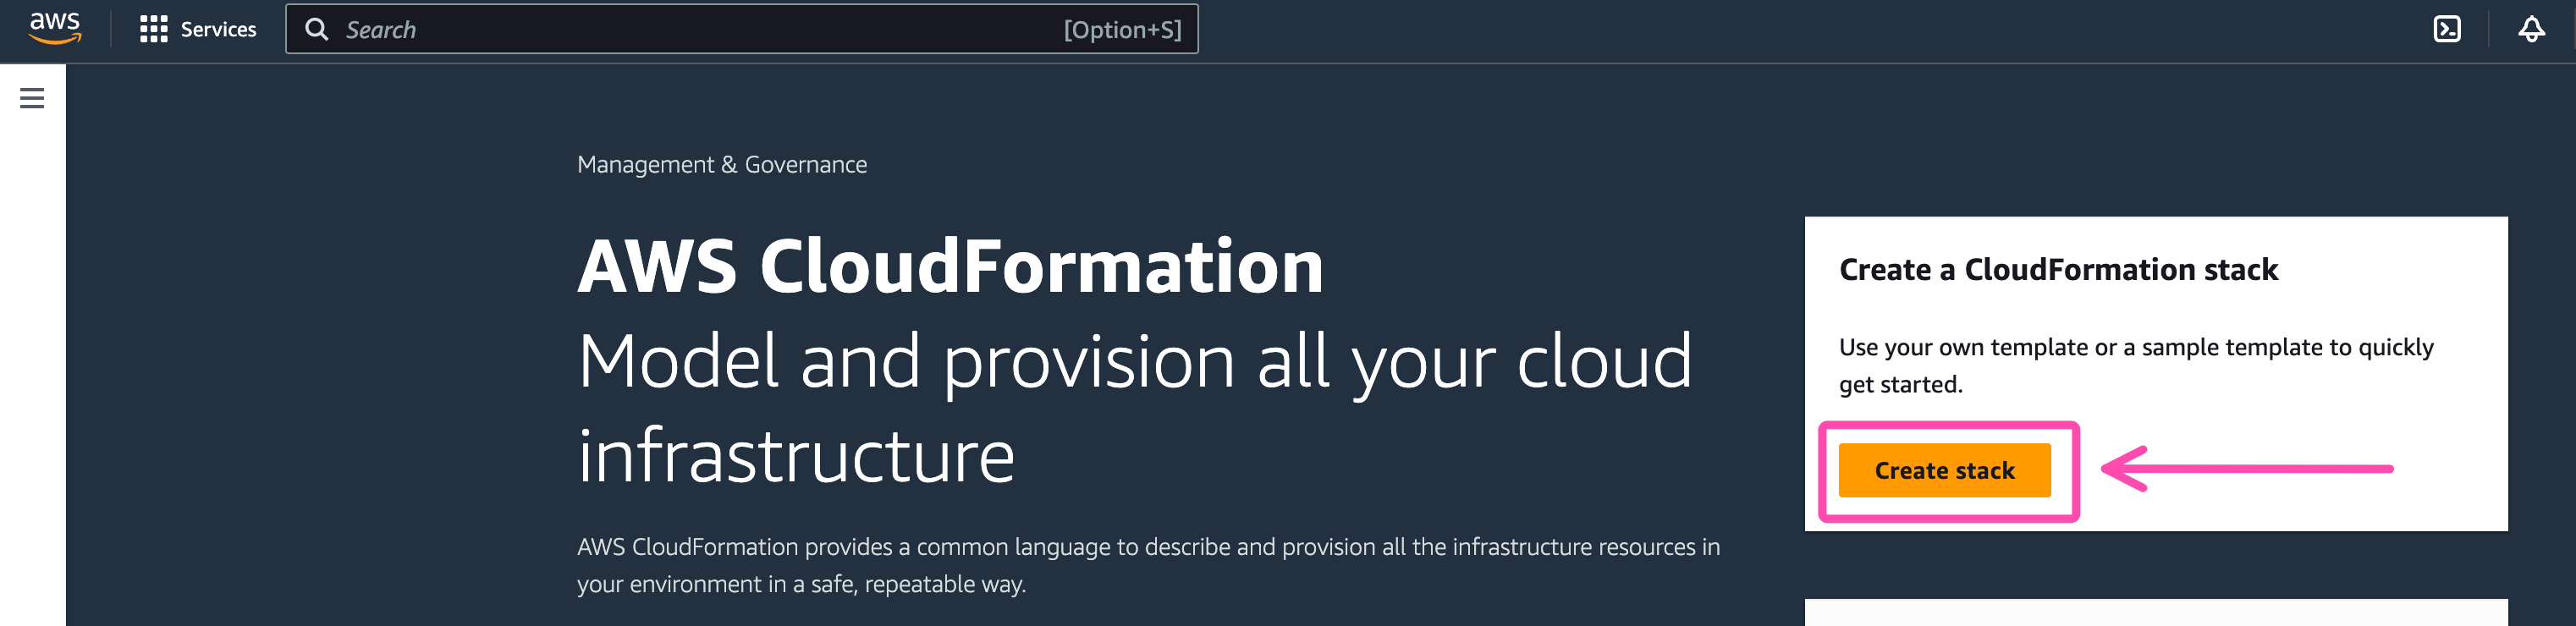
AWS: Create Stack
2. Leave everything as is and add this S3 policy Template URL in the "Amazon S3 URL" field or copy the link from as shown below https://s3.amazonaws.com/public.voicebase.com/s3-ingress/voicebase-s3-ingress.json then click next

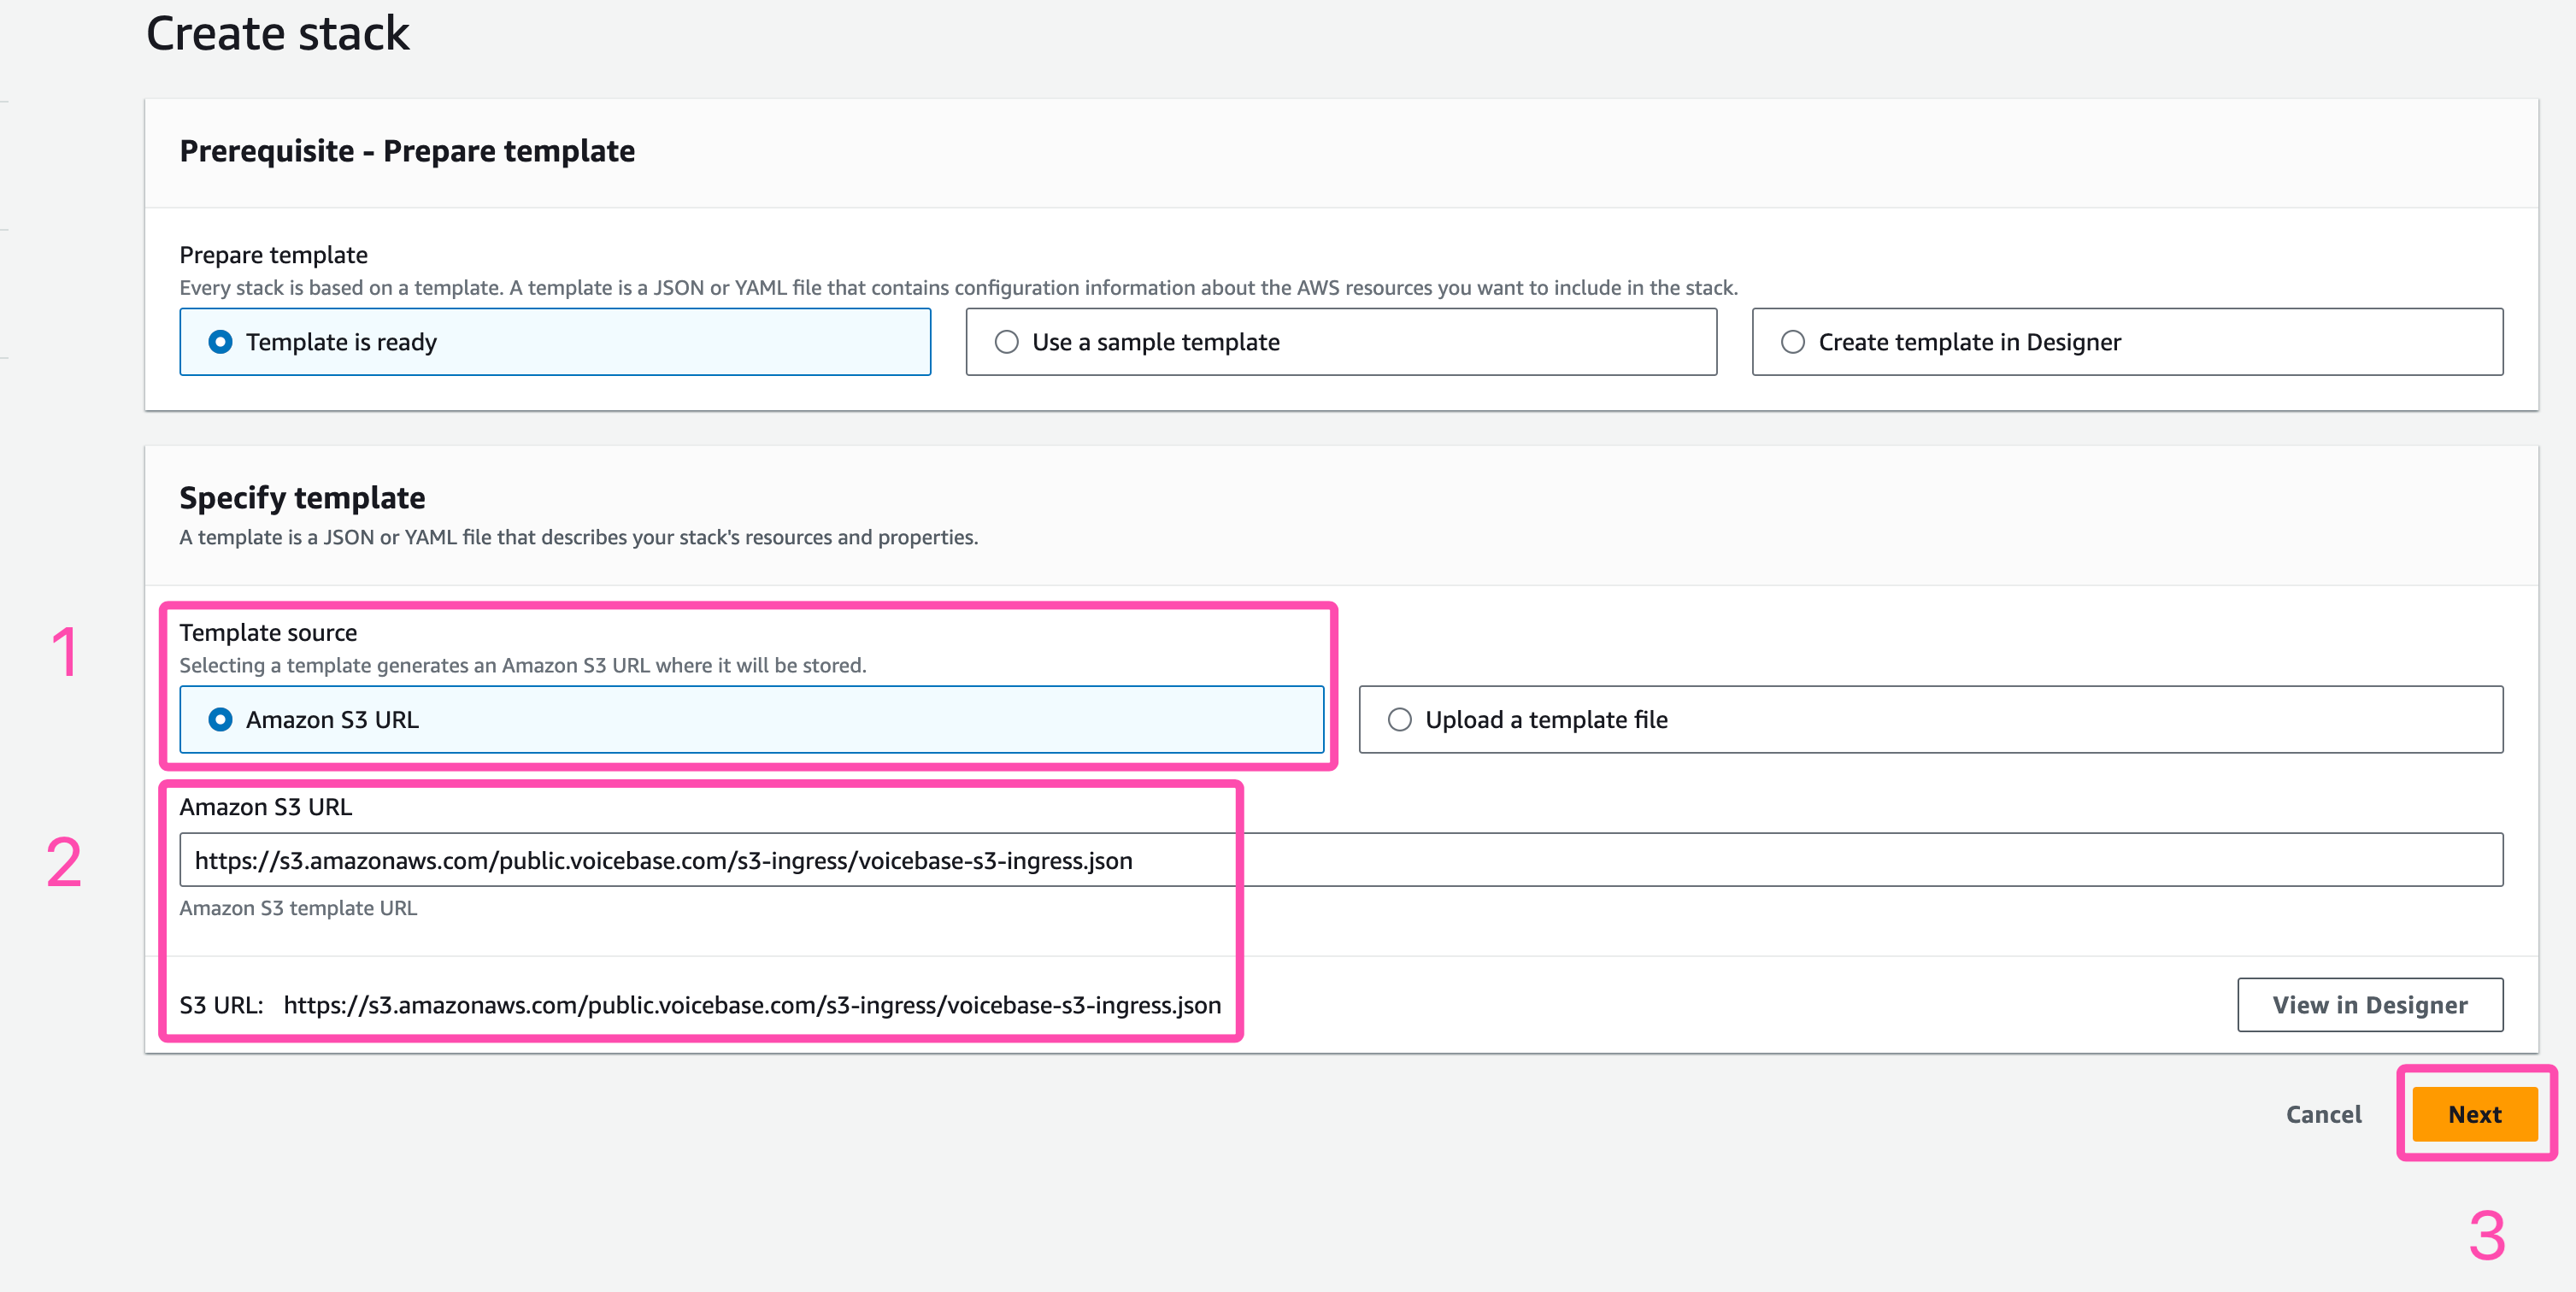
S3 URL
3. Now, on the stack details page fill in the fields per your use case.
Copy these details to a notepad separately as we will need them later in the LivePerson Analytics Studio section of our setup.
Make sure the "Company Name" field has only lower case letters with no spaces.
| AWS Field | Corresponding LivePerson Analytics Studio Field | Values |
| Stack Name | N/A | Thrive-Air-Data |
| Company Name | Analytics Studio A/C Name | thrive-air |
| External ID | External ID | fd87c-672... |
| VoiceBase Region | Analytics Studio A/C Region | US |

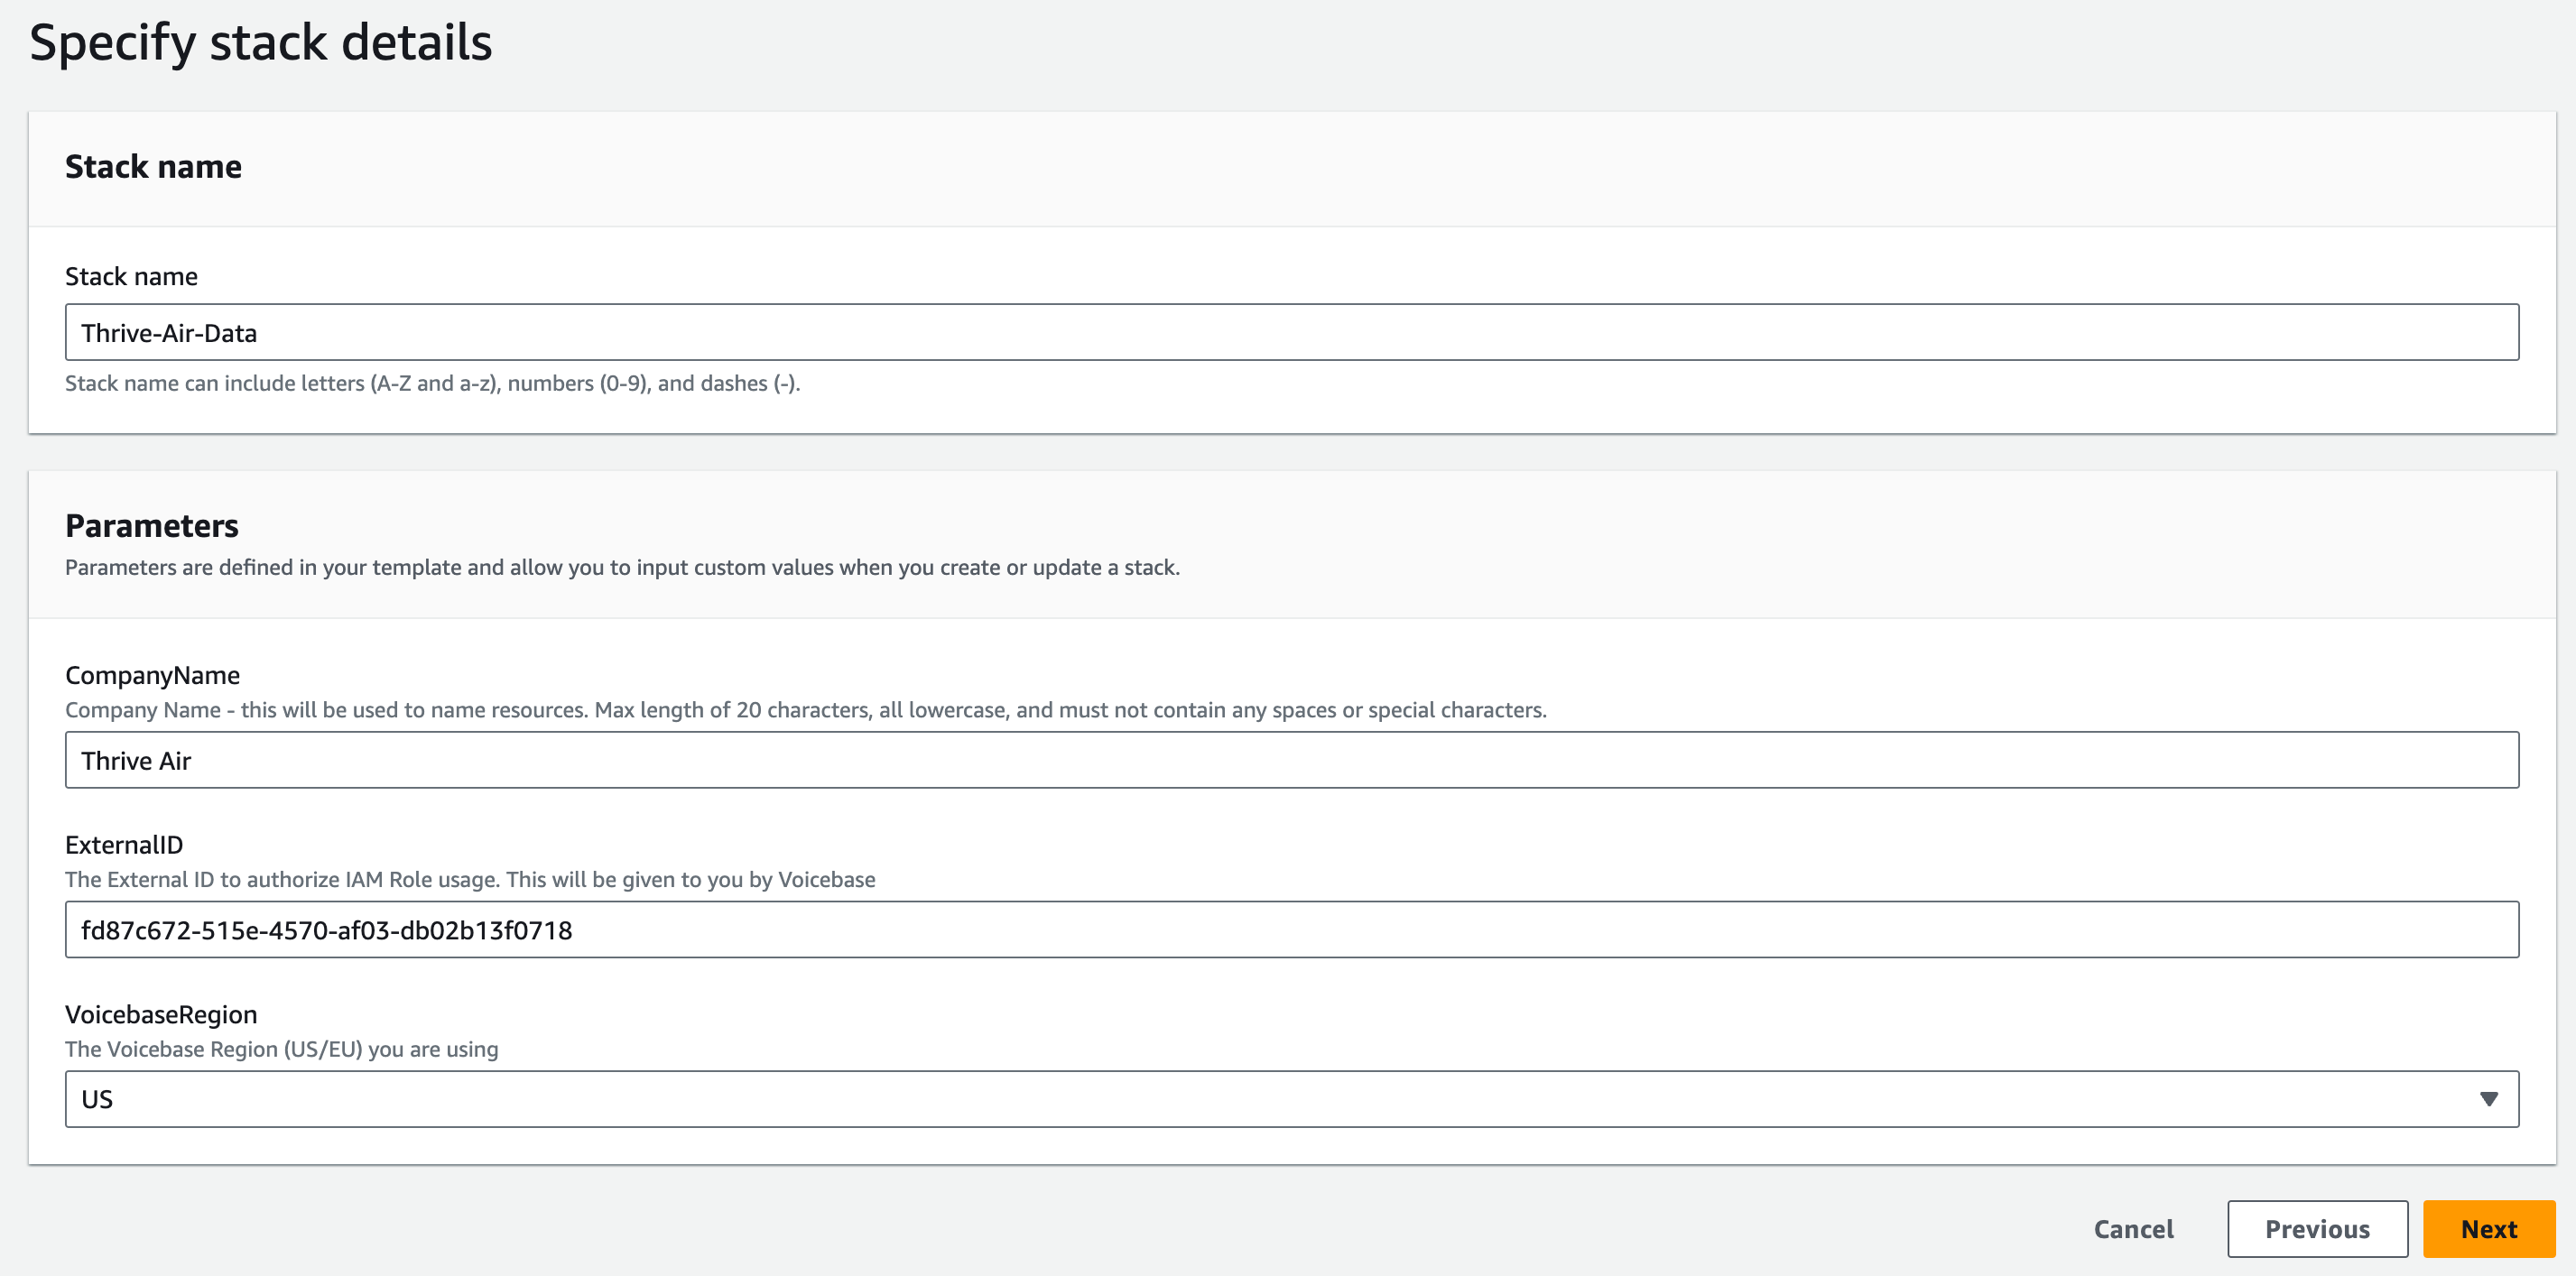
Stack Details
You may have noticed an interesting field here-- External ID this is the link between your AWS account and your LivePerson Analytics Studio account. To get your unique External ID head over to the LivePerson Analytics Studio setup section. There go to the LivePerson Analytics Studio section further down on this page Copy the External ID from LivePerson Analytics Studio and paste it into this field. With all these details filled, click "Next" on the bottom right.
On the following page, leave all fields as is and click "Next".
Once you arrive on the 'Review' page. You can go though all the details you provided. Scroll all the way to the bottom and check-select "I acknowledge that AWS CloudFormation might create IAM resources with custom names." Then click "Submit" and voila! You've just created a stack!

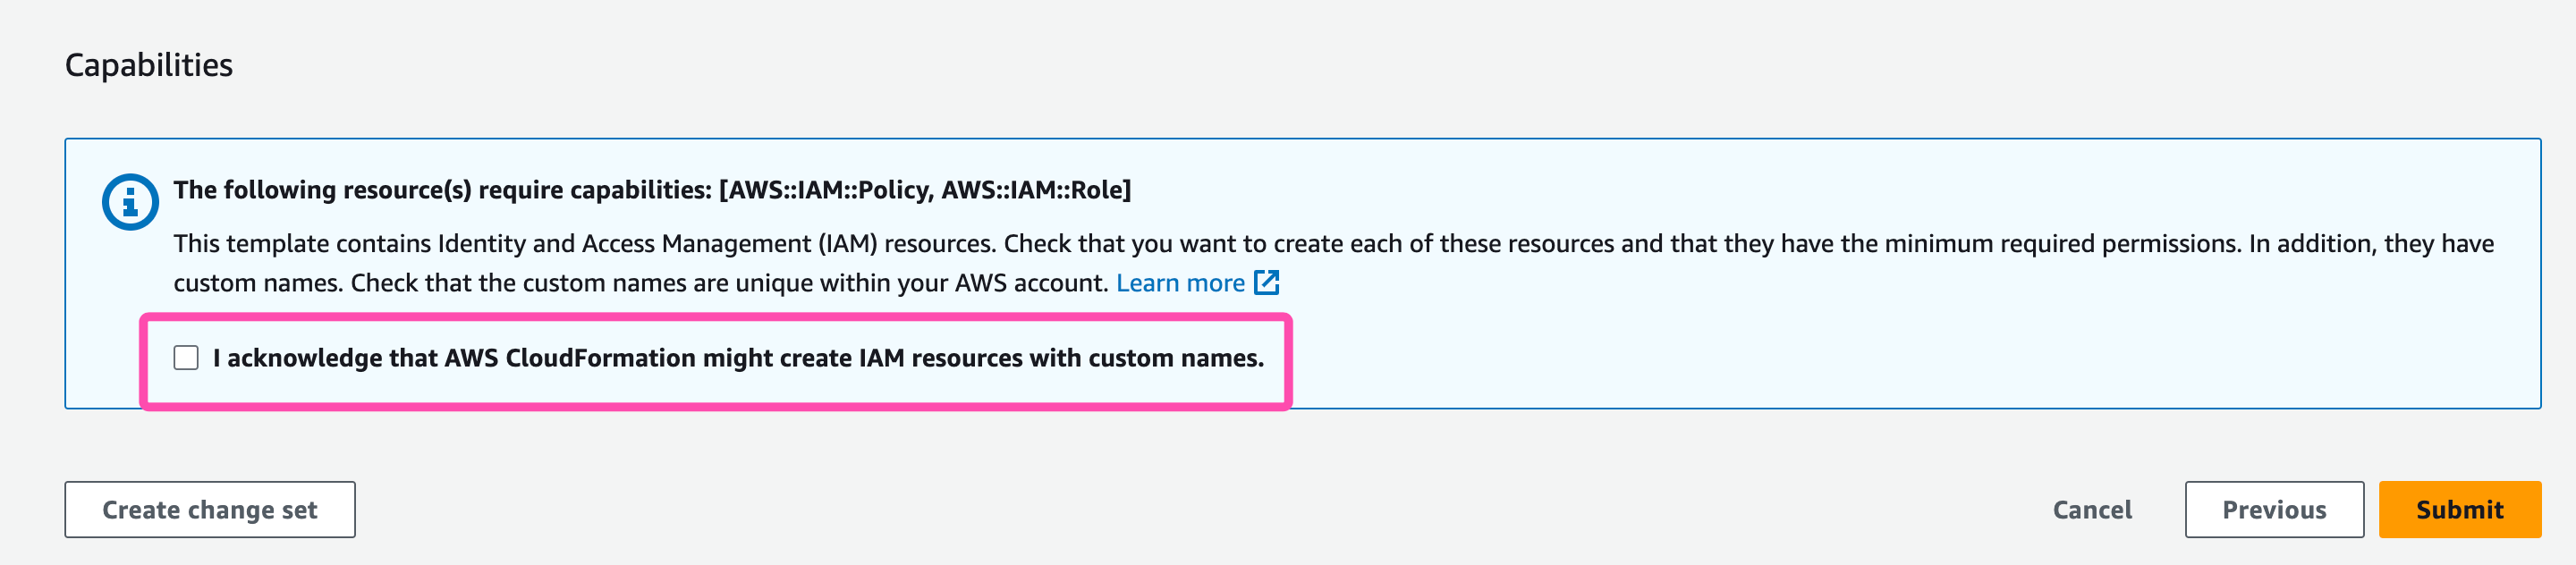
Capabilities
It might take upto 3 minutes for AWS to create & update fields in your stack. Be sure to pause for a couple of minutes before you head to the next step.
AWS S3 Bucket Folder Creation
If no errors were raised so far and the process up till this point were completed successfully then you should have an S3 Bucket automatically created for you.
- Navigate to your S3 buckets page. You can find all your S3 Buckets at the following link: AWS S3 Buckets
- Once here, open the bucket with the following name format:
vb-[CompanyName]-s3-bucketThis is the same "Company Name" you entered in the AWS Stack Creation section earlier. - Now, Click on "Create Folder". As for the name, make sure it follows this format:
[CompanyName]-folder, then click on "Create Folder". Now you have a place on S3 where all your LivePerson Analytics Studio data will stay.

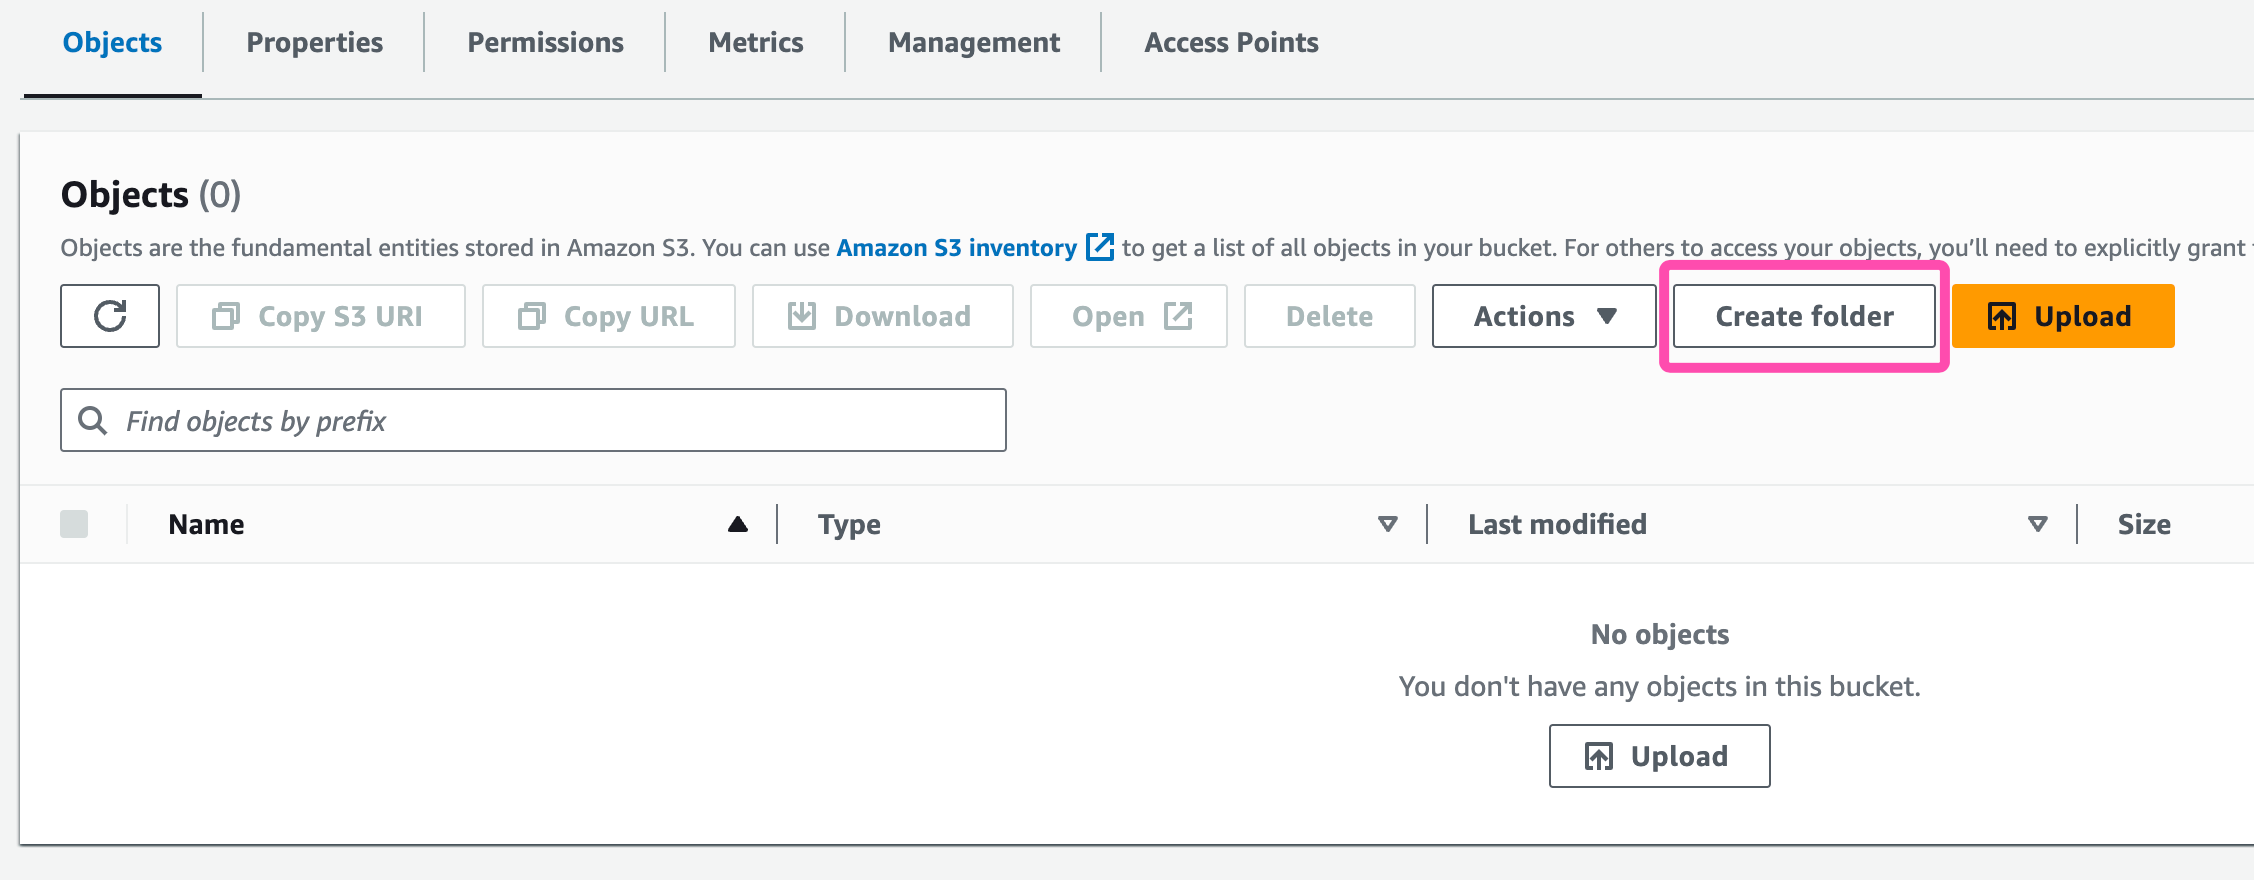
Folder Creation
Fetching details from AWS for Analytics Studio
In this step we fetch resource details from AWS and fill them into our LivePerson Analytics Studio Analytics Studio setup page.
- Head over to "Stack Details" page of the newly created Stack. There, click on the "Outputs" Tab. Now copy and paste the following values from AWS to Analytics Studio:
| Values | AWS Field | Location | Corresponding LivePerson Analytics Studio Field |
| arn:aws... | IAMRoleArn | Cloud Formation -> Stack Details -> Outputs | S3 ROLE |
| vb-thrive-air-s3-bucket | S3Bucket | Cloud Formation -> Stack Details -> Outputs | BUCKET |
| thrive-air-folder | Folder | https://s3.console.aws.amazon.com/s3/buckets -> vb-[CompanyName]-s3-bucket | FOLDER |

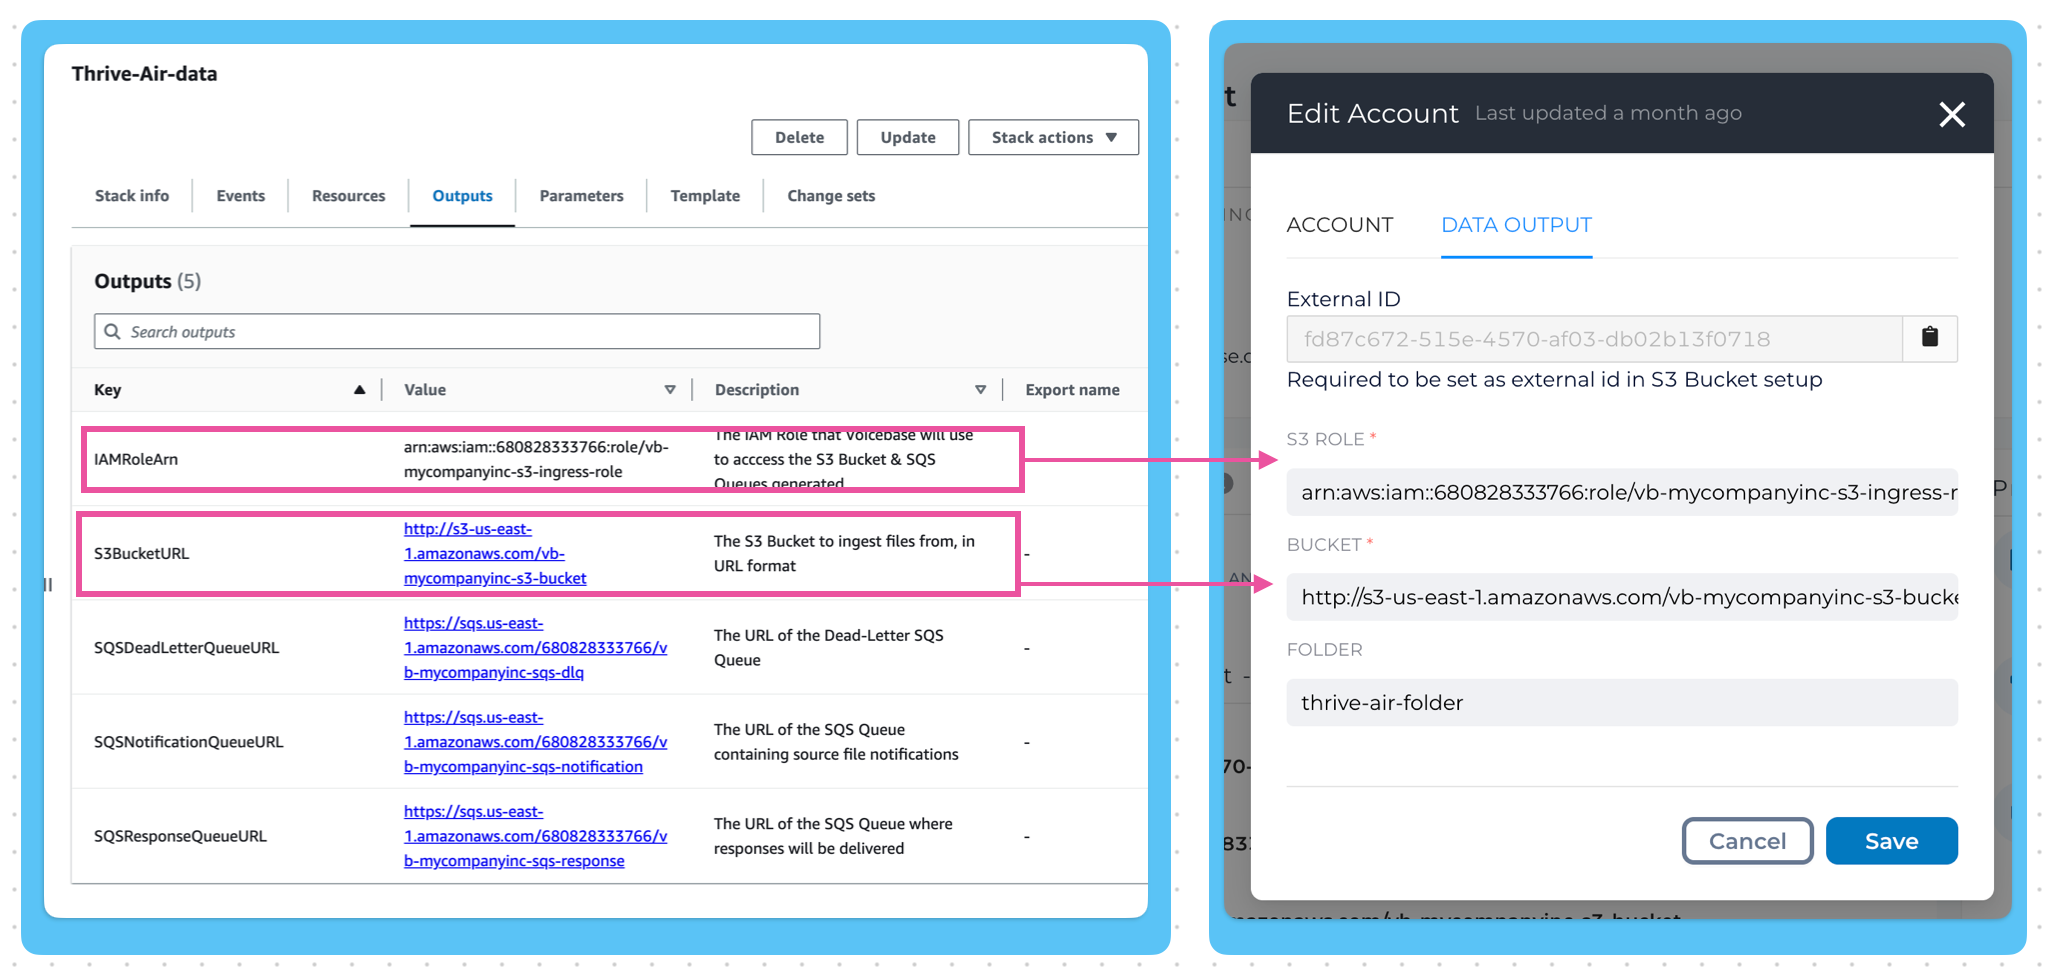
AWS field details
Setup AWS IAM Roles & Policies
In this section we setup the required roles, permissions and policies to allow data transfer between AWS and Analytics Studio.
- In your AWS console, navigate to the
Rolessection on the IAM page. You can do this by clicking on the top leftServices -> All Services -> Security & Identity -> IAM -> Rolesor the following link: AWS IAM Dashboard / Roles - Locate the role associated with the stack you created in section 2 of this guide : AWS Stack Creation.

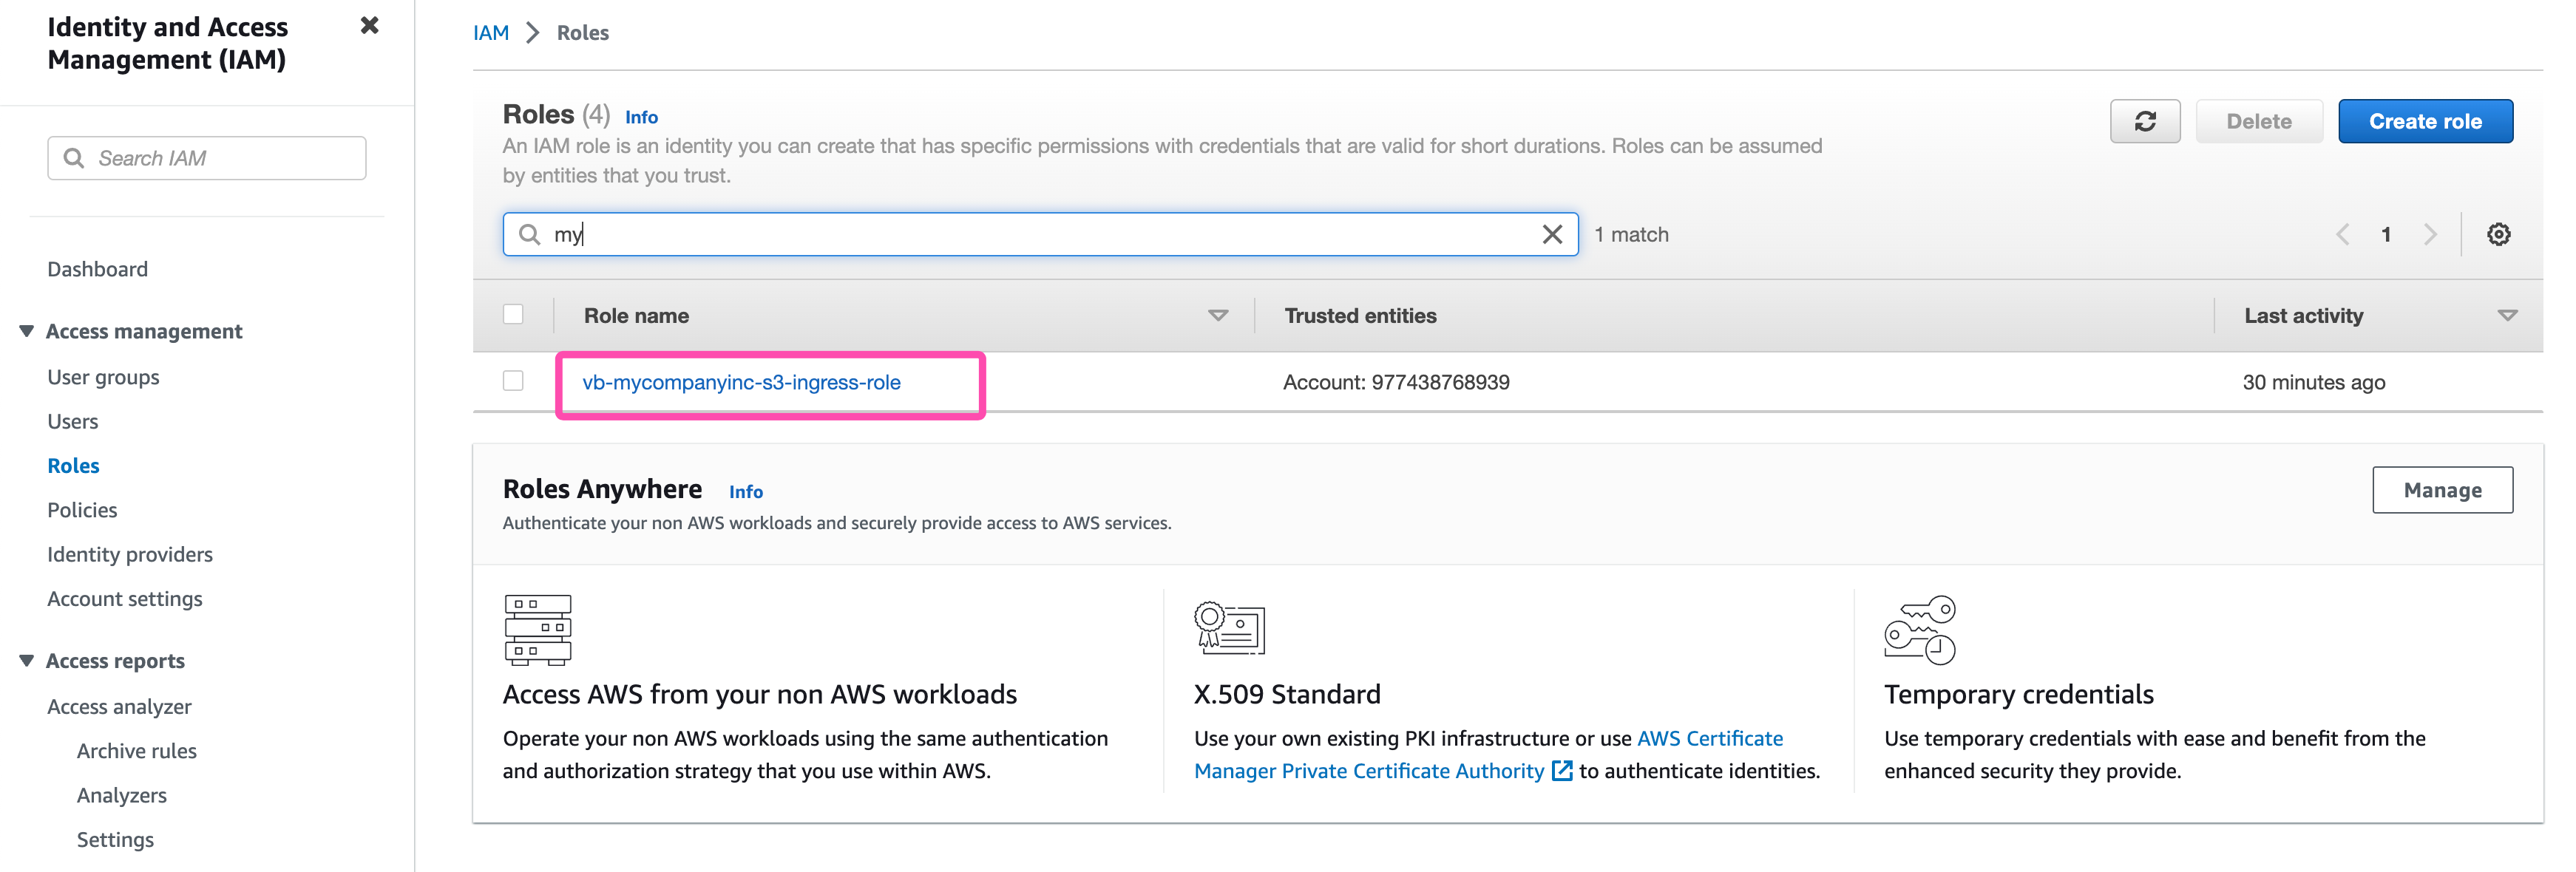
IAM Roles
3. Once on the roles page, click on the tiny plus sign on the left of the policy name, a drop down opens up. Now, click on "Edit" to update the policy details.

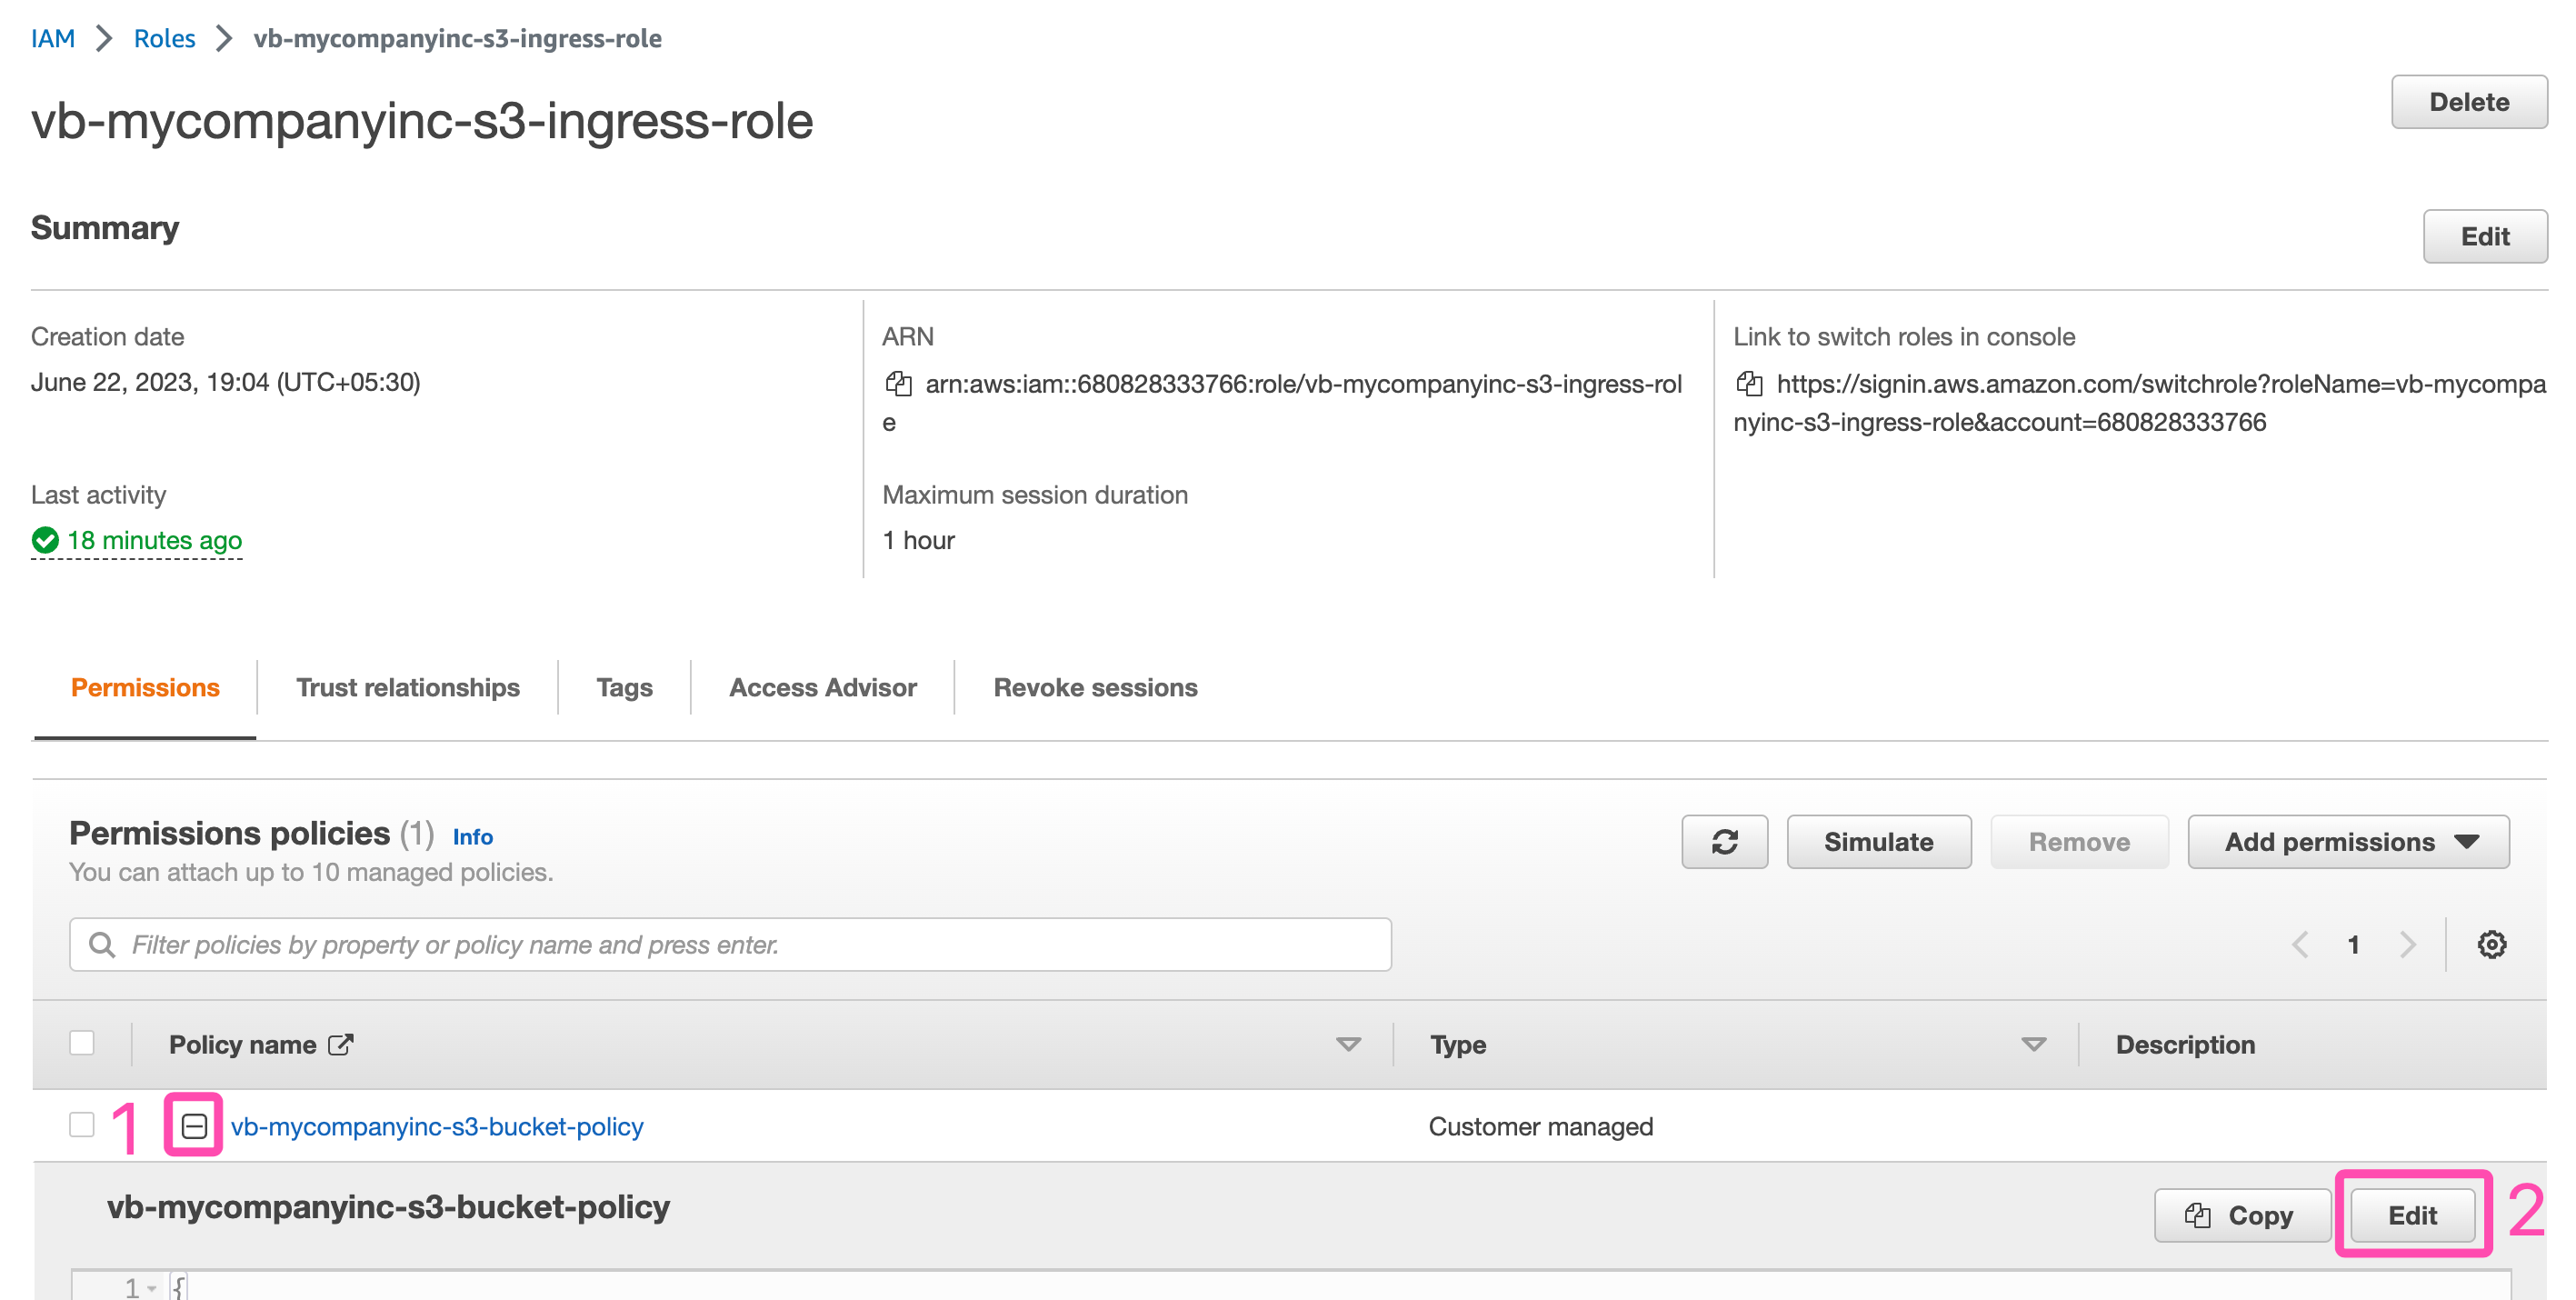
Update Policy
4. Select all the text inside the policy and delete it. Now, paste in the underlying text as shown in the image below. Then click "Next", followed by "Save Changes"
javascript:
{
	"Version": "2012-10-17",
	"Statement": [
		{
			"Effect": "Allow",
			"Action": [
				"s3:PutObject",
				"s3:GetObject",
				"s3:GetObjectVersion",
				"s3:DeleteObject",
				"s3:DeleteObjectVersion",
				"s3:ListBucket"
			],
			"Resource": "*"
		}
	]
}
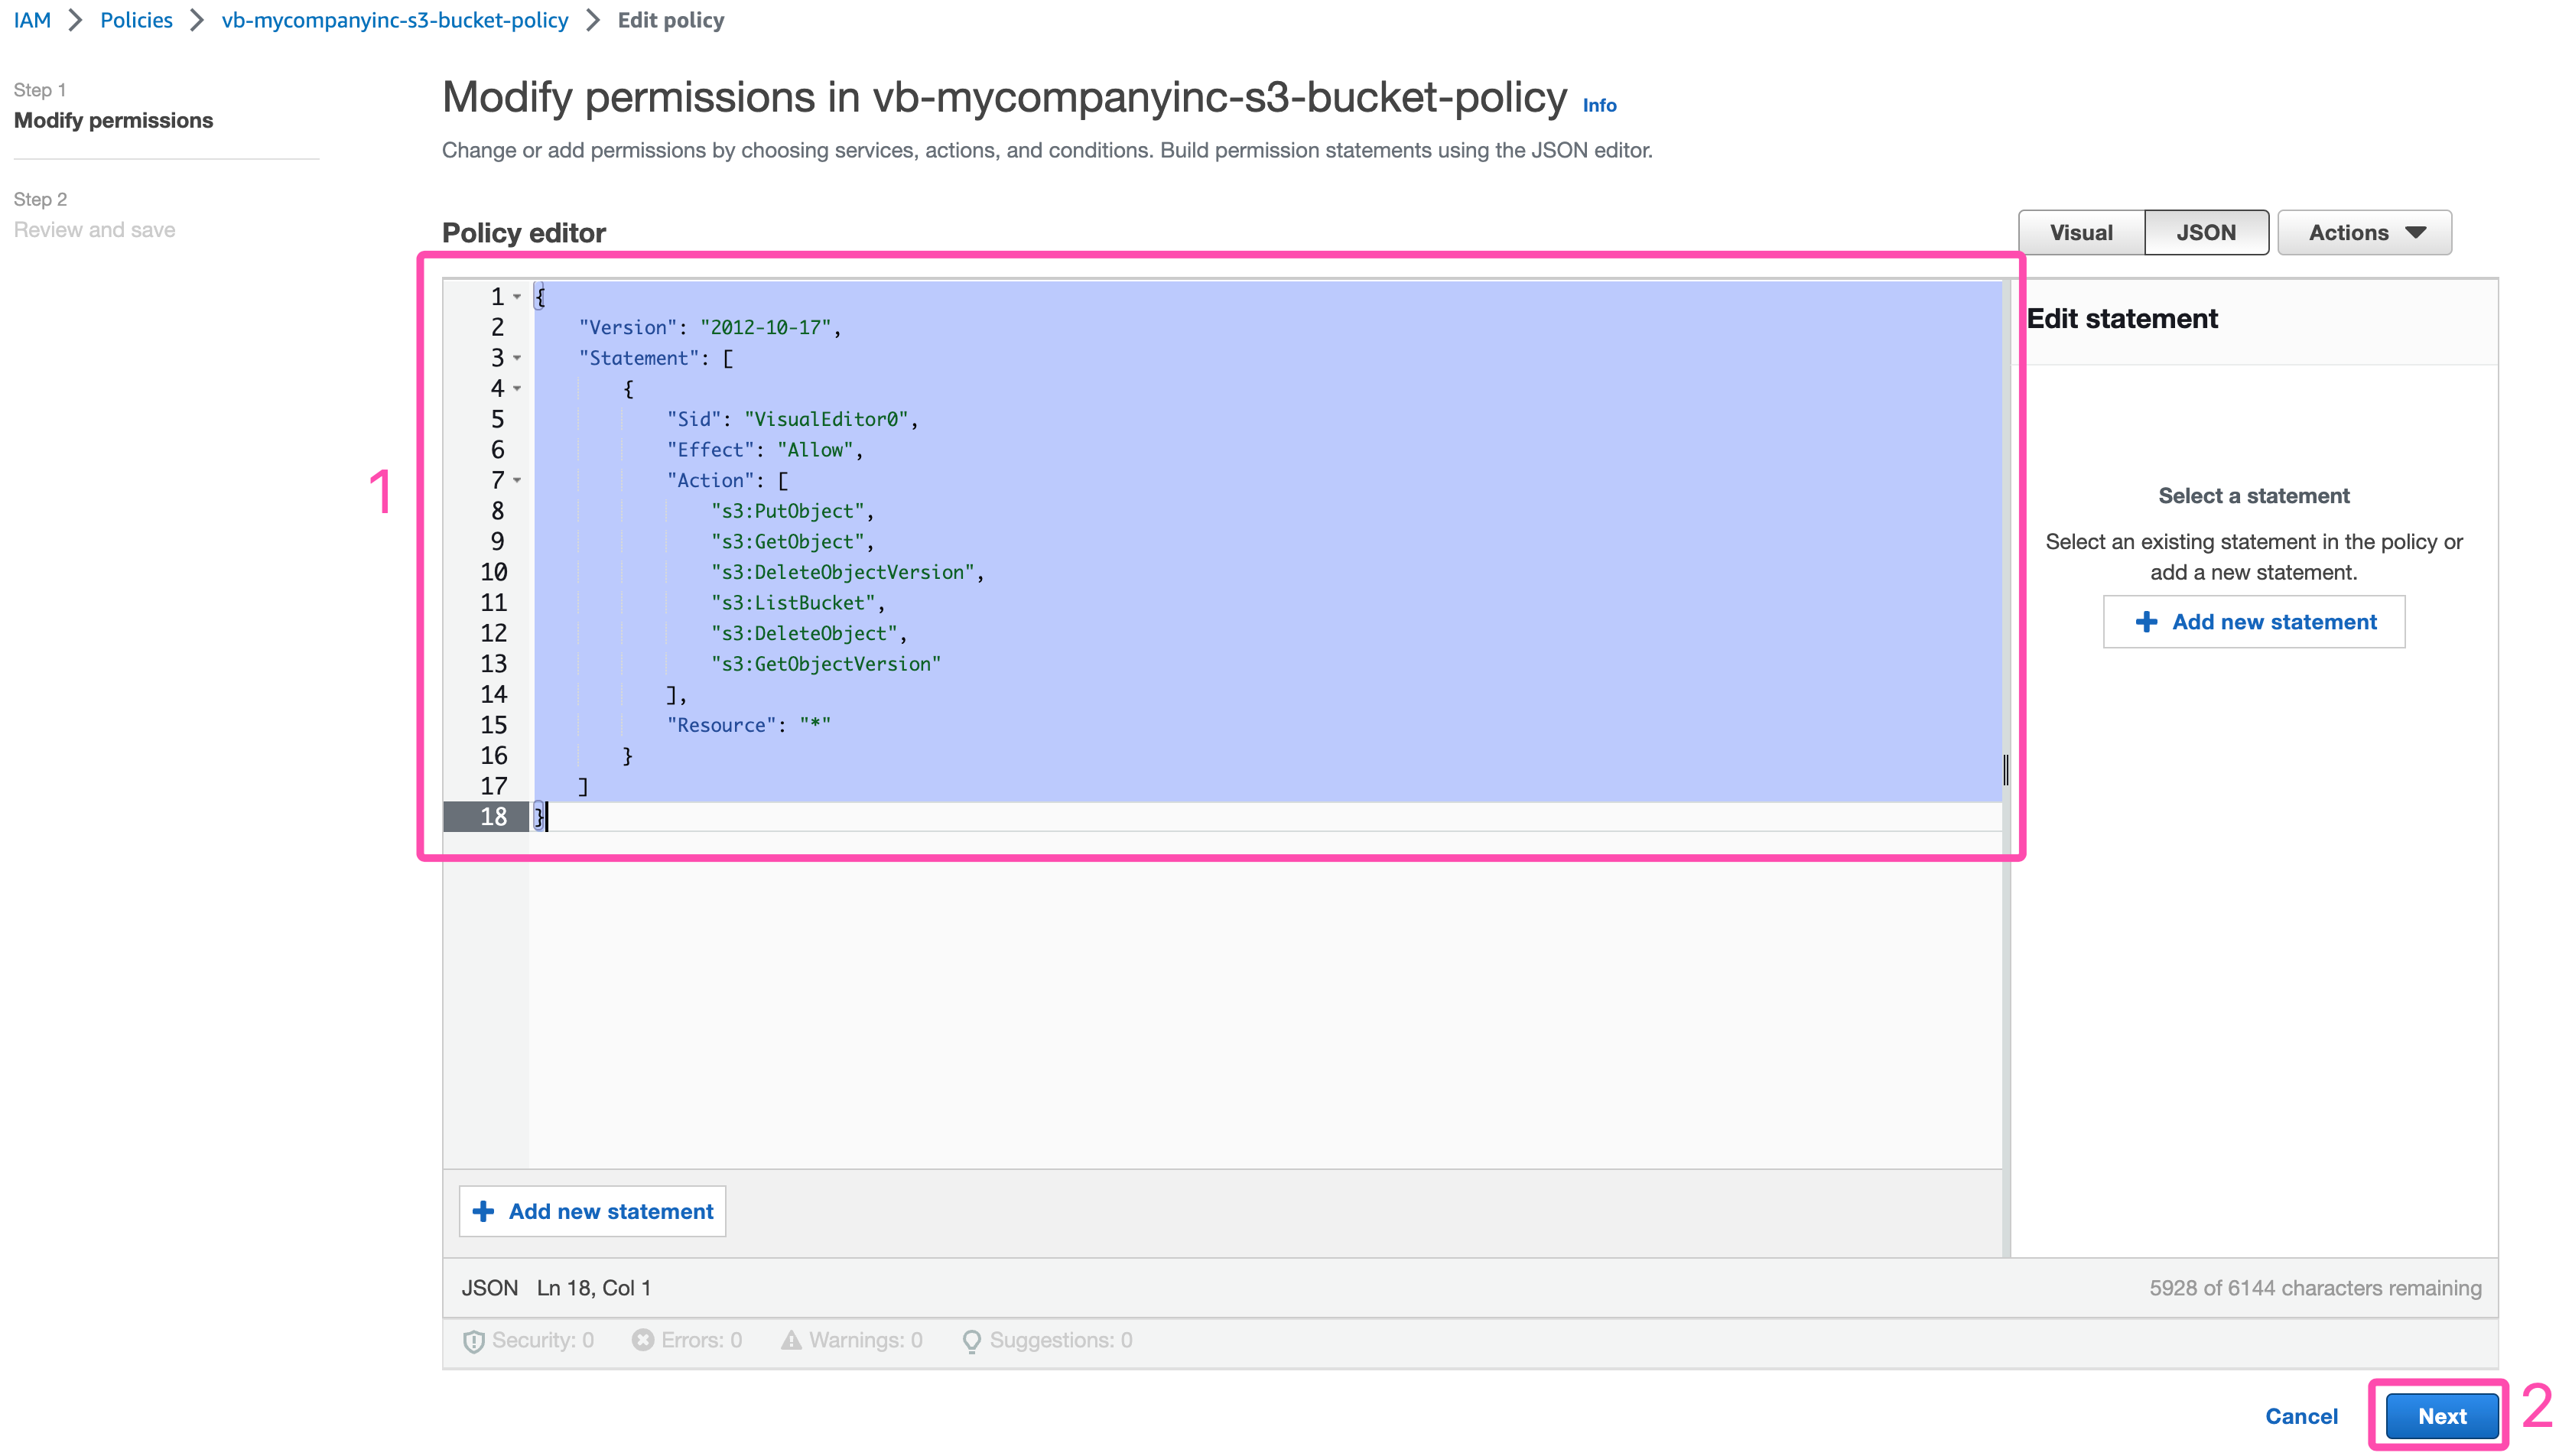
Modify Permissions
LivePerson Analytics Studio Setup
Overview
- Access & Admin controls
- Analytics Studio Data Output setup
- Analytics Studio Data Output Setup with AWS details
- Live Person Live Connection setup
- Trigger LivePerson Analytics Studio Job Queue
- Check for files in S3
Access & Admin controls
Once signed into your LivePerson Analytics Studio account, On the left pane, navigate to Settings -> Users.
Under Roles make sure you have the Admin role. If not, please ask LivePerson Customer Success.
Analytics Studio Data Output setup
Now click on "My Account" and scroll down to the section that reads "Analytics Studio Data Output - S3"
Make sure you have "Enterprise Accelerator" enabled. If not, please reach out to LivePerson Support or Customer Success.
If it is indeed enabled, your account page should look something like this:

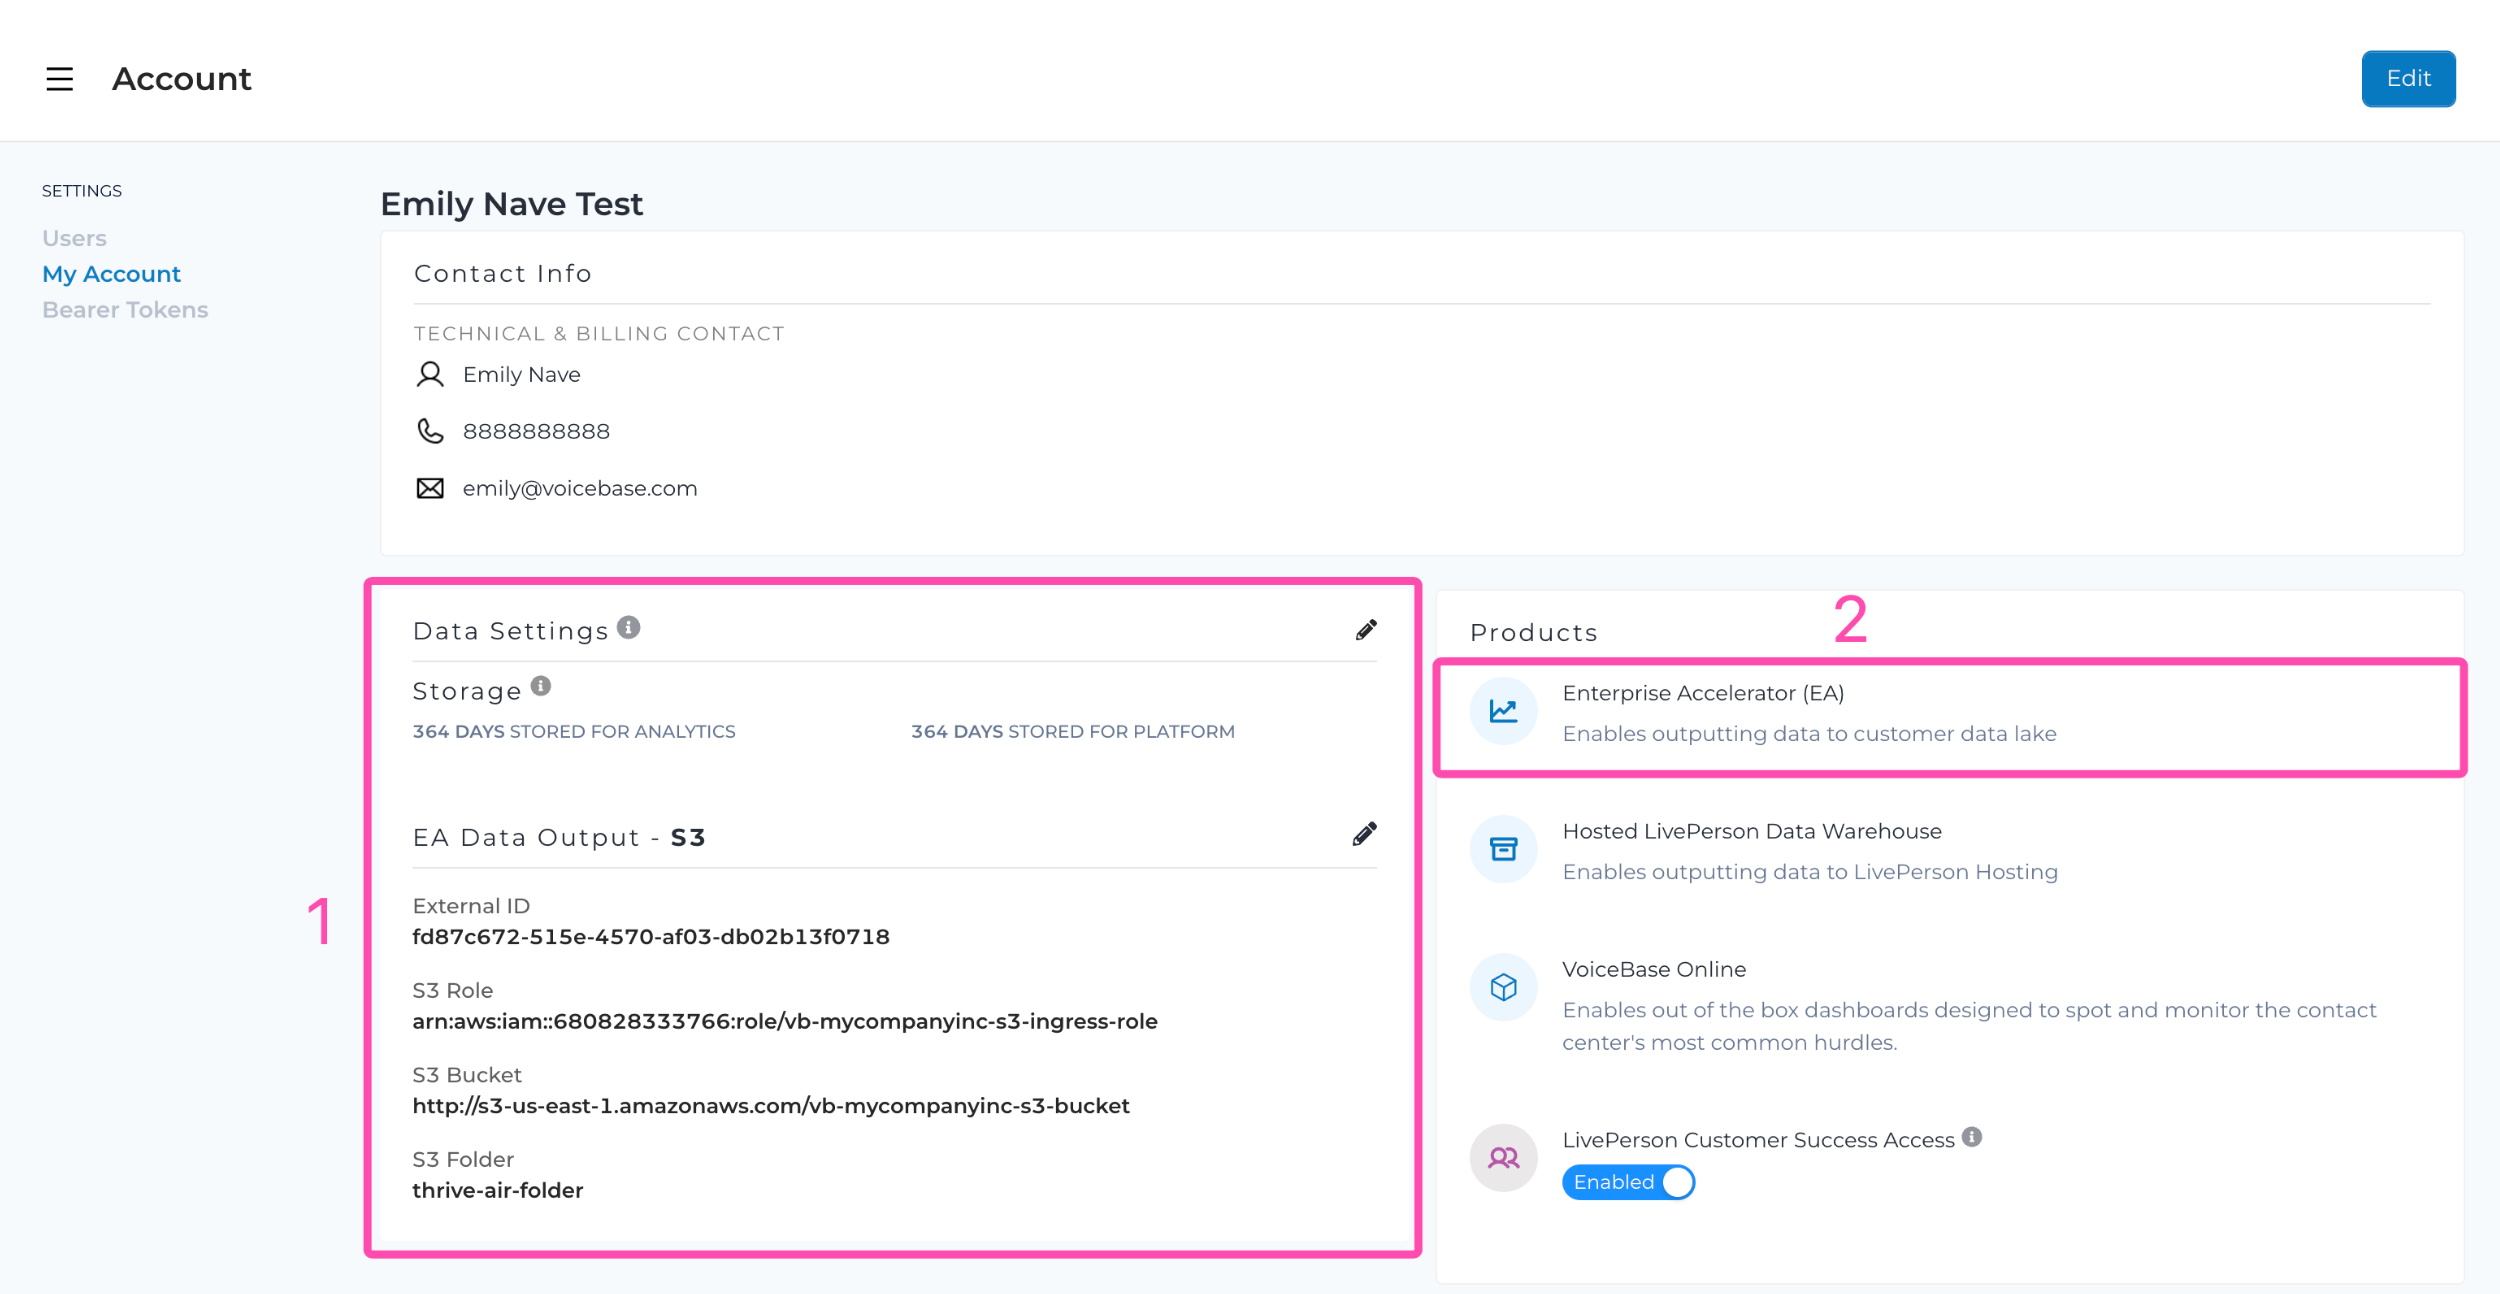
Analytics Studio Data output
On the top right corner, click on Edit Account followed by Data Output

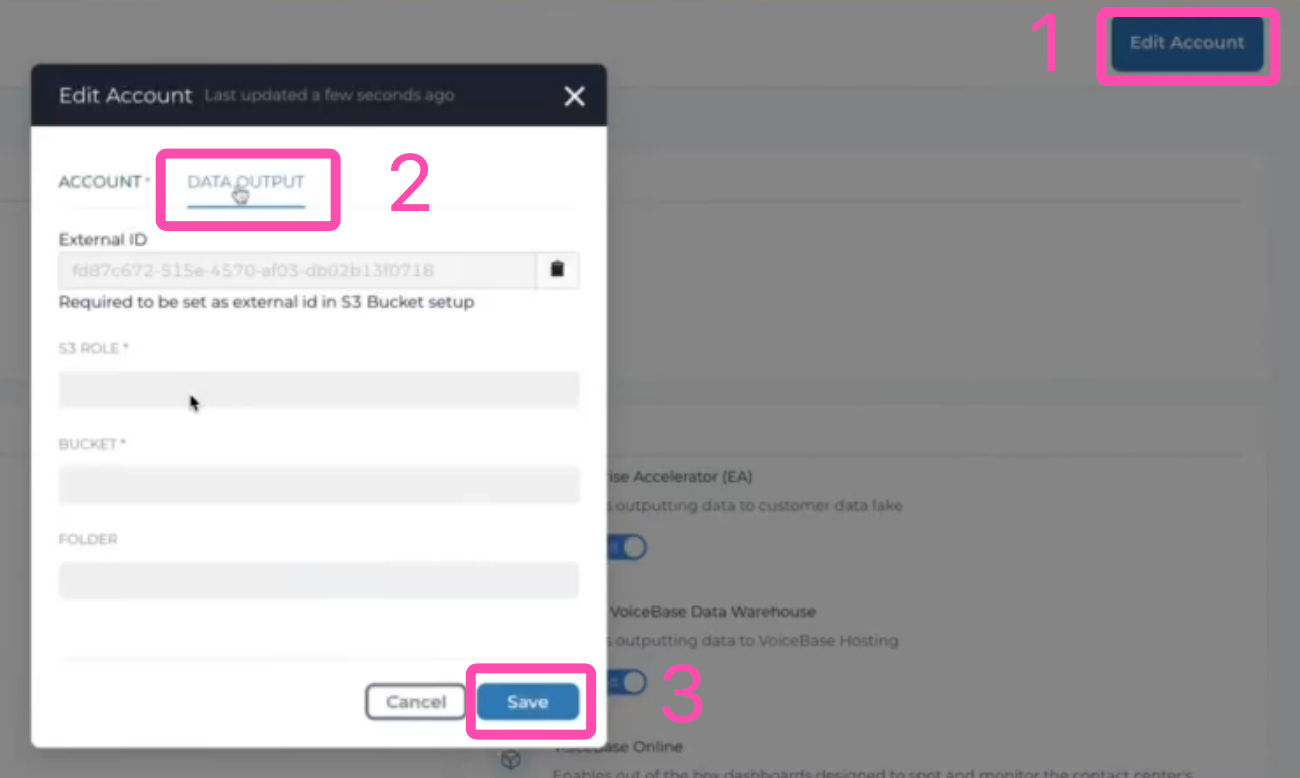
Data Output
You might notice a READ ONLY field by the name External ID. Make sure you copy the text into a notepad as it will come in handy with your AWS setup.
The External ID field is the your LivePerson Analytics Studio Org ID aka LivePerson Analytics Studio Account ID. It auto-populates during this setup.
In fact this is a good time to go back to your AWS account and input this value into the stack details page.
Analytics Studio Data Output Setup with AWS details
Once here, input the details from your S3 account as mentioned in Section: Your AWS Details in the AWS S3 Setup
Once done, it should look something like this
Here, FOLDER is a user defined field. You can name it whatever you like as long as the folder in your S3 bucket bears the same name.

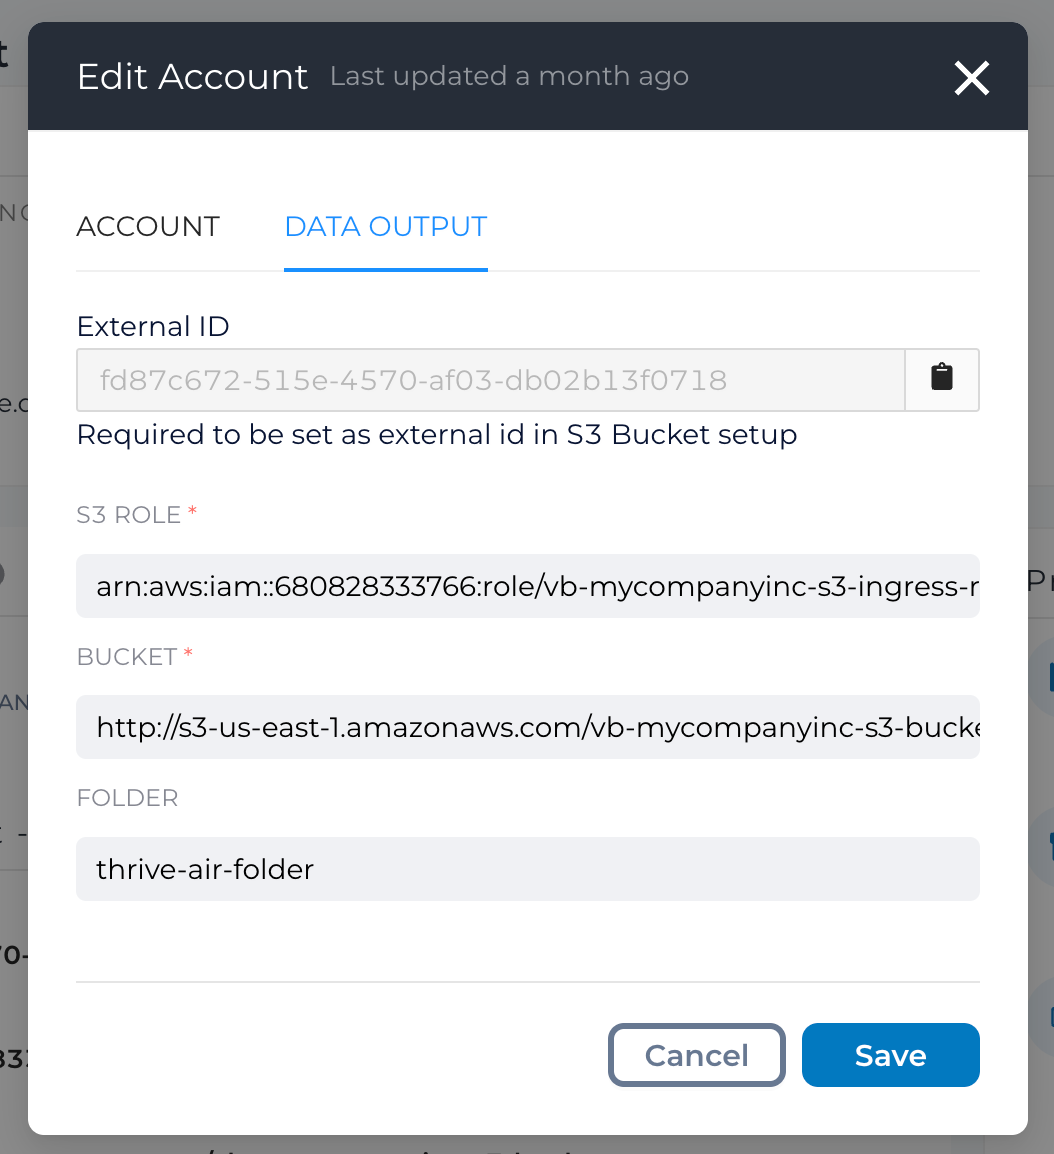
Data Output Details
Trigger LivePerson Analytics Studio Sync Warehouse
After having setup the IAM access roles and policies. We are now ready to trigger the job queue from Analytics Studio
1. In your LivePerson Analytics Studio account, navigate to Manage Data -> Job Queue -> Add Job Queue

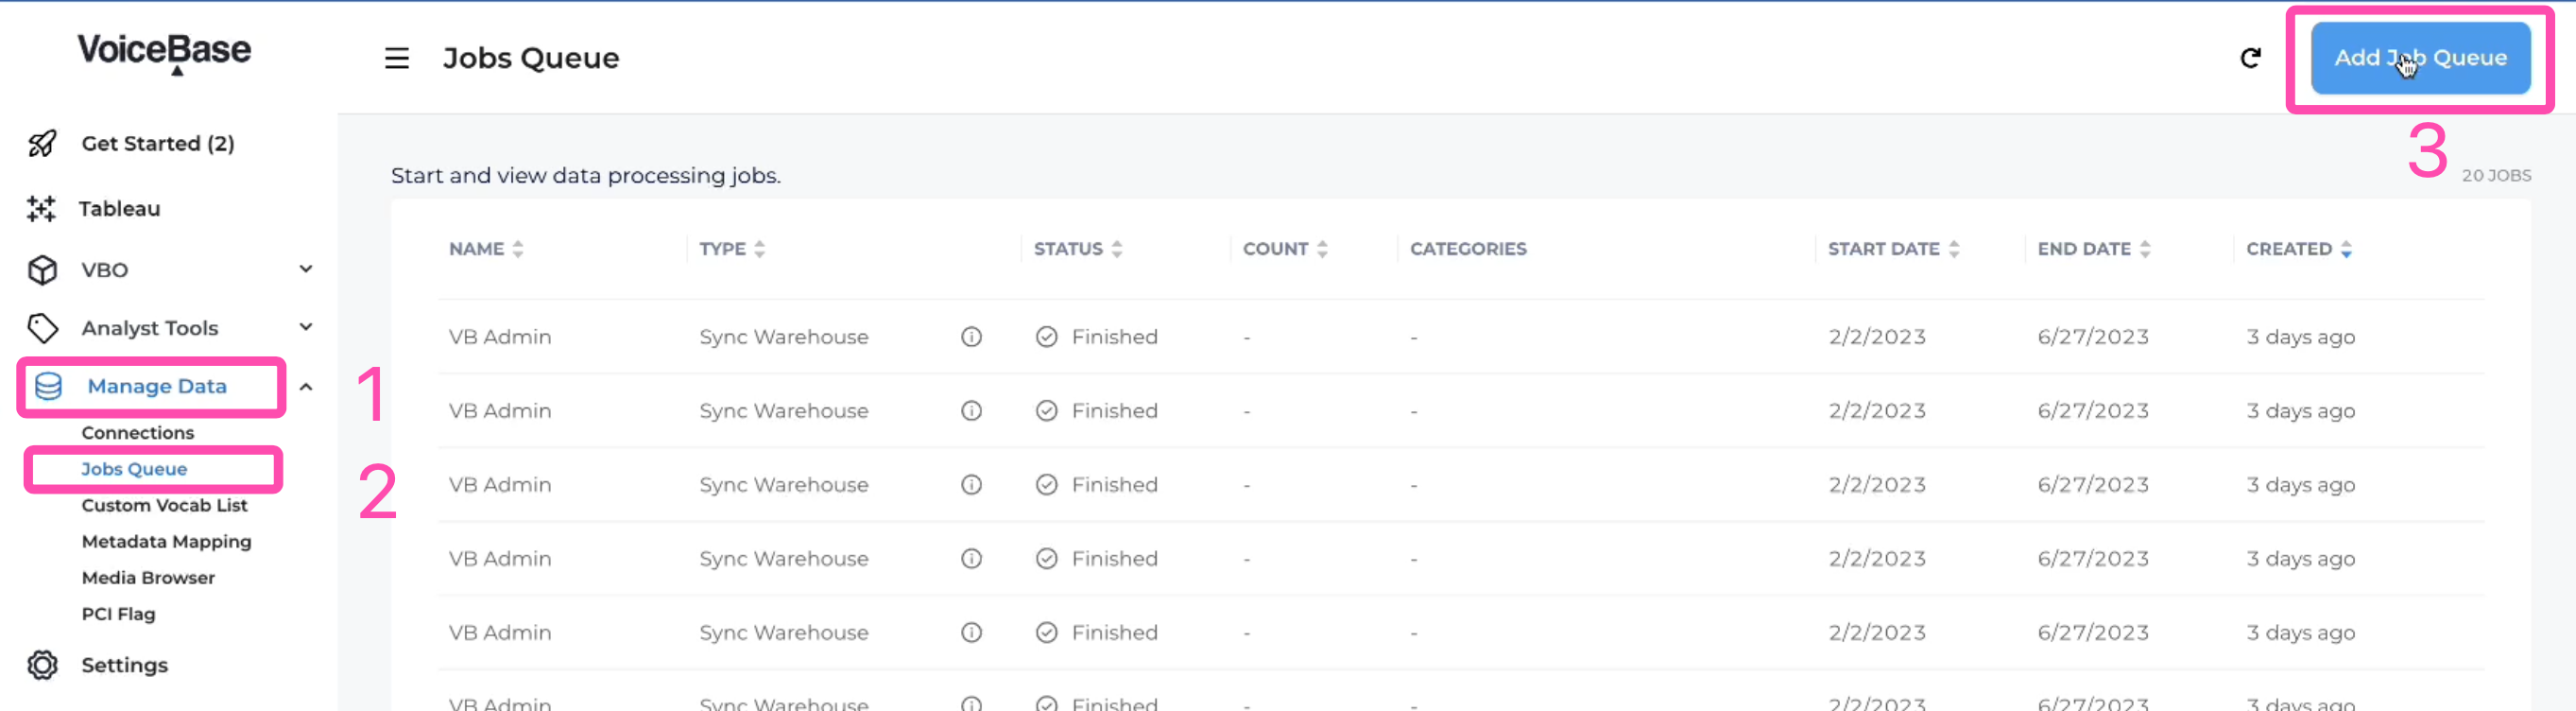
Jobs Que
2. Select the appropriate Created To / From dates from the drop down and click "Save" This will create request to sync data to your S3 bucket.

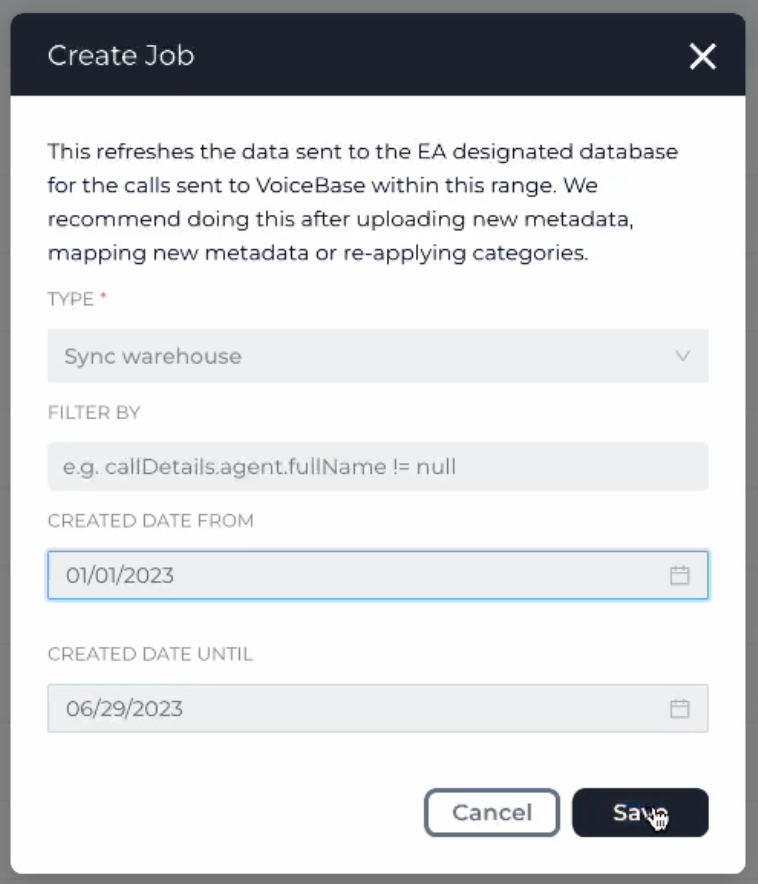
Create Job
This process takes about 10 to 15 minutes to complete. However, you may click on the refresh button on the top right corner to see the latest status updates.
This is because the "Finished" refers to the ETL process having completed. The data is yet to be transferred and may take a couple of minutes to appear in your S3 bucket.
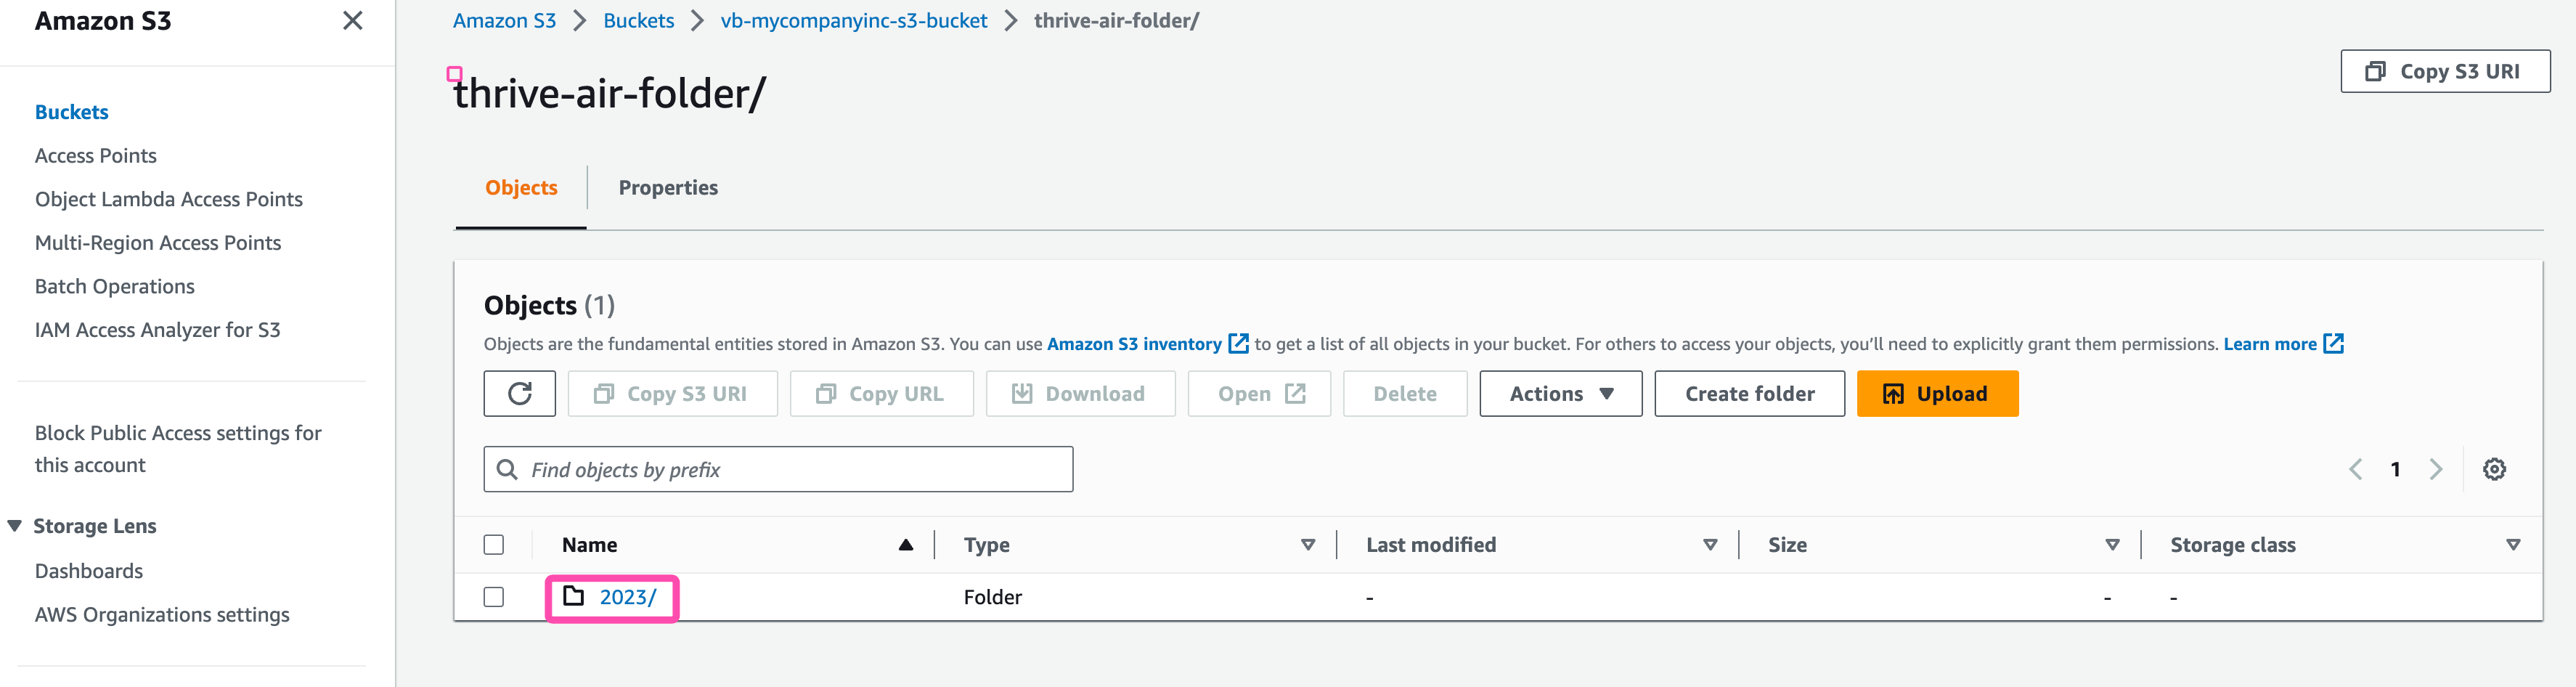
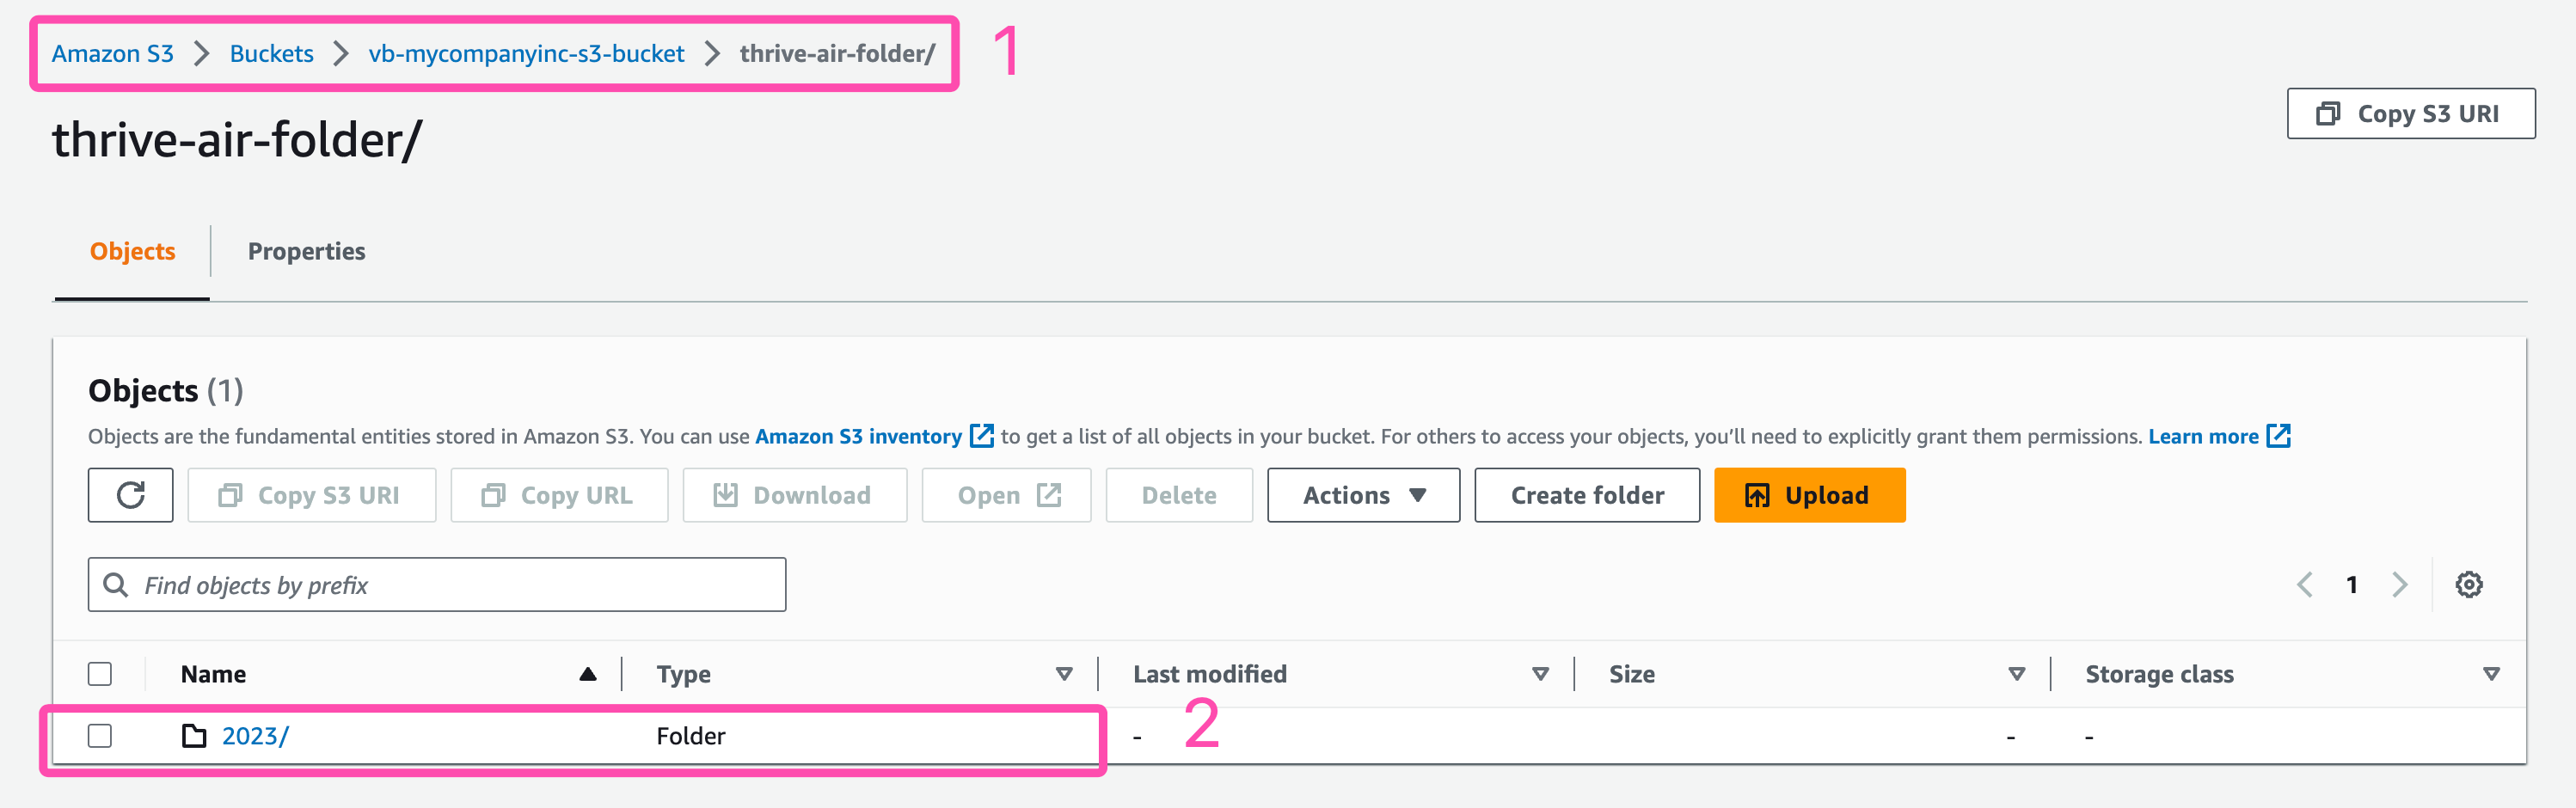
Check for files in S3
On your AWS console, navigate to to folder you created for the data transfer. The same folder you provided Analytics Studio with. You should now see a new folder created with the current year and sub folders for months and days followed by hours. For more details on the file structure and its purpose, please see the section "S3 Folder & File structure" further down on this page.

Check for files in S3
S3 Folder & File Structure

S3 Folder
As seen in the image above. Our thrive-air-folder from earlier now has a new sub-folder created inside of it.

S3 Bucket Folder and Sub folder
It contains additional sub-folder in the following hierarchy
bash:
All your S3 Buckets
└── vb-mycompanyinc-s3-bucket [ The bucket you created for LivePerson Analytics Studio ]
└── thrive-air-folder [ The folder you mentioned in LivePerson Analytics Studio ]
└── 2023 [ Year of folder creation / Data sync ]
└── 07 [ Month ]
└── 20 [ Day ]
└── 14 [ Hour ]
└── 2023-07-20-14-20-04-49106ac2-... [ Minute & Unique hash ]
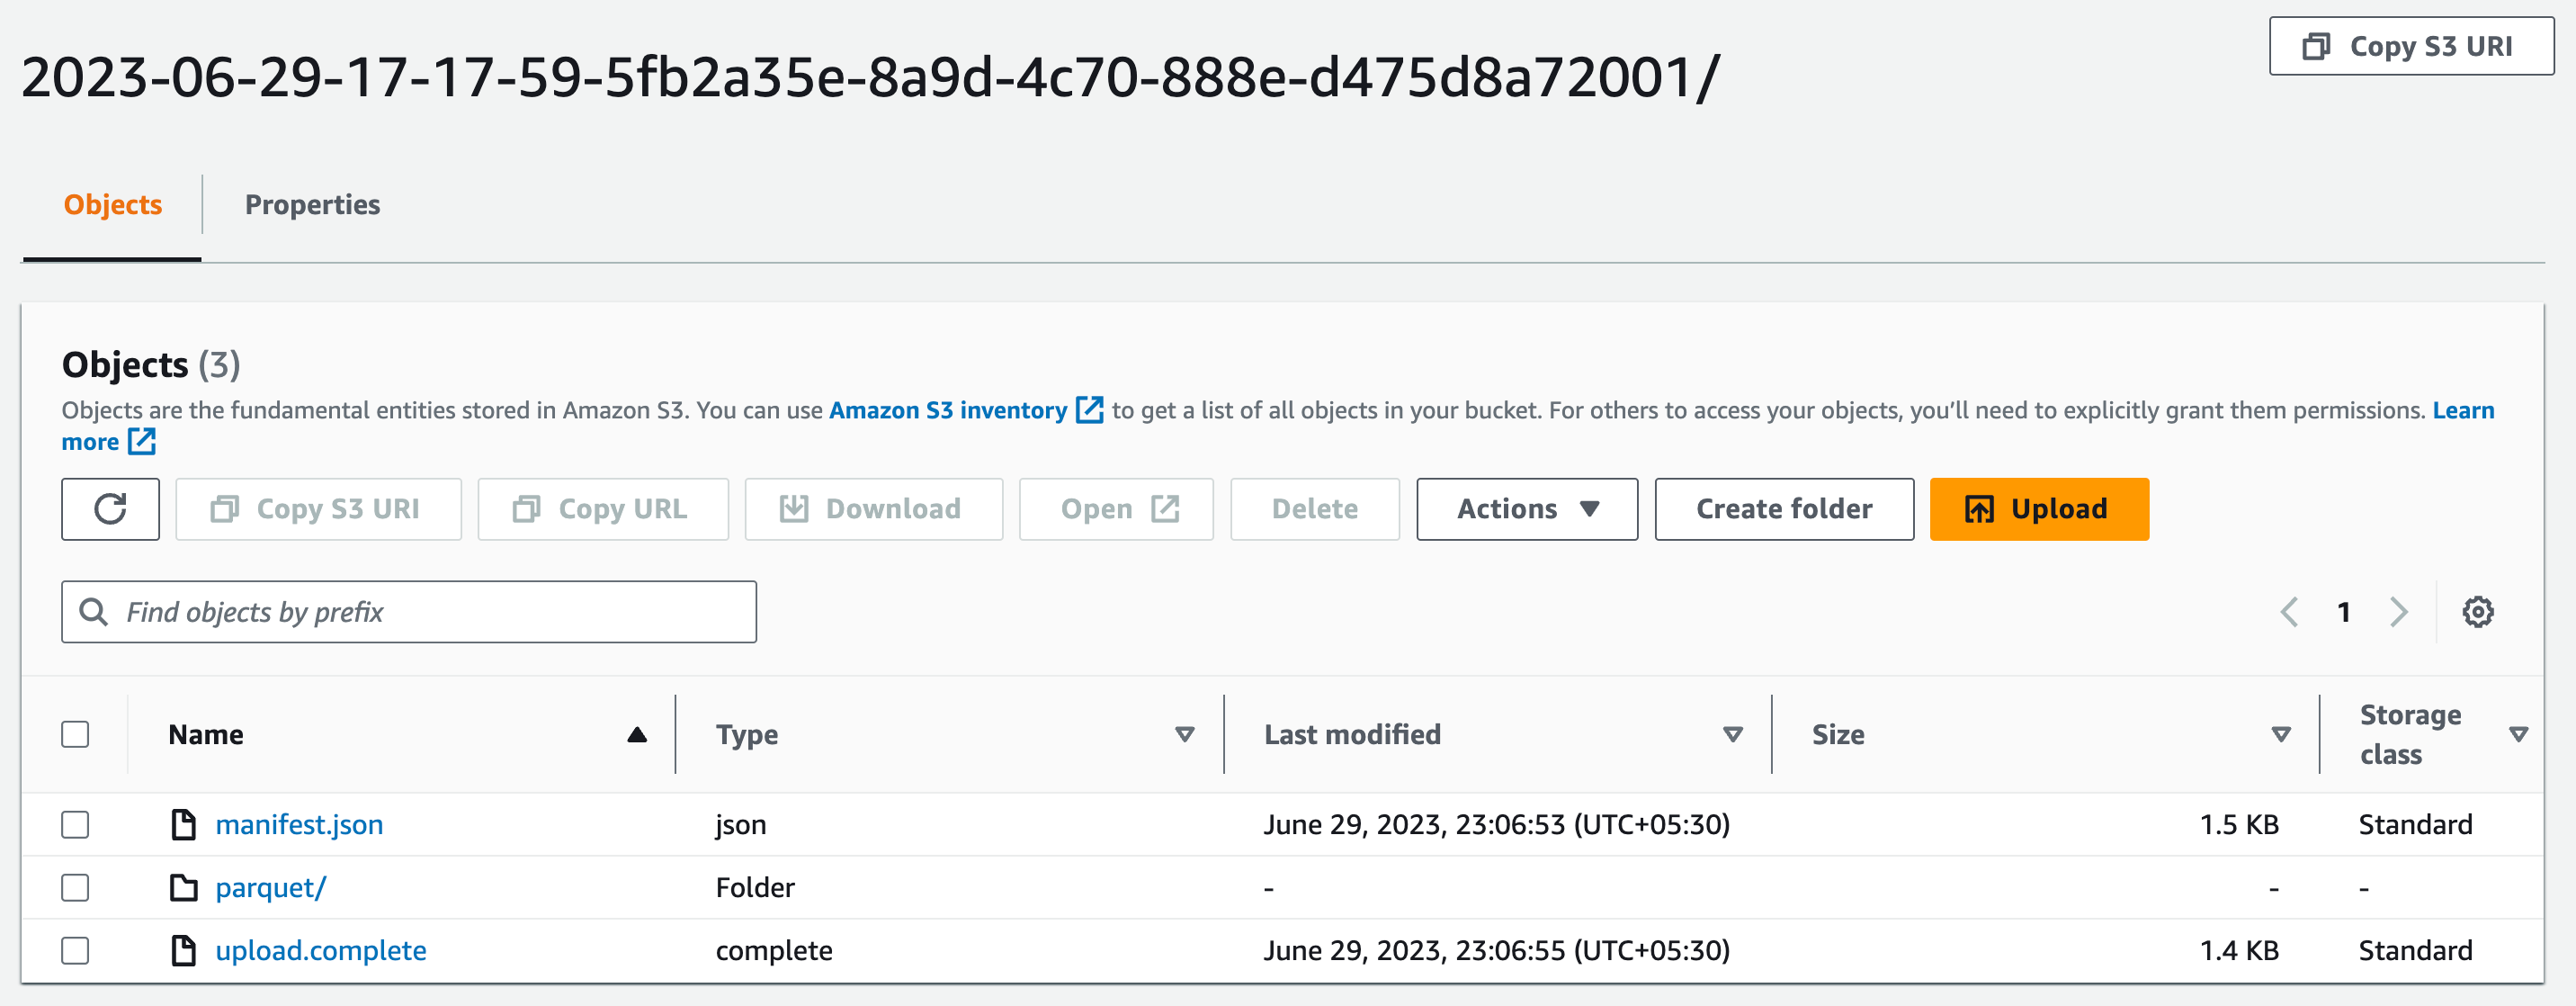
├── manifest.json []
├── parquet/ [ Folder that contains the actual parquet data files ]
└── upload.complete [ Used for upload notification ]
Overall folder structure
Let's dive deeper into the purpose of the critical folders and files on here.
The manifest.json tells you what files you actually have in your parquet folder. It is also used as a debugging mechanism to figure out where the source data came from.
The upload.complete is used for SQS notifications. You can hang a notification off of the upload.complete file. The moment your aws bucket is hit with new data, you will get an SQS notification. The JSON file itself mentions the exact name and path of the data (parquet files).
The parquet/ folder itself houses all the parquet files.
If you put a notification on the parquet folder, you will receive a notification even before the files have finished writing. Clearly, that's not ideal at all. Which is why we have the upload.complete that gets written only after all the data parquet files have been fully and completely written.
Here's a look at the demo S3 URI
s3://vb-mycompanyinc-s3-bucket/thrive-air-folder/2023/06/29/17/2023-06-29-17-17-59-5fb2a35e-8a9d-4c70-888e-d475d8a72001/
This is deliberate. It is standard AWS practice and the reason for it is to avoid complexity and clutter. The idea being-- so that we do have 100+ files in a single folder. If you do, it would be rather difficult to locate them and work with them programatically unless you know the exact key.

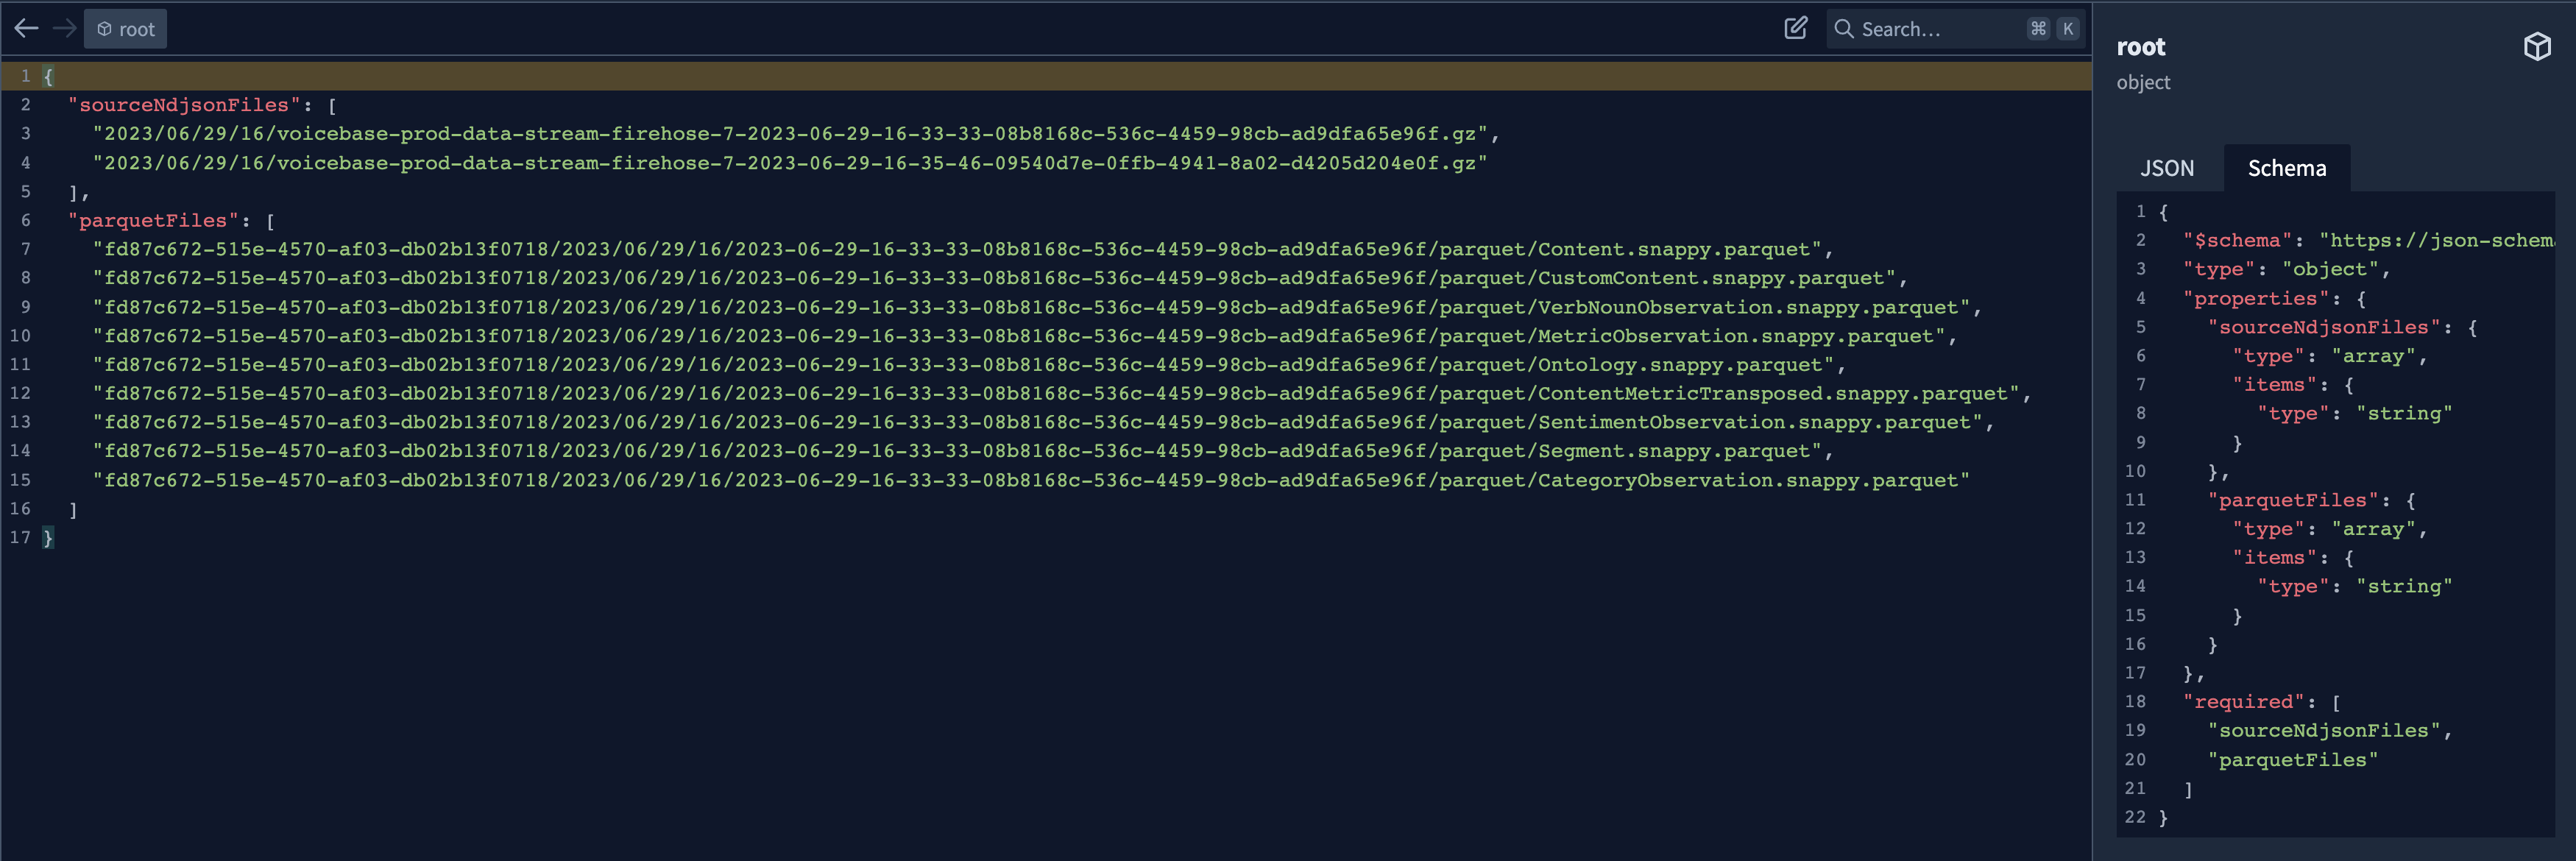
Manifest.json structure
The parquet folder
Each parquet file inside the parquet folder is a representation of an SQL table. You can think of it as each conversation being processed into a SQL-type relational schema with rows and columns.
For a detailed explanation of each file, field and rows data in the parquet. Pease head to this page.
The annoyance with parquet is that you need a driver to open and view the data since the data is stored in a columnar fashion. However the pros far out weight the cons. You can snap a JDBC driver, connect via a BI platform or load via Python and the data is already indexed. This makes it incredibly fast and performative.
Customer Managed Policy and Inline Policy are two types of identity-based policies in AWS IAM. Here is a breakdown of each type and when to use them:
Customer Managed Policy:
- A Customer Managed Policy is a standalone policy that you create and administer within your own AWS account.
- It can be attached to multiple users, groups, and roles within your account.
- You can customize an existing AWS Managed Policy to fit the specific requirements of your organization.
- Customer Managed Policies are recommended when the existing AWS Managed Policies do not meet the needs of your environment.
- They provide more control and flexibility over the permissions defined in the policies.
- When you make changes to a Customer Managed Policy, IAM creates a new version of the policy and stores up to five versions.
- You can revert to an earlier version of the policy if needed.
Inline Policy:
- An Inline Policy is a policy that is created and embedded directly into a single IAM identity (user, group, or role).
- It maintains a strict one-to-one relationship between the policy and the identity.
- When you delete the identity, the inline policy is also deleted.
- Inline Policies are useful when you want to ensure that the permissions in a policy are only assigned to the intended identity and not inadvertently assigned to any other identity.
- They are typically used when you need a policy that is specific to a single user, group, or role.
- If a policy could apply to multiple entities, it is better to use a Managed Policy instead.
In most cases, AWS recommends using Managed Policies over Inline Policies. Managed Policies provide better manageability, versioning, and the ability to apply the same policy to multiple principal entities. Inline Policies are useful for maintaining strict control over the permissions assigned to a single identity.
This is deliberate. It is standard AWS practice and the reason for it is to avoid complexity and clutter. The idea being-- so that we do have 100+ files in a single folder. If you do, it would be rather difficult to locate them and work with them programatically unless you know the exact key.
The parquet folder contains all your LivePerson Analytics Studio data.
The manifest.json gives a further description of the data itself and is used for debugging purposes.
The upload.complete is used to issue automated notifications of a new data dump. Ie. You will get a SQS notification
Missing Something?
Check out our Developer Center for more in-depth documentation. Please share your documentation feedback with us using the feedback button. We'd be happy to hear from you.