Interaction Simulator
Description
Our previous phone simulator has been replaced by the Interaction Simulator. The Interaction Simulator was created to address some of the limitations of the previous solution, such as the lack of agent status and transfer support.
The Interaction Simulator is a cloud-based program that doesn't need to be downloaded or installed. You may access it by going to https://interaction-simulator.tenfold.com.
The tool was built to be Tenfold environment agnostic, so we will not have one simulator per environment (Dev/QA/Canary/Production), but that doesn’t mean we can’t support all those environments. Check out the Settings section below on how to select your desired environments.
Using the Tool
The screen below will then appear when you access the URL above. You can also click here.
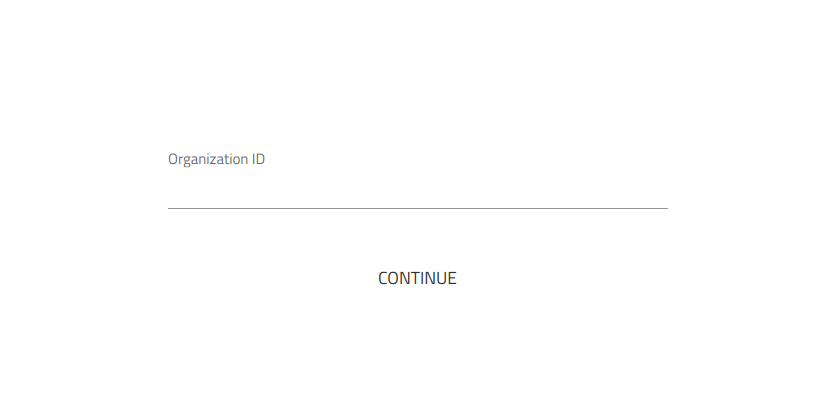
Enter your organization ID and press Continue. The organization ID can be found on the Company Settings tab in the dashboard. You will then be presented with the Home tab of the app. Below are the functions of each button.
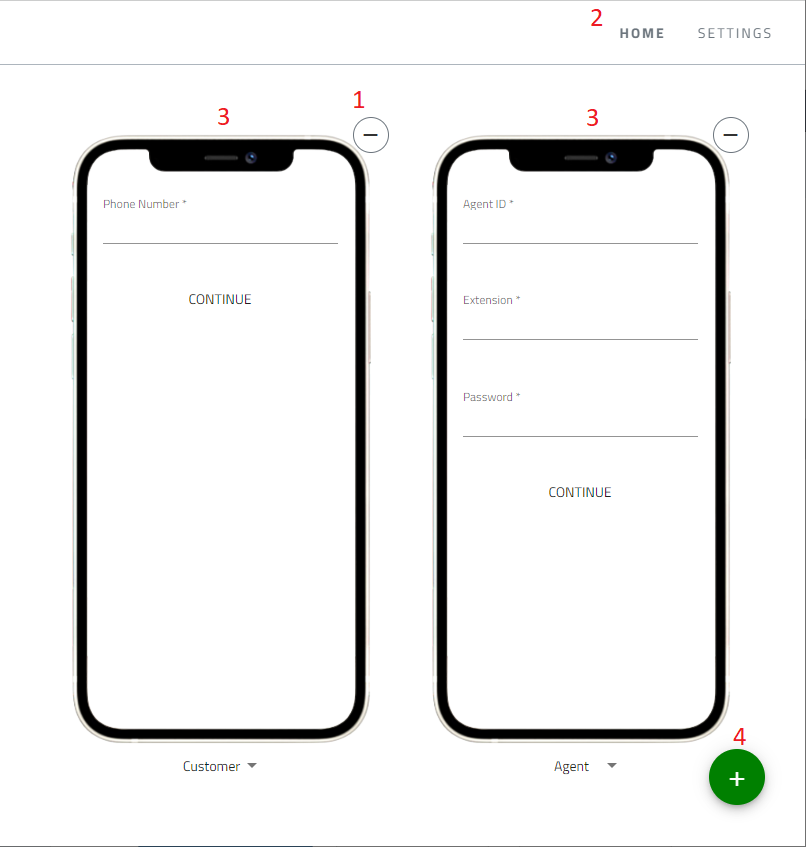
- The button above each device can be used to remove that particular device from the view.
- The navigation bar at the top is where you switch between the different tabs of the app.
- These are the devices where you will be placing/receiving phone calls. The dropdowns under each device are used to change the device type between agent or customer.
- Use the + button to add more devices.
Interaction Simulator Settings
General Settings
- Organization ID - This is the organization ID provided in the initial screen. Use it to double-check which organization you’re using if you access multiple organizations.
- Use WebRTC - This enables the use of WebRTC to allow real audio to be used between calls.
- Event Webhook URL - The event webhook URL controls where your phone events are sent to. This will usually be the HTTP Producer URL for the environment you want to use. Use one of the URLs below and replace {InsertOrgId} with your organization ID:
- Developement - https://events-development.tenfold.com/receive/{InsertOrgId}/interaction-simulator
- QA - https://events-qa.tenfold.com/receive/{InsertOrgId}/interaction-simulator
- Production - https://events.tenfold.com/receive/{InsertOrgId}/interaction-simulator Please contact your account team or our Support department if you're not sure which environment you should be using.
Agents
- When you access the page, you will be presented with a list of your Agents. If you click on the Add button (top right), you will be asked to provide the agent details.
- You can also edit an existing agent by clicking the Edit button in front of the agent.
- If you want to remove an agent, click the Delete button in front of the agent name.
As you may notice, you’re not required to create agents and stations manually. The entities are generated automatically for you the first time you access Interaction Simulator using the following logic:
- Agents will be created with incremental IDs starting at 10000.
- Agent passwords will always be initiated as 1234.
- Stations will be created with incremental extensions, starting at 1000.
- Station passwords will always be created as 1234.
- The Agent Statuses you can change are only the Unavailable statuses with reason codes. The other statuses like Available or Unavailable - In Call, for example, are automatically generated and can’t be changed.
- You’re given two initial IVR fields but you’re free to create more. Those fields will automatically be sent along with ringing events on every inbound call for the time being.
The two available device types, Agent and Customer, control what type of features you get in the device.
The Customer device is the simplest one. It’s only capable of simple call controls like dialing, answering, hanging up, and putting the call on hold. It also does not require any form of login.
The Agent device, on the other hand, simulates an agent's softphone. It’s capable of more complex controls, such as transfers and conferences, and has all the Agent configurations described in the General Settings section above.
You can change a device type after it has been created by clicking on the dropdown box below each device and selecting the desired type.
Adding or Removing Devices
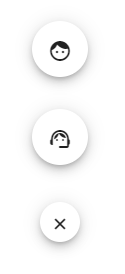
The + and - buttons are used to add or remove devices in a very straightforward fashion. When you click on the + button, you will be presented with a couple of options:
- The top button is used to add a new Customer device
- The middle button is used to add a new Agent device
- The bottom button is used to cancel
See the differences between agent and customer devices in the following sections.
Login Page
Customer devices (the device on the left), have no actual login process. All you need to provide is the phone number for that device. This is the number that will be used for phone calls and the number that will show in the Tenfold UI for the call coming into the agent. This will also be the number used to match records in your CRM. Once you provide the number you want to use, you can press continue.
For Agent devices (the device on the right), in addition to the automatically generated agent configurations outlined above, there are two other items to be aware of.
- There is a real authentication process that will require you to provide the correct credentials. See the Automatically Generated Agent Configurations section above to obtain these credentials.
- Once you log in, we keep your session active so you're not required to log in again. If you want to go back to the login screen, you can click on the Sign Out button below each device. However, this session is kept in your local storage so if you clear your browser data, you will need to log in again.
The Dialpad View
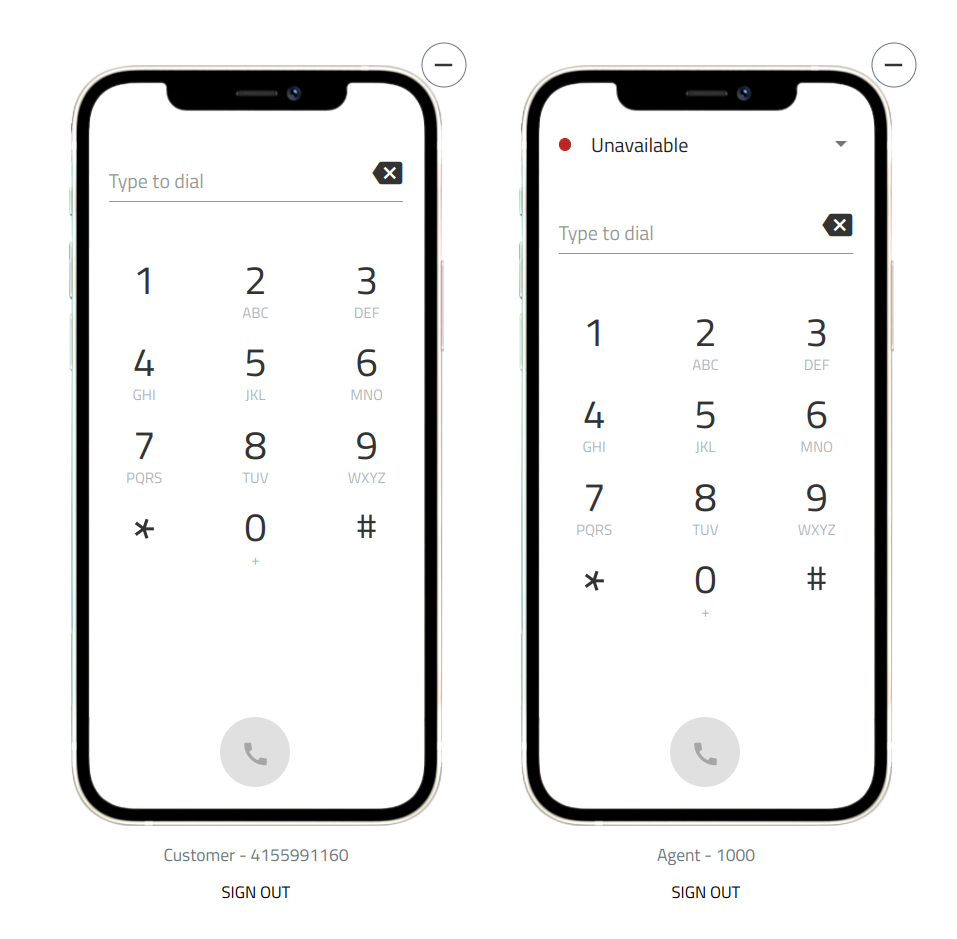
This is where you can place phone calls. In order to dial out, all you need to do is either press the numbers in the keypad or click in the input field and type using your keyboard directly. Once you provide a number, the dial button becomes active: You can then go ahead and click it to start a call.
Basic Call Scenarios
Calls dialed from the Customer's phone to the Agent's phone are considered inbound calls from the agent's perspective, and calls from the Agent's device to the Customer's device are outbound calls from the agent's perspective. The examples below cover the inbound scenario, but they are functionally similar to an outbound call scenario.
- Cancel the call by clicking on the red Hang-up button on the customer's device.
- Reject the call by clicking on the red Decline button on the agent's device.
- Answer the call by clicking on the green Answer button on the agent's device.
- After selecting the agent you want to transfer a call to, the customer call will be put on hold, and your second agent will get an inbound call. At this point, you can perform the following actions:
- Cancel the transfer by clicking the red Hang-up icon.
- Reject the incoming transfer by pressing the red Decline button on your second agent’s device.
- Answer the call by pressing the green Answer button on your second agent’s device.
Notice that as soon as the agent enters a call, its status will automatically transition to “Unavailable - In Call.”
Transfer Scenarios
Transfers can only be started when you already have an active call with the customer. You will also need a third device created and configured to simulate a second agent. Refer to Adding or Removing Devices above for more information.
Once you are ready to perform a transfer, click on the phone icon with the plus sign on the agent's phone. Then select which agent you want to transfer to. There are currently only two options:
- By default, you will see the list of available agents. To consult with one of the agents, click on the phone button in front of their name.
- The second option is to use the dialpad to type the extension you want to transfer the call to.
Once all calls are connected, you will be presented with a few more options:
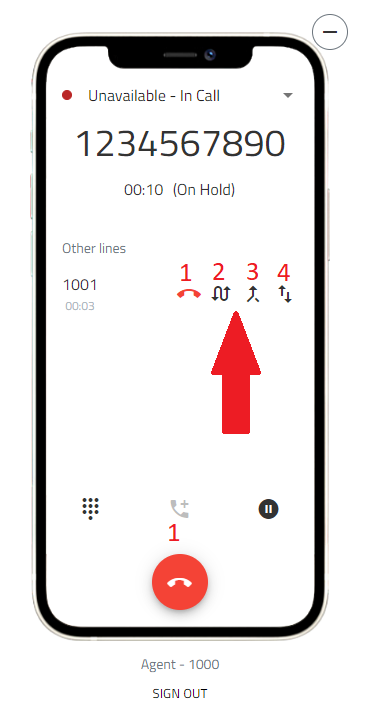
- This will hang up the consult call.
- This swaps between the two calls for the first agent (retrieving the call with the customer and putting the consult call on hold and vice-versa).
- This will merge the calls together, creating a conference.
- This will transfer the call to the second agent.
There is no particular call action needed to leave a call. Simply end the call as usual, and the other parties will continue to be connected.
Missing Something?
Check out our Developer Center for more in-depth documentation. Please share your documentation feedback with us using the feedback button. We'd be happy to hear from you.