Installation guide
LivePerson Connector for Salesforce provides a unified and sleek agent workspace experience. Agents can login to Salesforce and directly engage with customers easily managing tasks like: accept incoming conversations across different messaging channels, seamlessly resolve customer issues & escalate/transfer conversations to other human/bot agents. Agents can communicate with consumers over familiar messaging channels within Salesforce. This includes all messaging channels supported, such as web messaging, SMS, WhatsApp, Apple Messages for Business, Facebook Messaging, brands’ mobile app, etc.
This guide provides an overview of the tasks that should be completed to enable the LivePerson Agent Widget in Salesforce.
Step 1: Install the LivePerson embedded UI in Salesforce
You need to install the LivePerson Embedded UI from the provided Salesforce Package into your Salesforce instance. Further, you need to install the LivePerson Conversation Object into your Salesforce instance.
LivePerson Embedded Application Install (Salesforce Aura Lightning Component)
1. Install the app package from the list of available packages provided. LivePerson recommends installing the most recent release. Select Install for All Users when installing the UI.
2. If you are using Salesforce Sales Cloud, start by navigating to App Manager in the setup page.
3. You will find Sales Console listed in the list of apps. Click on the arrow -> Edit on the right side
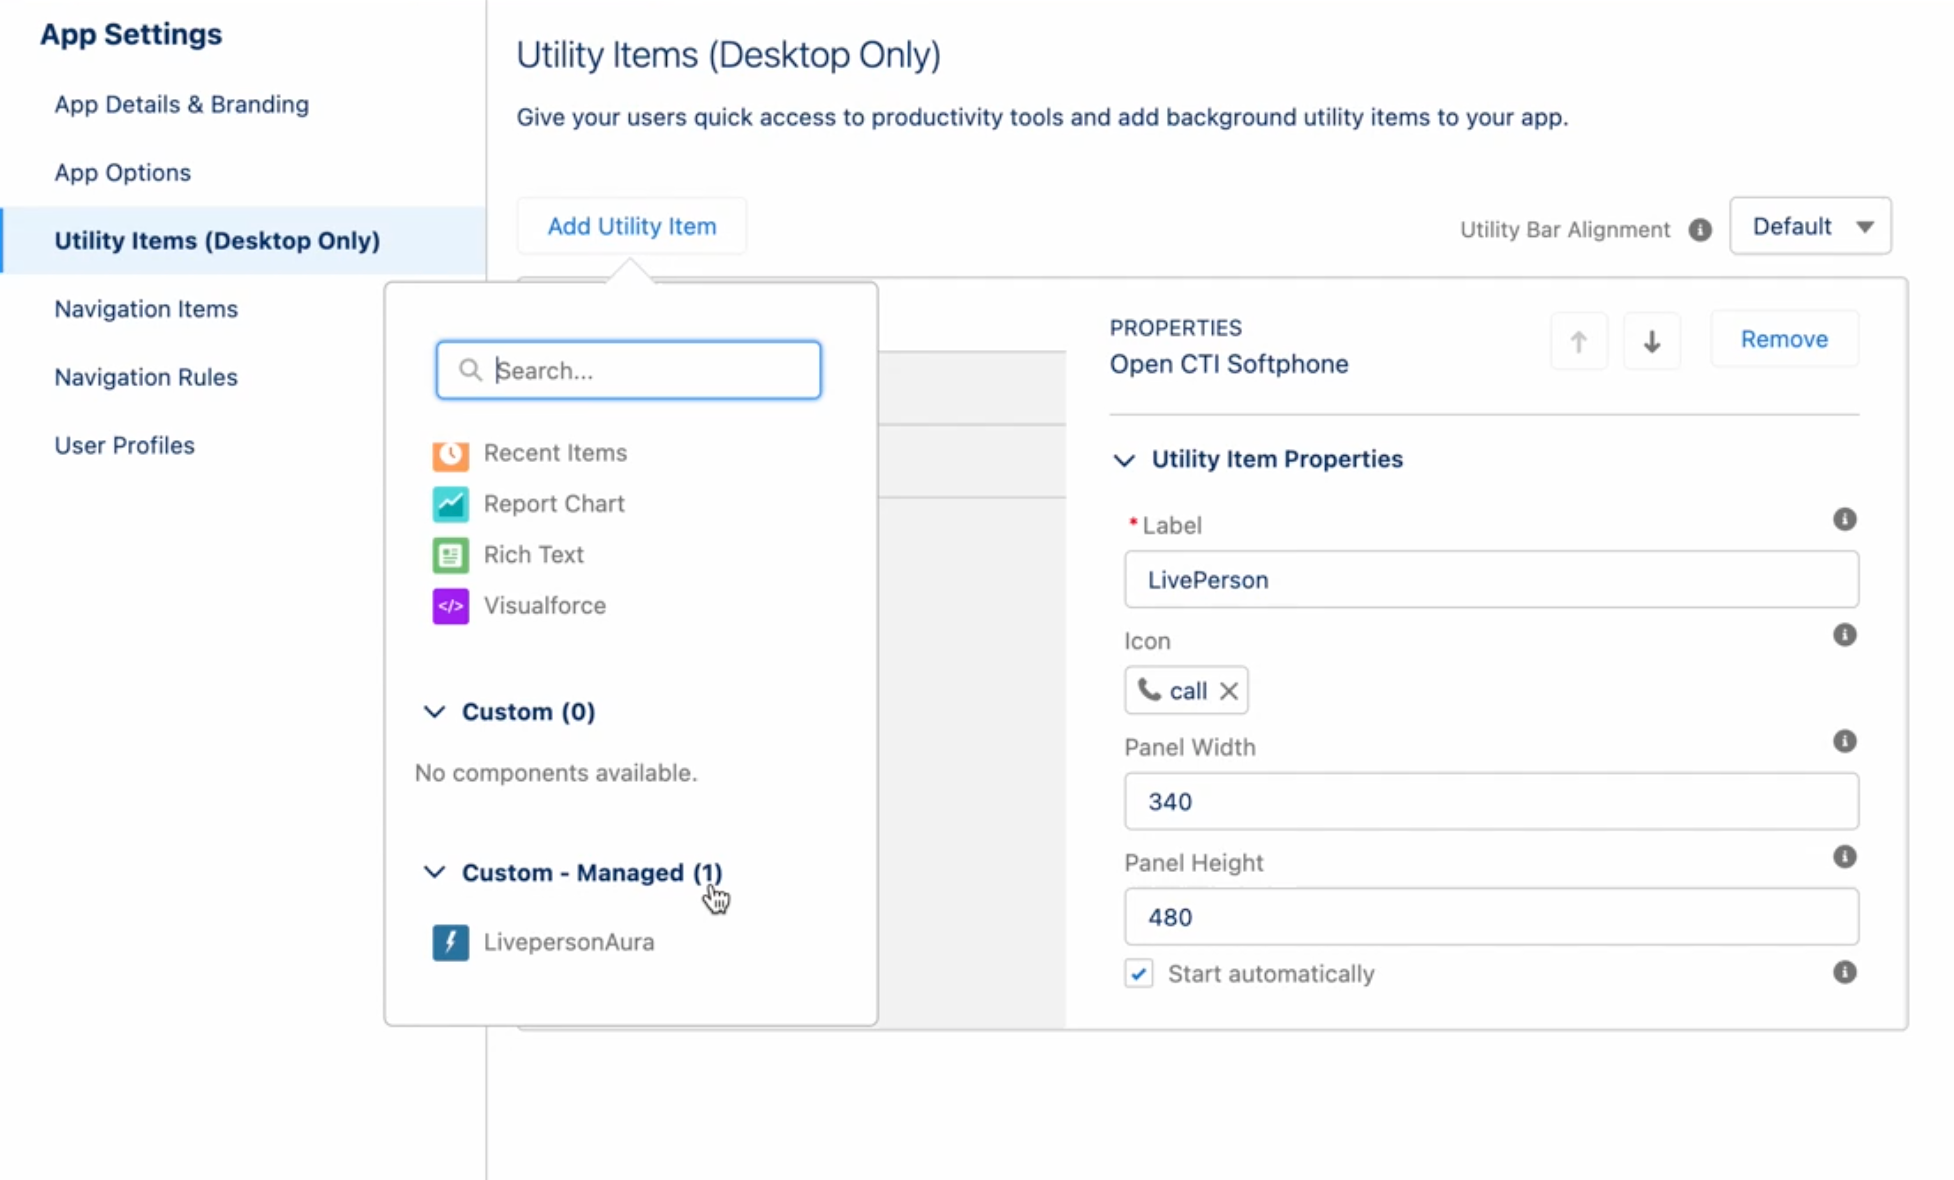
4. Select Utility Items then Add Utility Item.
Add Custom Managed LivePerson Aura and then change the panel width to 400 and the panel height to 600 and then click save

Content Security Policy (CSP) Trusted Site Settings
Lastly, please note, the following URLS will be automatically added to your Salesforce CSP settings.
firebaseio.com
wss://*.firebaseio.com
googleapis.com
*.googleapis.com
wss://*.liveperson.net
liveperson.net
*.liveperson.net
liveperson.com
*.liveperson.com
tenfold.com
*.tenfold.com
wss://*.firebasedatabase.app

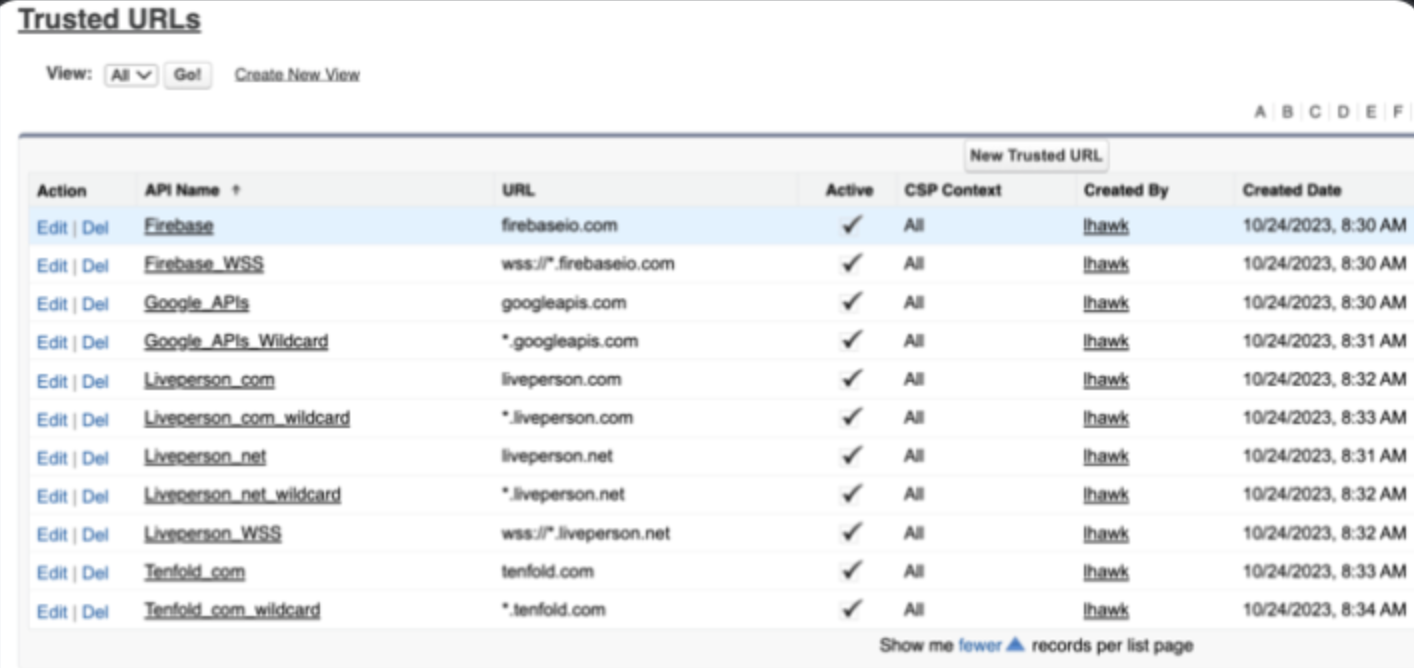
For each site please ensure the check for "Allow site for connect-src" is checked.
LivePerson Conversation Object Package Install
Install the Conversation Object using the link provided. Select Install for All Users when installing the UI. This will create the new LivePerson Conversation object in your Salesforce instance.
Step 2: Permissions
Role setup
In order for LivePerson to update task records (i.e. phone calls logged to Salesforce) and properly set relationships, the API user must be higher in the role hierarchy than users of this integration. Additionally, both the API user and end-users in Salesforce must have the appropriate roles assigned. This provides the application user with the access required to set relationships and update tasks.
For example:
Permissions
LivePerson/Tenfold leverages an API user to establish the initial integration, obtain the OAuth token, and perform all API calls/writes to the SFDC instance.
The below section outlines the minimum permissions necessary for that user for the core integration to function.
Alternatively, you may connect Tenfold to Salesforce via an Administrator account which provides sufficient privileges for the integration.
User permissions
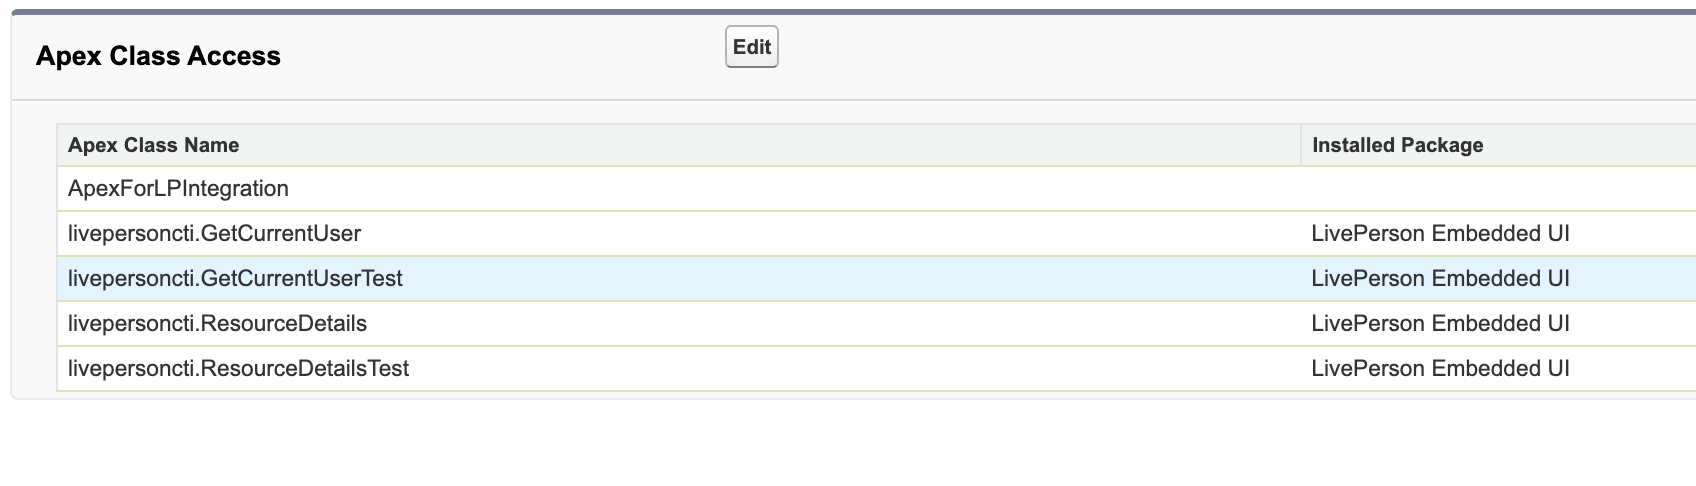
In your instance go to Setup -> Apex Classes and create a new Apex class
You'll name it ApexForLPIntegration
The class will just be boilerplate like this:
java:
global with sharing class ApexForLPIntegration {
    public ApexForLPIntegration() {

    }
}
System permissions
The following system permissions are required for the integration.
Table 1. System permissions required for the Salesforce integration user
| Permission | Purpose |
| API Enabled | Allows the LivePerson app to interact with the Salesforce API. |
| Edit Tasks | Enables the LivePerson app to create and update interactions and follow up tasks. |
| View Setup and Configuration | Allows LivePerson/Tenfold to dynamically build API queries based on the permission set assigned to the API User. This Permission depends on the View Roles and Role Hierarchy. |
| View Roles and Role Hierarchy | This permission is a dependency of the View Setup and Configuration. |
| View All Users | Allows LivePerson/Tenfold to import users into Tenfold Dashboard. |
| Modify Metadata Through Metadata API Functions | Allows LivePerson/Tenfold to create the workflows and workflow rules required for omnichannel agent status updates to be pushed from Salesforce to Tenfold. |
When adjusting system permissions in the API user’s Permission Set after Tenfold has been connected to Salesforce you must re-initialize the integration by following these steps.
- Change the selected CRM in the Tenfold Dashboard to another CRM.
- Switch the CRM selection back to Salesforce.
- Re-connect Tenfold to your production or sandbox environment.
- Click the “Synchronize Fields” button in Tenfold Dashboard > Company Settings > CRM.
Object Permissions
Each object enabled for the Tenfold integration requires Modify All and Create object permissions. If it is desired to reduce permissions further, be mindful that the Tenfold API user requires the appropriate permissions and sharing settings to read and write relevant Salesforce records and support your use case.
Table 2. Account object permissions required for the Salesforce integration user
| Account Object | |
| Field | Permissions |
| Account Name | Read Access Edit Access |
| Account Owner | Read Access Edit Access |
| Created By | Read Access |
| Phone | Read Access Edit Access |
Table 3. Contact object permissions required for the Salesforce integration user
| Contact Object | |
| Field | Permissions |
| Account Name | Read Access Edit Access |
| Asst. Phone | Read Access Edit Access |
| Contact Owner | Read Access Edit Access |
| Created By | Read Access |
Read Access Edit Access | |
| Home Phone | Read Access Edit Access |
| Mobile | Read Access Edit Access |
| Other Phone | Read Access Edit Access |
| Phone | Read Access Edit Access |
Table 4. Lead object permissions required for the Salesforce integration user
| Lead Object | |
| Field | Permissions |
| Created By | Read Access |
Read Access Edit Access | |
| Lead Owner | Read Access Edit Access |
| Lead Status | Read Access |
| Mobile | Read Access Edit Access |
| Name | Read Access Edit Access |
| Phone | Read Access Edit Access |
Important
The Task object does not allow for control of Object Permissions in the permission set. Set the following Field Permissions on this object.
Table 5. Task object permissions required for the Salesforce integration user
| Task Object | |
| Field | Permissions |
| Assigned To | Read Access Edit Access |
| Call Duration | Read Access Edit Access |
| Call Type | Read Access Edit Access |
| Comments | Read Access Edit Access |
| Created By | Read Access Edit Access |
| Due Date | Read Access Edit Access |
| Name | Read Access Edit Access |
| Priority | Read Access Edit Access |
| Related To | Read Access Edit Access |
| Status | Read Access Edit Access |
| Subject | Read Access Edit Access |
| Task SubType | Read Access Edit Access |
| Type | Read Access Edit Access |
| LivePerson Conversation | Read Access Edit Access |
Table 6. Opportunity object permissions required for the Salesforce integration user
| Opportunity Object | |
| Field | Permissions |
| Account Name | Read Access Edit Access |
| Amount | Read Access |
| Created By | Read Access |
| Opportunity Name | Read Access Edit Access |
| Opportunity Owner | Read Access Edit Access |
| Probability | Read Access |
| Stage | Read Access |
Table 7. Case object permissions required for the Salesforce integration user
| Case Object | |
| Field | Permissions |
| Account Name | Read Access Edit Access |
| Case Number | Read Access |
| Case Owner | Read Access Edit Access |
| Created By | Read Access |
| Status | Read Only |
| Subject | Read Access Edit Access |
Table 8. Conversation Transcript Object permissions required for the Salesforce integration user
| Case Object | |
| Field | Permissions |
| Conversation Number | Read Access Edit Access |
| Account | Read Access |
| Contact | Read Access Edit Access |
| Lead | Read Access Edit Access |
| Case | Read Access Edit Access |
| Opportunity | Read Access Edit Access |
| Product | Read Access Edit Access |
| Transcript | Read Access Edit Access |
| Created By | Read Access |
| Last Modified By | Read Access Edit Access |
| Status | Read Only |
| Owner | Read Access Edit Access |
| CSAT Score | Read Access Edit Access |
| Brand ID | Read Access Edit Access |
| Engagement Channel | Read Access Edit Access |
| Skill | Read Access Edit Access |
| Start Time | Read Access Edit Access |
| End Time | Read Access Edit Access |
Step 3: LivePerson/Tenfold Account Setup
Please contact your Customer Success Manager to set up a Tenfold Account.
Once your Tenfold Account is enabled, you can establish the link to the LivePerson account and turn on messaging features with the following instructions.
Step 4: Ensure your Agents can login to their workspace in Salesforce
Share the user credentials with the agents and ensure they are able to login to the Conversational Cloud and then the application in Salesforce.
See our FAQs for more information.
Missing Something?
Check out our Developer Center for more in-depth documentation. Please share your documentation feedback with us using the feedback button. We'd be happy to hear from you.