Tenfold Setup
This solution is powered by Tenfold: our cloud-based solution that gives sales and service reps the full context of each customer in real time. Access CRM data, chat controls and key customer data in a single pane of glass. Use workflow automations that keep your reps focused on continuous conversations with customers.
This guide provides an overview of the features that should be configured to enable the deep rooted CRM integration features for the LivePerson Connector in Salesforce.
Step 1: Establish a connection to your CRM
As a Brand Admin, you will be granted access to the Tenfold Dashboard where you will have access to edit the configuration or enable or disable several features that are enable the deeper integration with Salesforce. These will be configured as part of your initial setup for this solution.
To begin with, you will need to connect your CRM instance. This step will require that you have admin rights in the CRM account.
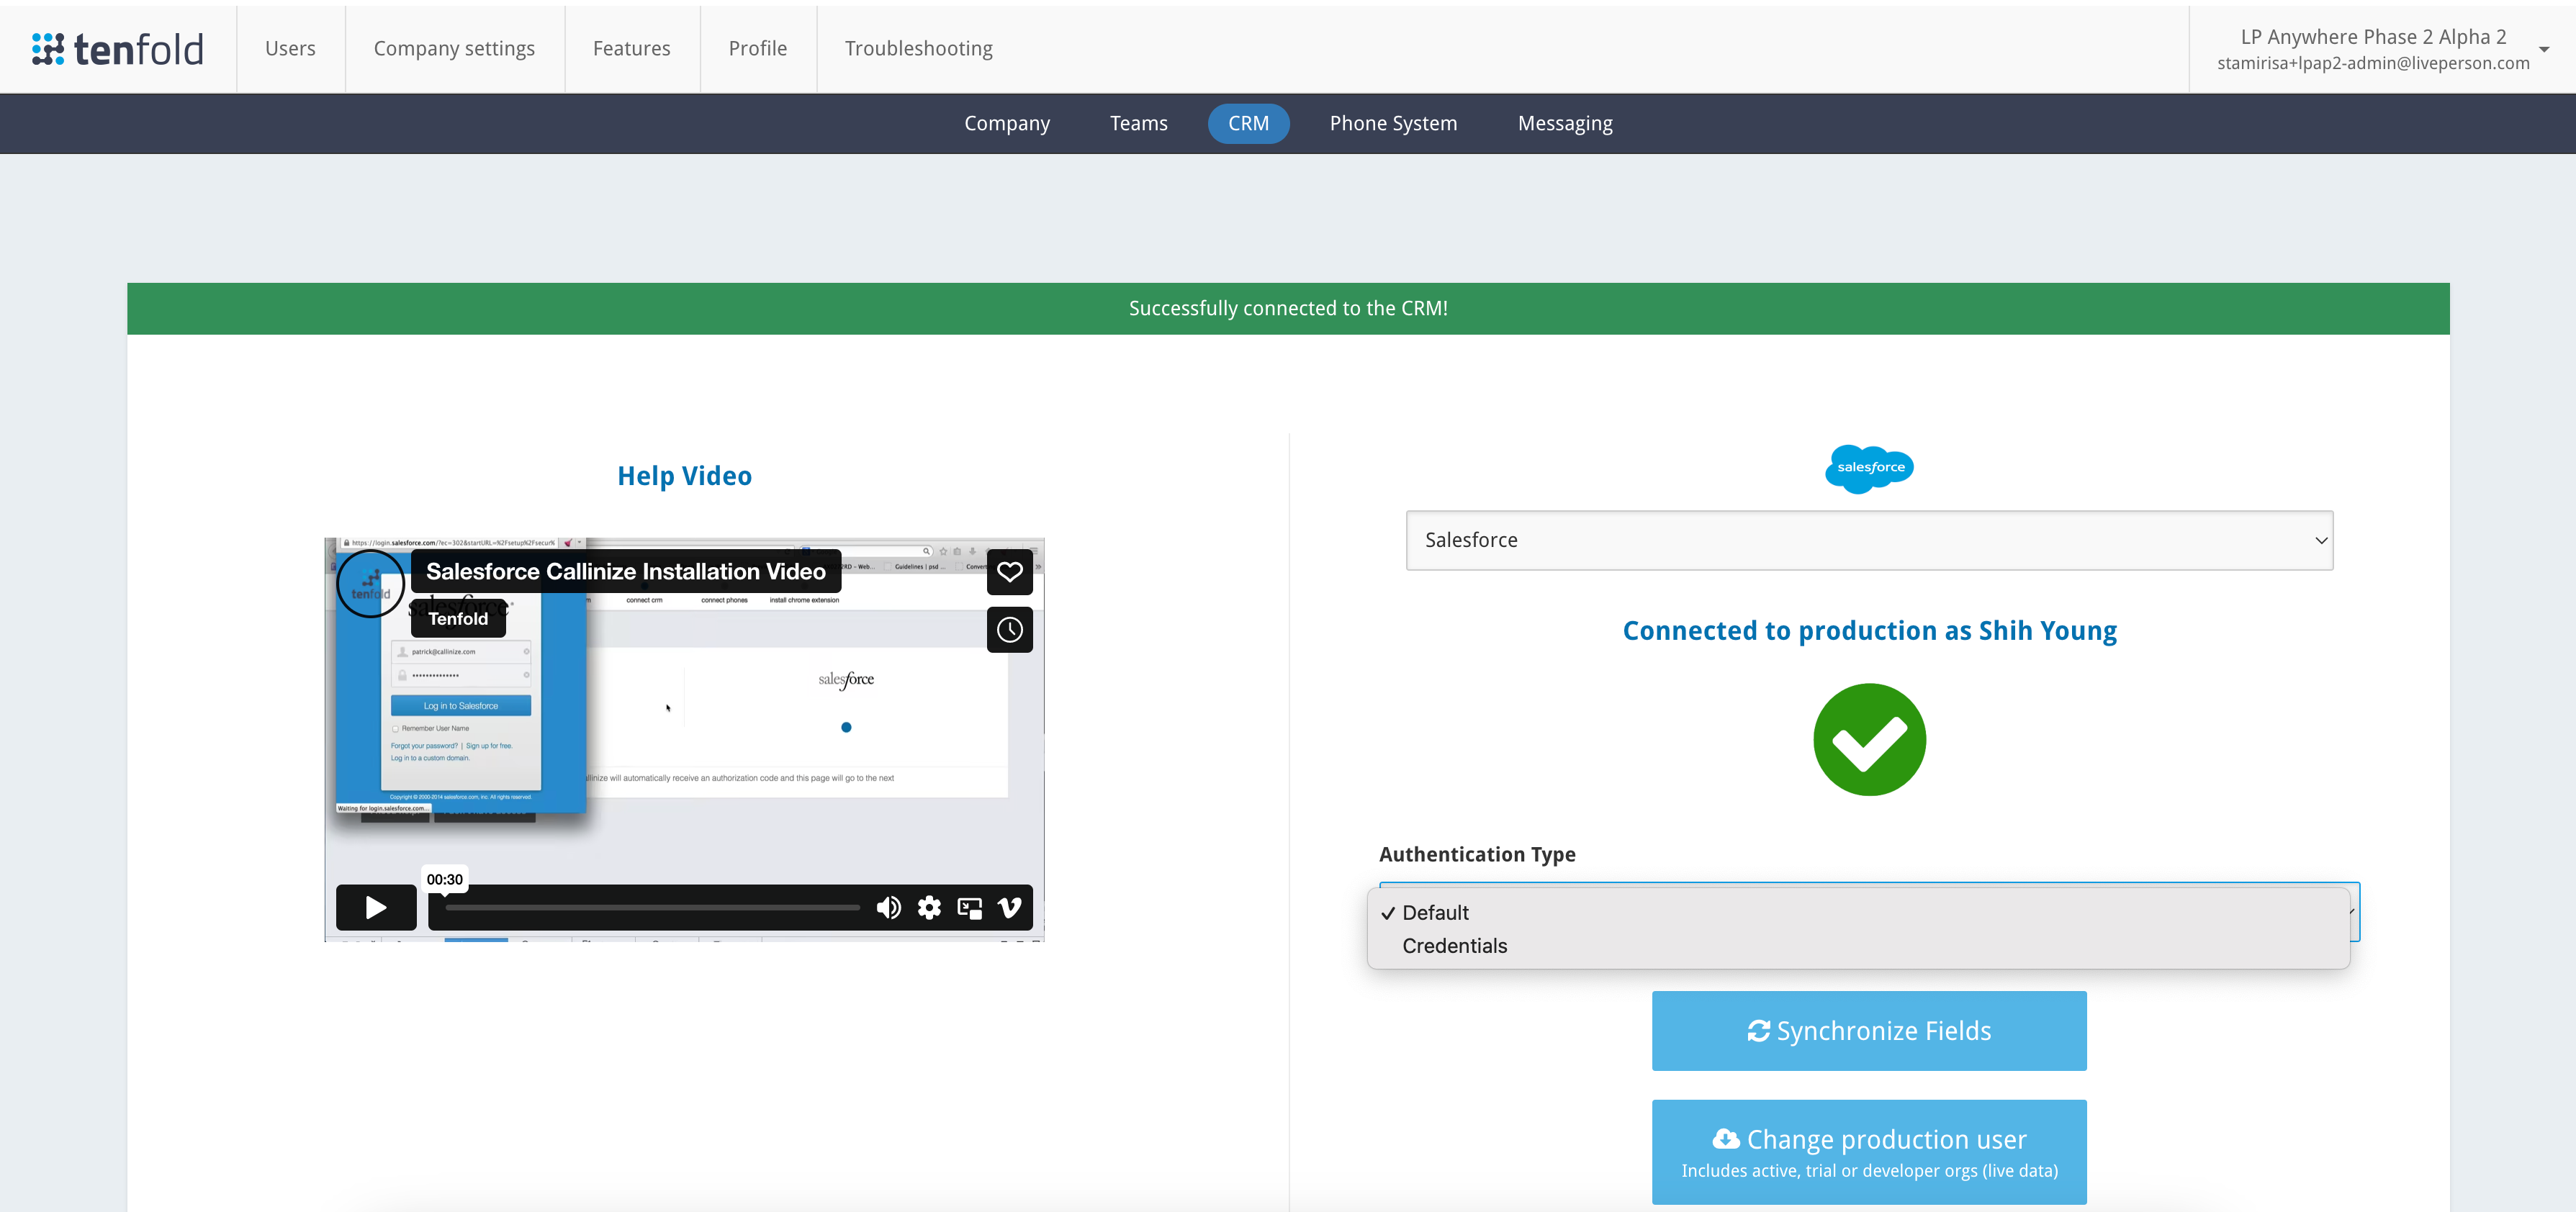
Select Company settings-> CRM -> Select Salesforce and the Authentication Type. You should be able to add your Salesforce credentials and connect to Salesforce. Please note, this Salesforce user will be used to call all backend APIs so admin access is required.

CRM Connection
Configure the Oauth connection
Establishing the initial connection from Tenfold to Salesforce takes only a minute. If you configured the connection through Connected App access, do not perform these steps.
- Start by navigating to your Tenfold dashboard at https://dashboard.tenfold.com
- Select the Company Settings link in the top navigation
- In the sub-navigation, select CRM
- Select Salesforce as your CRM. You will be able to select between authenticating for either a Production/Developer or Sandbox instance.
- Select Default from the Authentication Type box.
- Click the Connect with production button.
- A redirect window will appear and either:
- If you are already logged into Salesforce, the handshake will automatically occur.
- If you are not already logged in, then a Salesforce login screen will appear.
- You will be prompted to grant Tenfold relevant permissions and the window will automatically close.
Configure the Connected App connection
Establishing the initial connection from Tenfold to Salesforce takes only a minute. If you configured the connection through Oauth, do not perform these steps.
- Start by navigating to your Tenfold dashboard at https://dashboard.tenfold.com
- Select the Company Settings link in the top navigation
- In the sub-navigation, select CRM
- Select Salesforce as your CRM. You will be able to select between authenticating for either a Production/Developer or Sandbox instance.
- Select Credentials from the Authentication Type box.
- Enter your client ID and Client Secret into the appropriate boxes.
- Click the Save button. If the credentials and permissions are correct, you should see a message at the top of the screen saying the connection tested successfully.
Step 2: Enable the Messaging Configuration in Tenfold
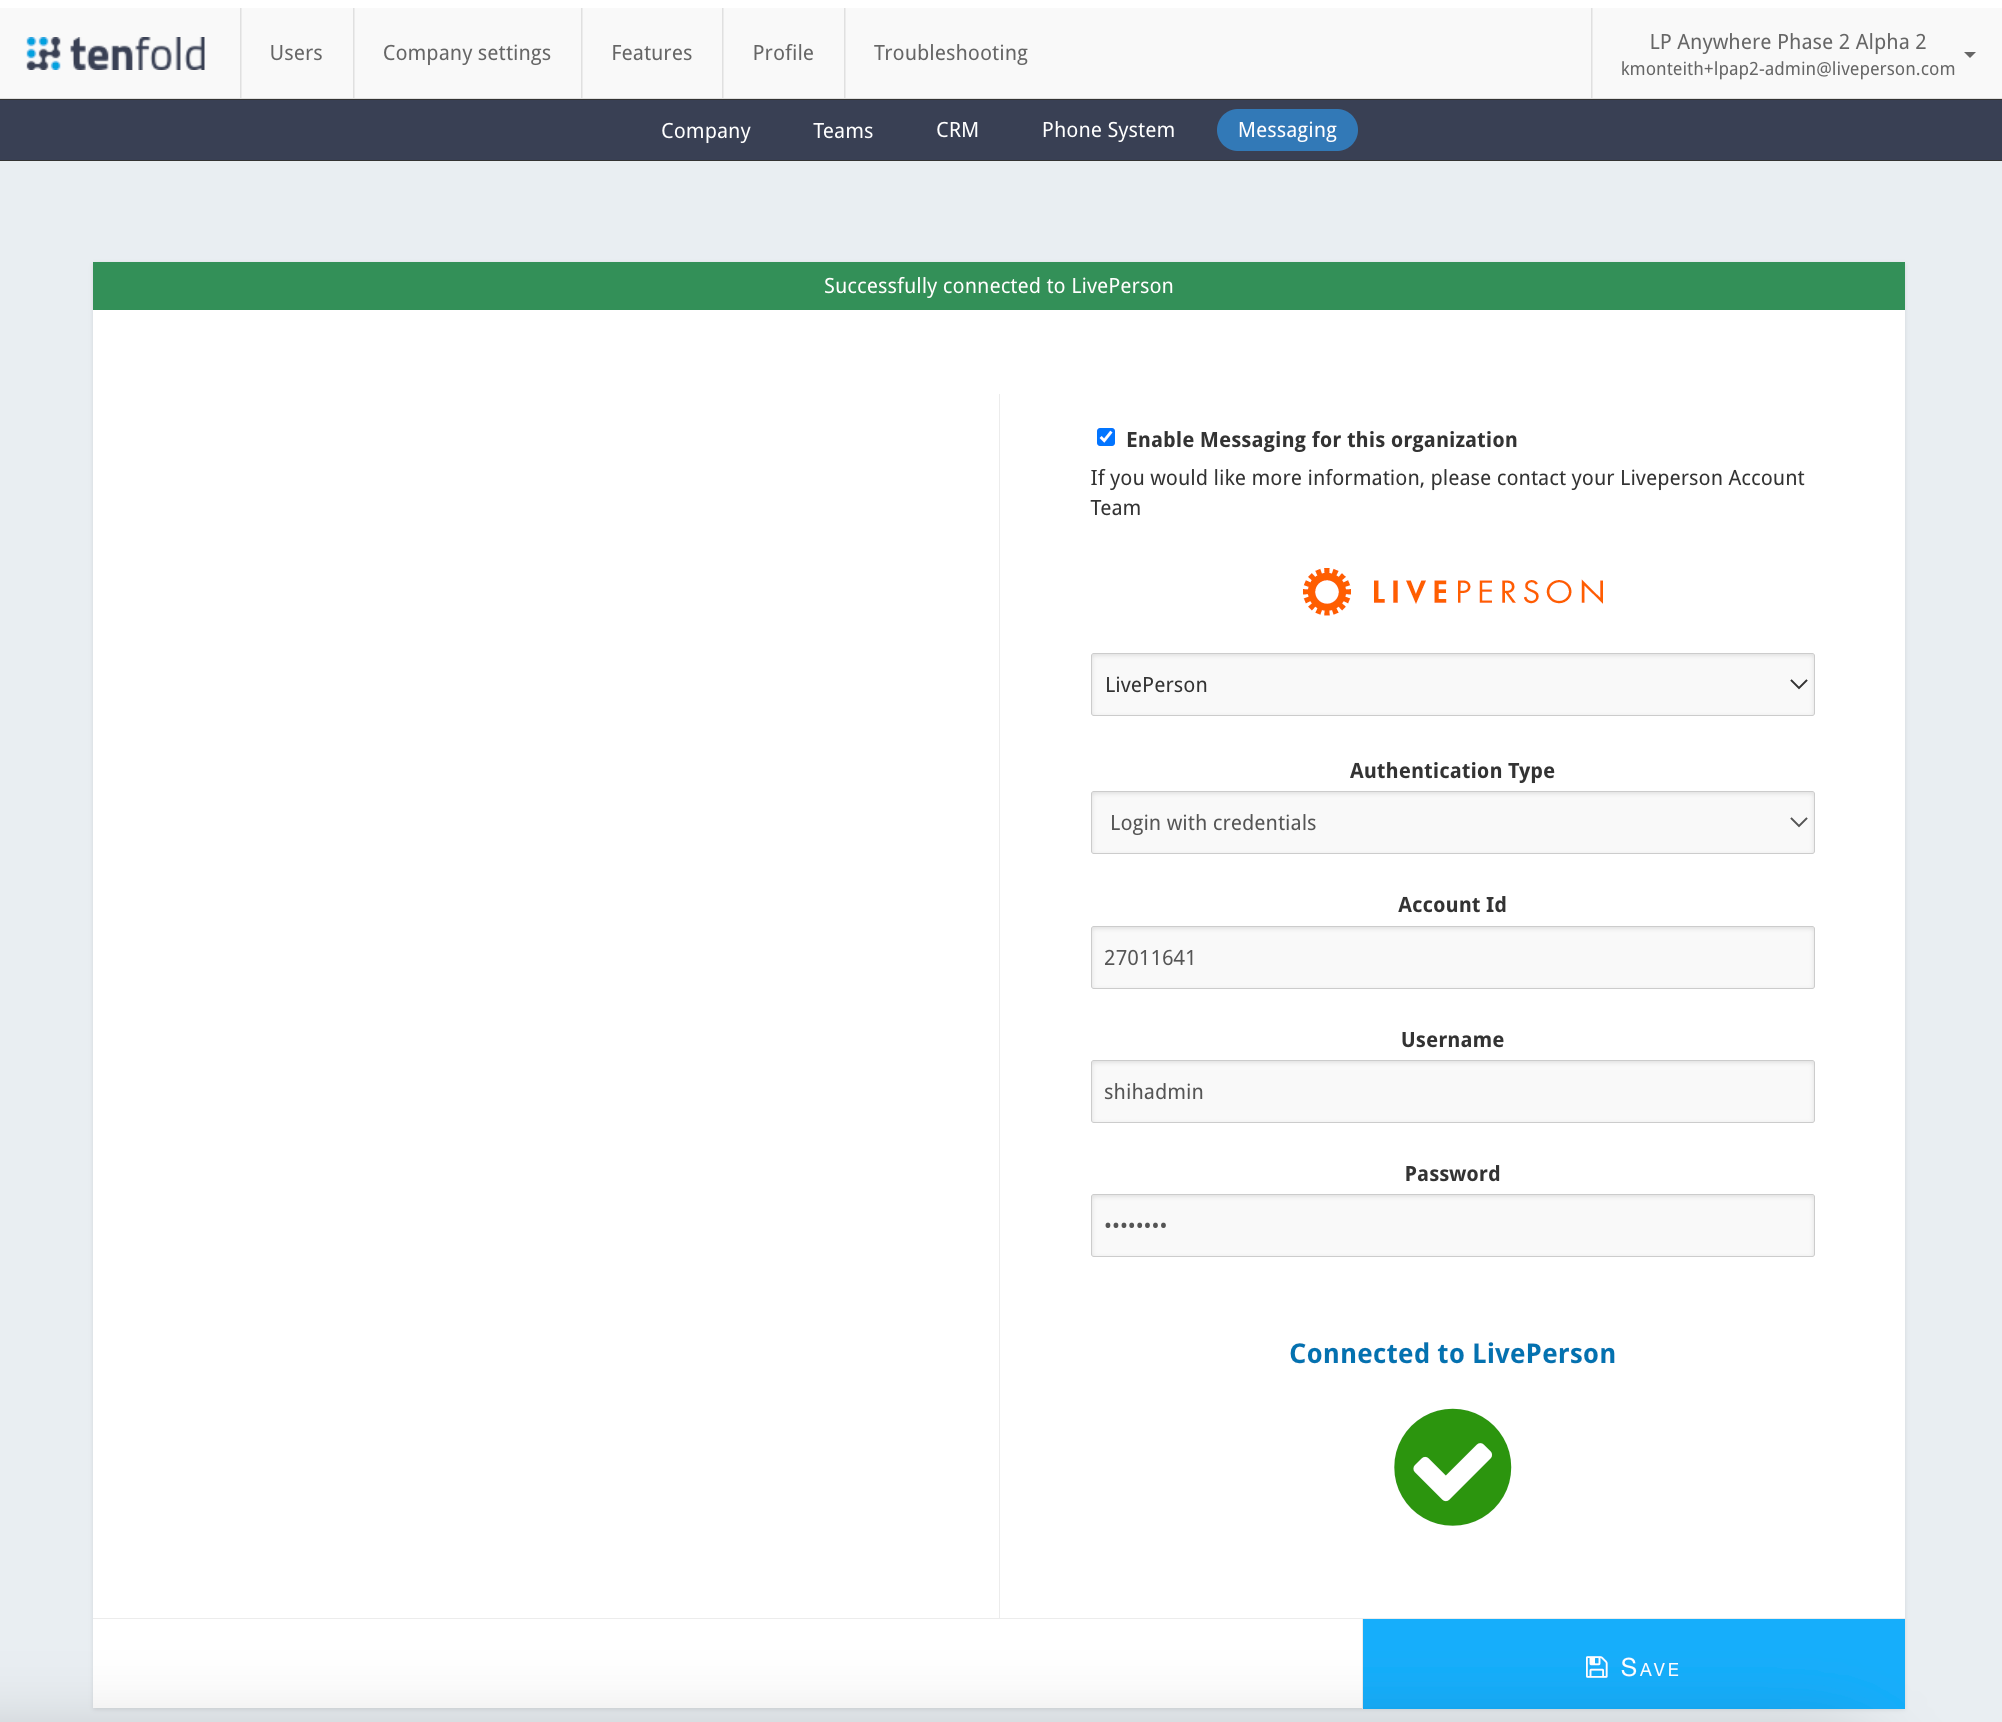
To enable the use of the LivePerson Connector, this setting will need to be enabled in Tenfold by simply clicking on the Messaging tab under the Company settings. Upon enabling this, you will be required to enter the LivePerson Site ID and user credentials that will be used for the backend APIs. It is essential to have a unique user solely for this purpose. This user must have admin privileges in LivePerson.

Enable the Messaging Configuration in Tenfold
Step 3: Setup the agent users in Tenfold
In-order to gain access to the LivePerson application in Salesforce, agent must be maintained in Tenfold. You may either sync all agent users from your Salesforce instance or you may choose to import them from a file. Please reference the following documentation to add, enable and disable agent users.
Step 4: SSO Setup or Login with Credentials
Login with Credentials but bypass Tenfold Login
Agent SSO into LivePerson is now available. However, please note that if you still choose to login with credentials, you may set up SSO with Tenfold using Salesforce as the identity provider. This will mitigate multiple logins for the agent users in Salesforce. Please use the following directions to setup SSO. If this is not enabled, the agents will need to login with credentials twice, once into Tenfold and then again into LivePerson. The agents will need to provide the LivePerson account ID and credentials.
* Please note, if SSO is enabled in your LivePerson account for a subset of agents and you still choose to login with credentials you must be sure to migrate from IDP to SP Initiated authentication and Oath in LivePerson.
If SSO is not enabled and agents try to login to LivePerson, this is what they see:

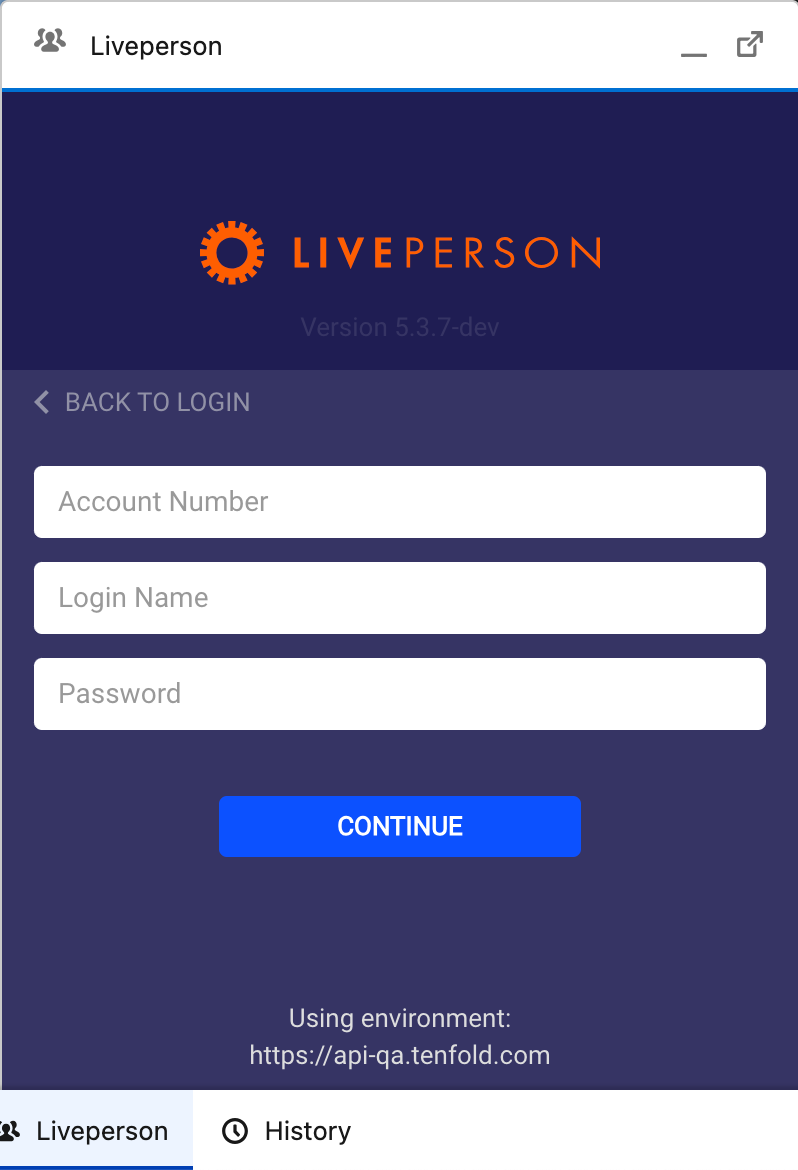
After providing their account ID, the agent will need to input the credentials.
Agent SSO
LivePerson has recently added the ability for agents to use SSO with their LP accounts, that is, instead of using credentials to authenticate with LivePerson, they can instead login with their identity provider such as Okta or Salesforce.
Salesforce Connector SSO
In order for SSO to work, LivePerson accounts must be migrated from the IDP initiated flow to the SP initiated flow and Oath. Please reach out to your account team to enable this.
For an account that has SSO enabled, this is what the agent would see:

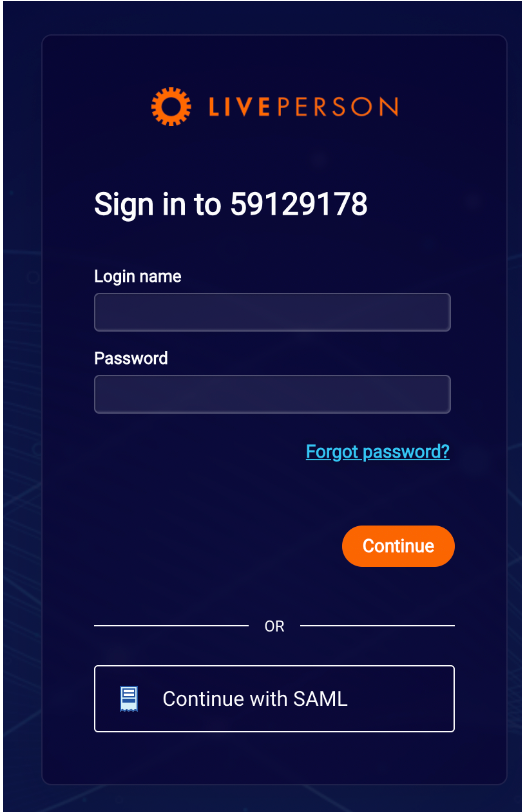
When SSO is enabled, agents have the ability to login with credentials as well as using SAML. It’s also possible to entirely disable credentials login for a brand, forcing agents to login using SSO. What that implies is that after providing their account ID, they will be taken directly to their identity provider webpage. If you would like to disable the option to login with credentials, you may reach out to your account team.
Once they click the “Continue with SAML“ button, they will be taken to their identity provider of choice to login, and then back to LivePerson.
Why do I need to provide the account ID
Whether SSO is enabled or not the agent is asked to provide the account ID to initiate authentication. That is required because the first time you access LivePerson, the website doesn’t know who you are or what are the settings for your account. When you provide your brand ID, LivePerson fetches the settings for your account and decides what options you have access to, as shown in the example videos above. It’s understood that we want to minimize clicks and information agent needs to provide, but this step cannot be avoided.
This section covers how to setup SSO in all the different touchpoints involved.
1.1 Configuring your IDP
There is a variety of Identity Providers and LivePerson should be able to support most IDPs. Fortunately, the technologies behind SSO (such as SAML) are well standardized, so as long as their IDPs implement SAML as per specification, their IDPs should work with LivePerson. This section covers instructions on how to setup two different identity providers.
Using Okta as an IDP
Before configuring the SSO application in Okta, we need to add some additional fields to Okta to hold information that needs to be sent to LP as part of the SAML authentication. To do so,
1 - Login to your Okta account with an admin user
2 - Go to the Directory > Profile Editor tab and locate the User (default) profile

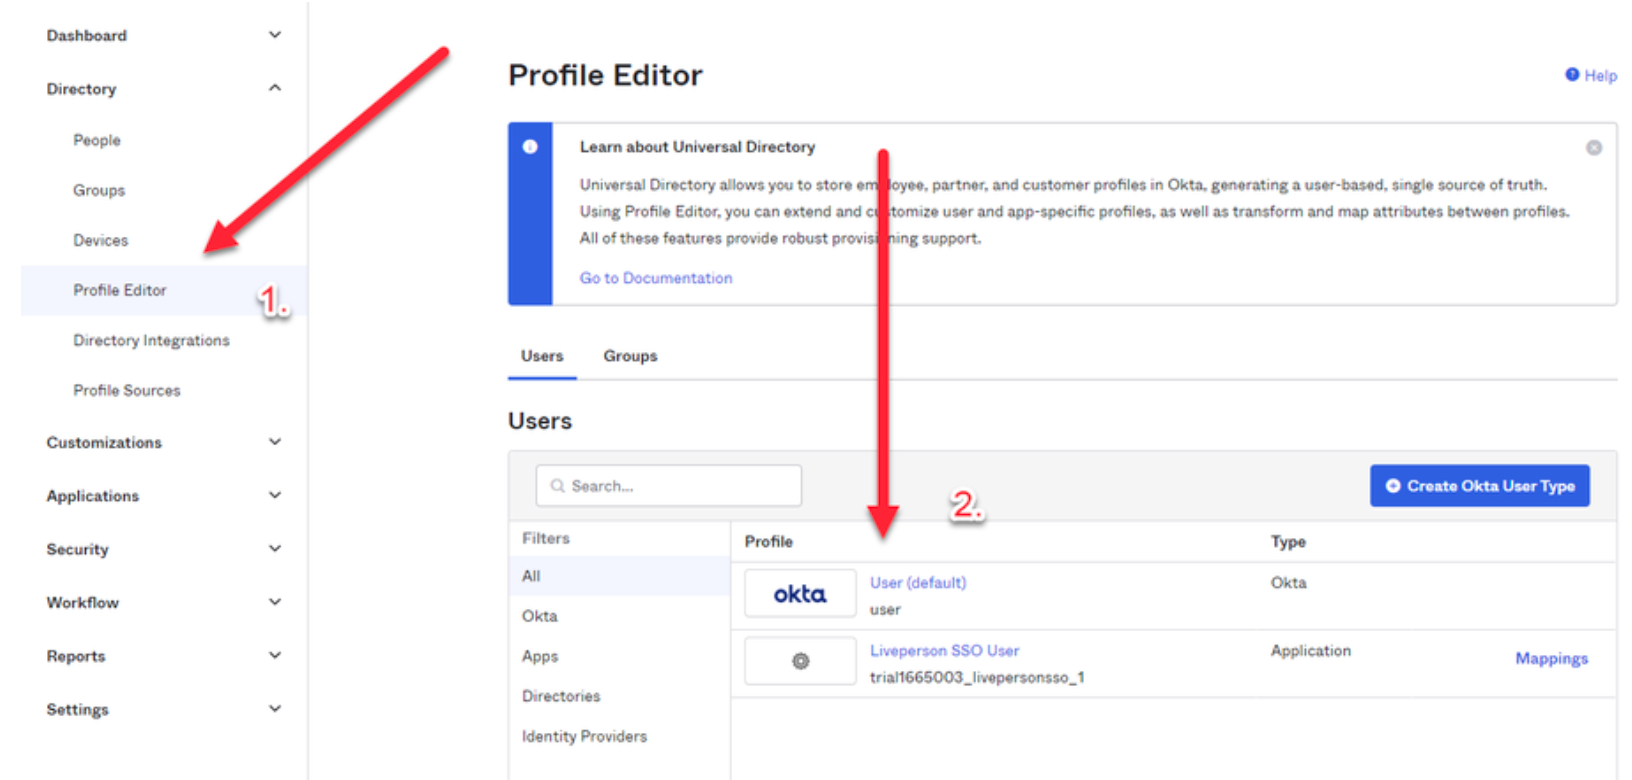
3 - Click on Add Attribute
4 - In the modal that opens, give the new attribute a display name and a variable name. All the other fields can be left as is. This field will be used to store the LivePerson account ID

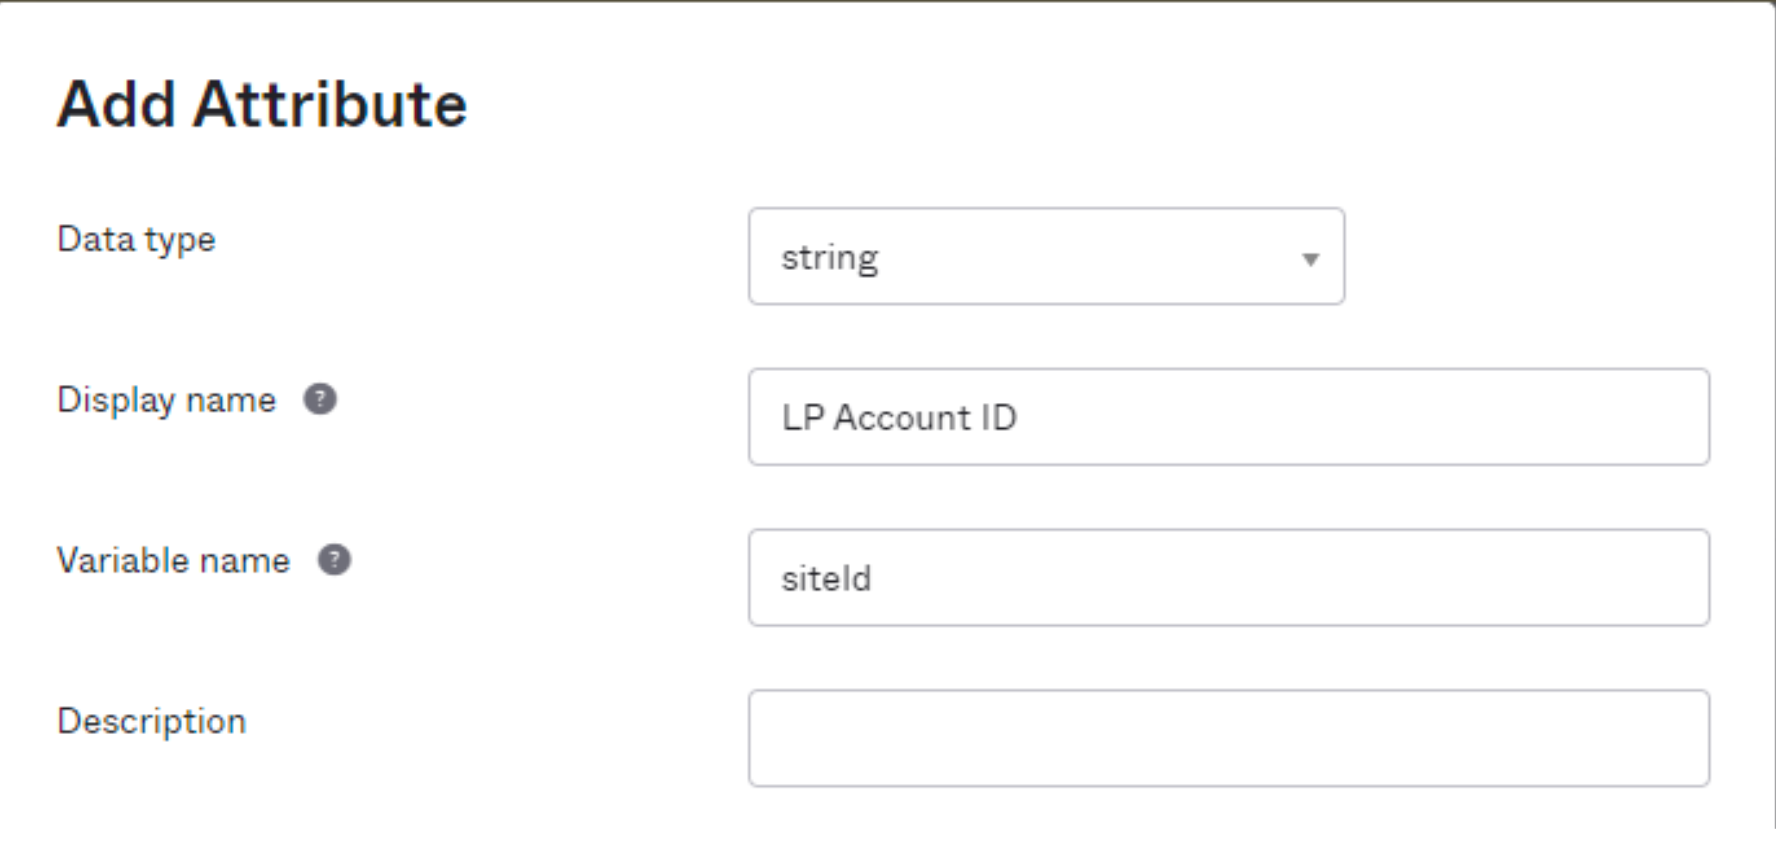
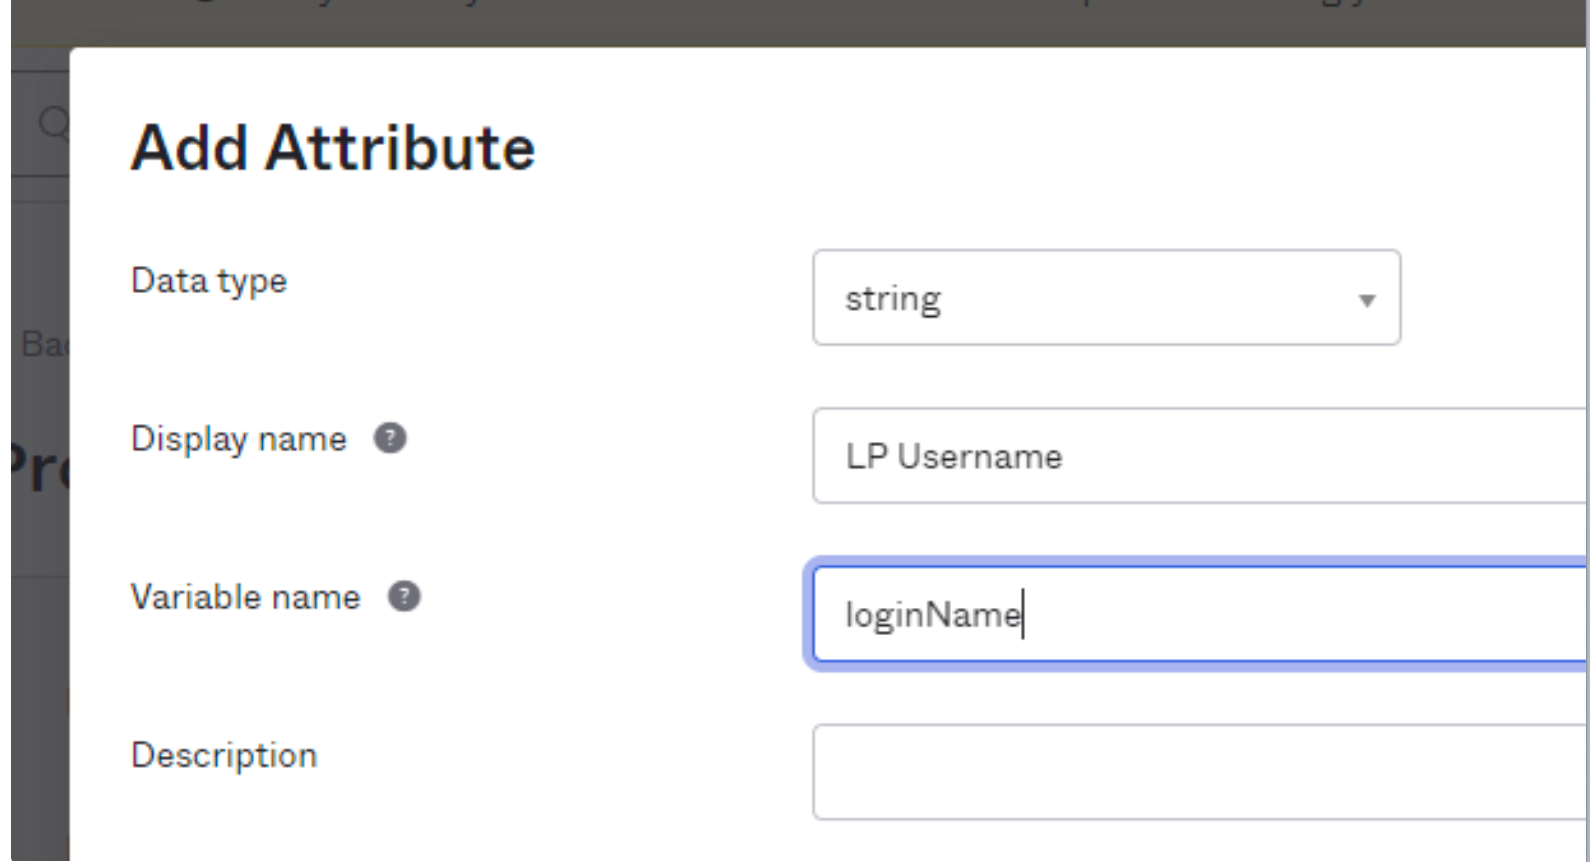
5 - Click in “Save and Add Another”. Repeat the step and create a second field to store the LivePerson username for each user:

It’s important to highlight that the instructions below are specific to the identity providers demonstrated and there will be differences for other identity providers
6 - Save and go to the Directory > People tab
7 - For each user in the “People“ list and open the user profile:

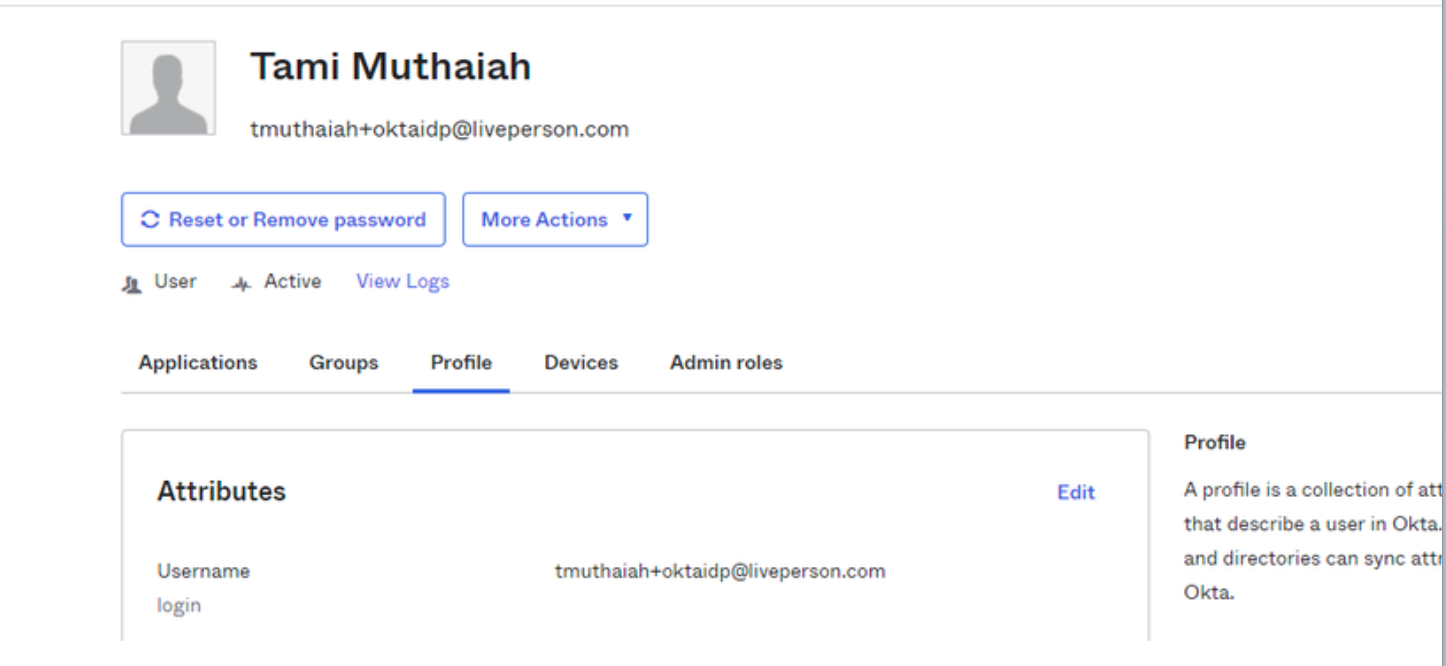
8 - Click on Edit and add the LivePerson brand ID and LivePerson username for that user in the two new attributes you created in the previous steps:

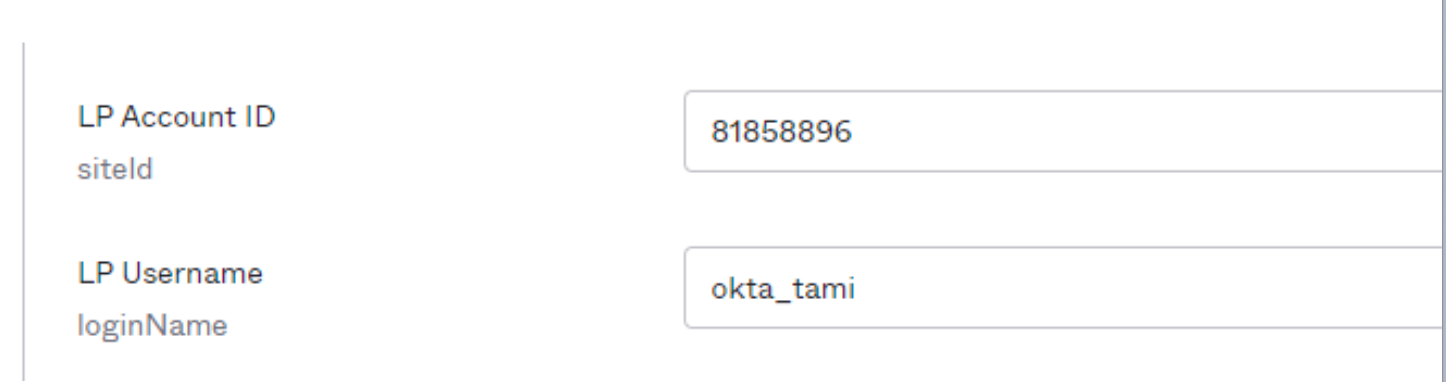
9 - Save and repeat for other users.
Once that’s done, we’re ready to create the SSO app in Okta
1 - Login to your Okta account with an admin account
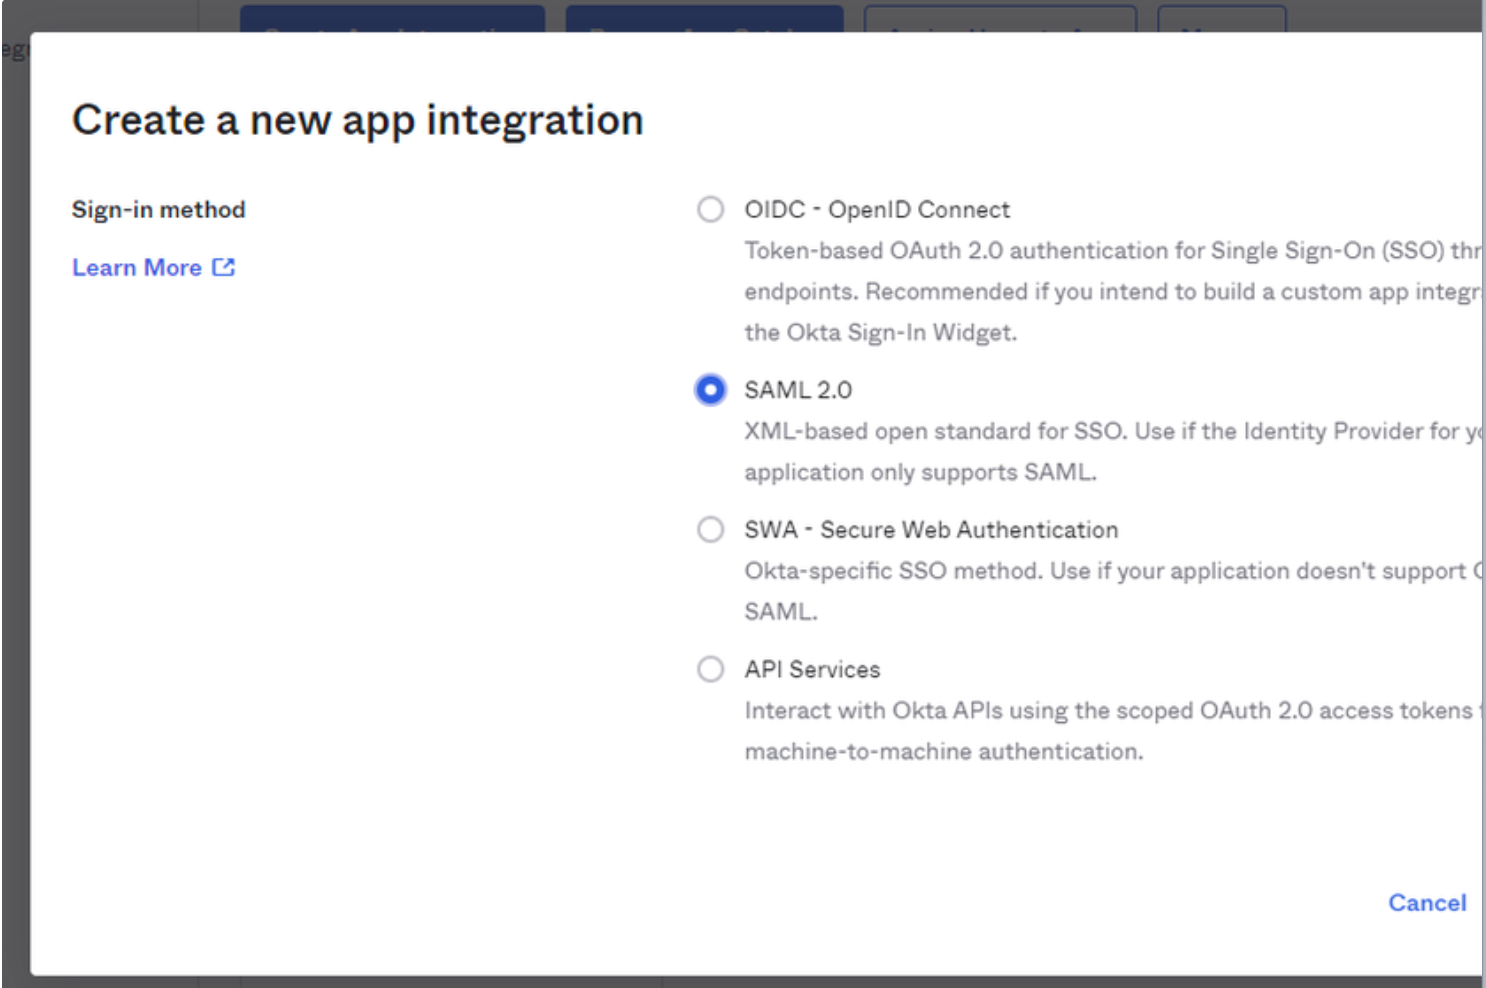
2 - Go to the “Applications“ tabs and click in “Create App Integration“


3 - In the modal that opens, select SAML 2.0 and click “Next”

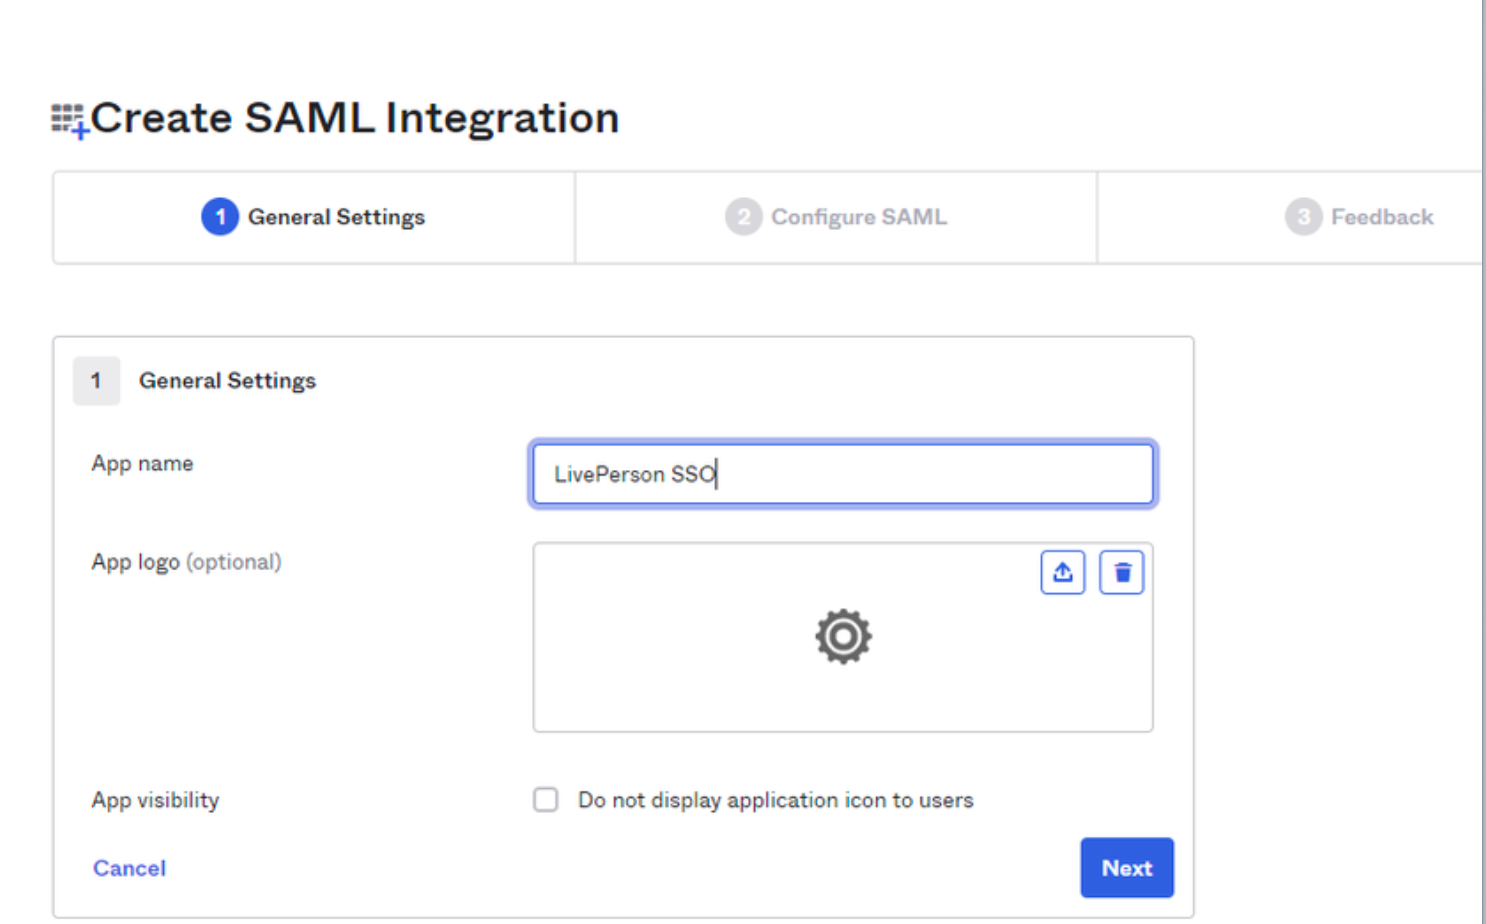
4 - Give your app a name and an optional icon:

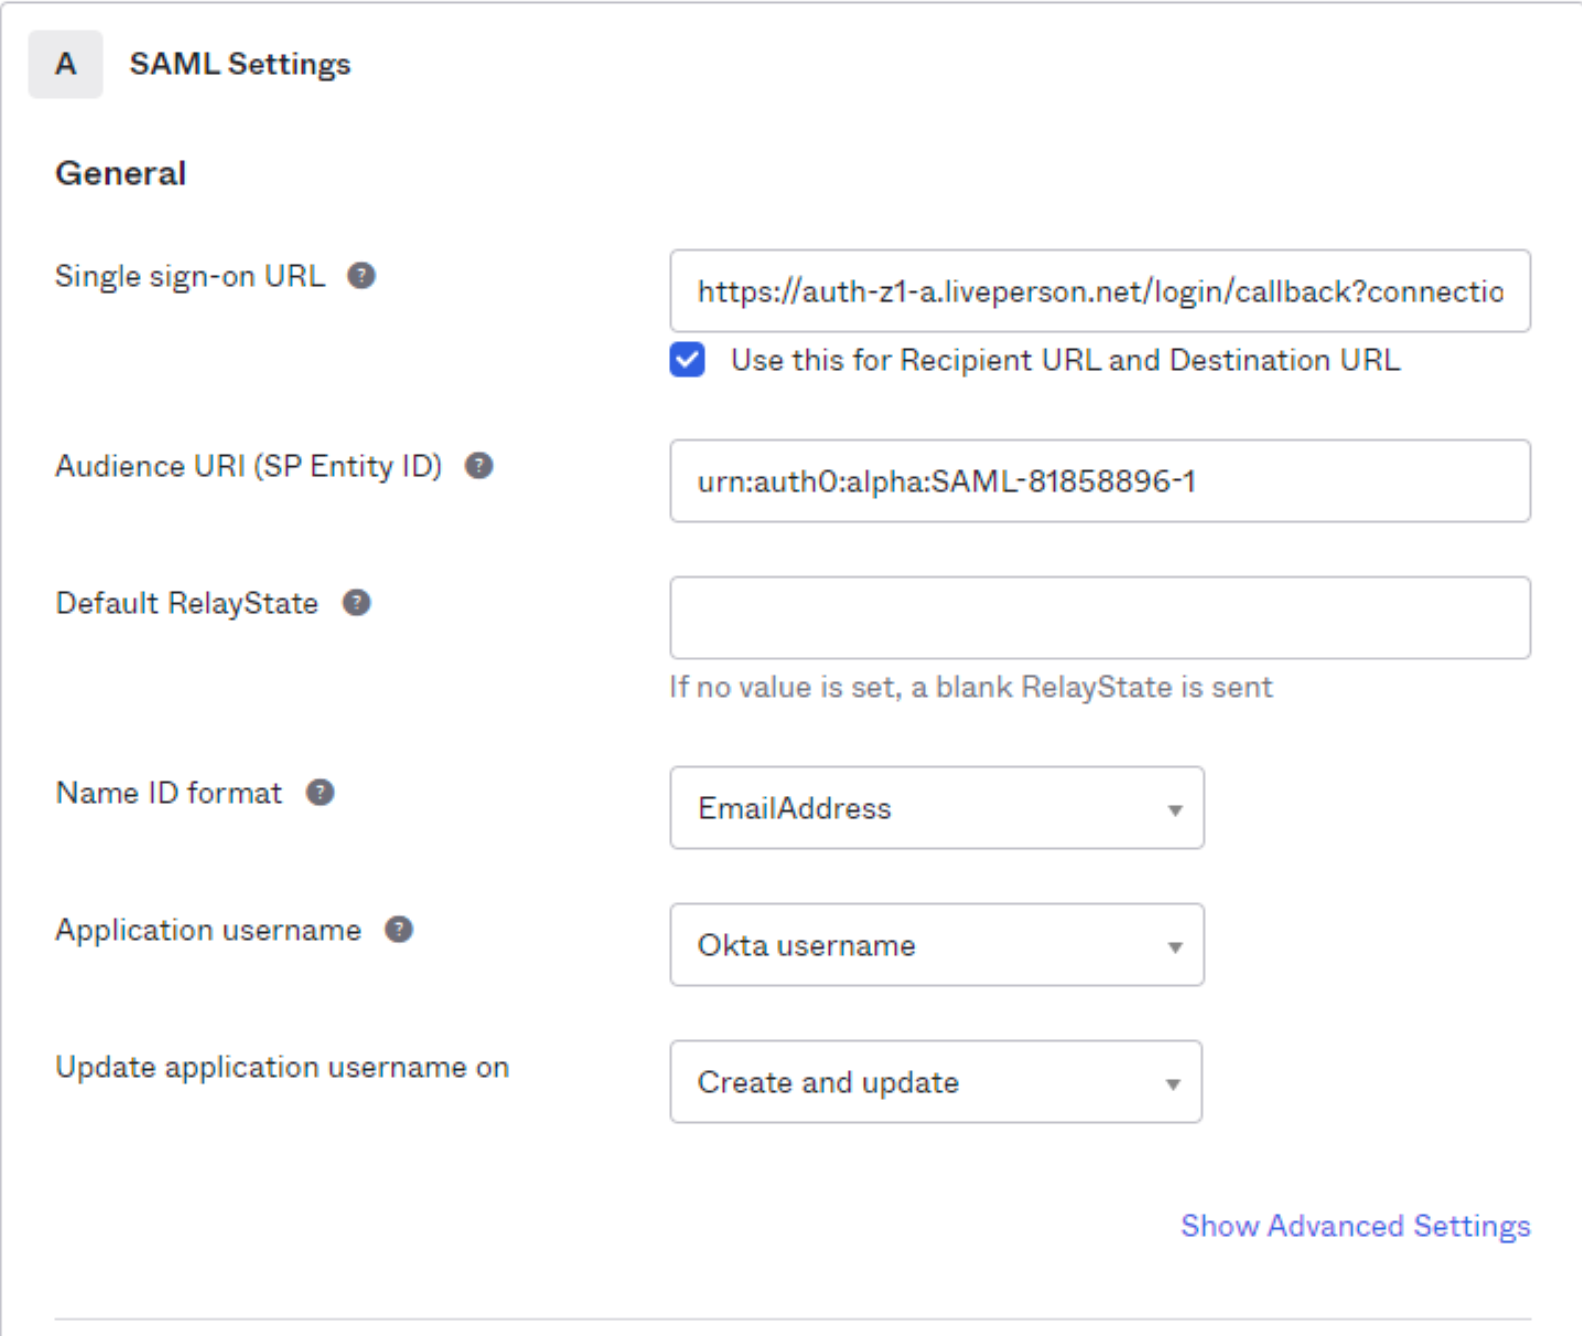
5 - In the next screen, provide the following fields:
Single sign-on URL: https://AUTH0_DOMAIN/login/callback?connection=CONNECTION_NAMEAudience URI (SP Entity ID):
urn:auth0:AUTH0_DOMAIN:CONNECTION_NAMEWhere
AUTH0_DOMAIN and CONNECTION_NAME should be replaced according to the instructions found in this document

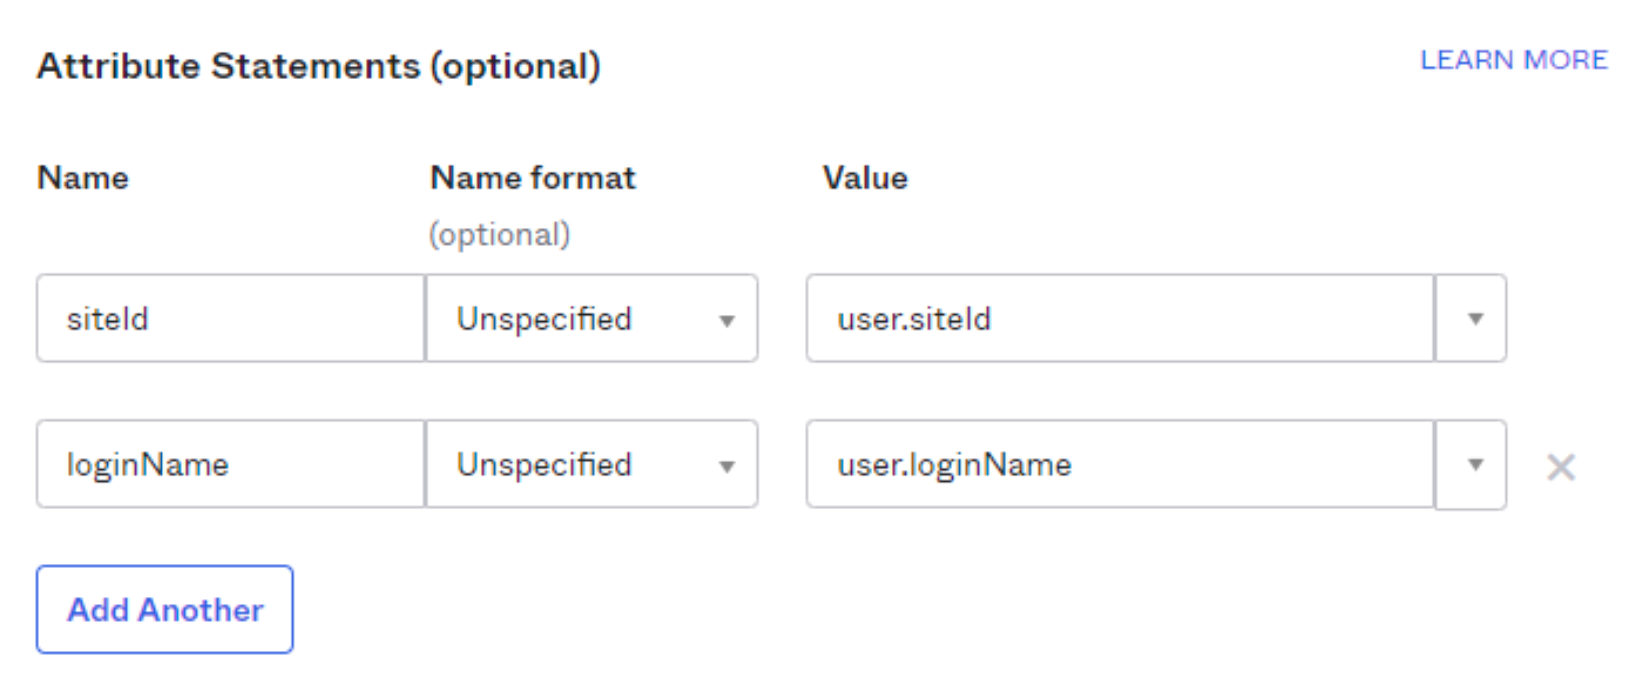
6 - scroll down and in the “Attributes Statements“ section, add two new fields like below:
Note that the values in the “Name“ column must be siteId and loginName. The values in the “Value“ column
must be user.FIELD_NAME where FIELD_NAME is the “variable name“ you gave to the custom attributes you created in the previous steps. For example, if you created a custom attribute called liveperson_account_id to store the account ID, the “Value” in the screenshot above would be user.liveperson_account_id

7 - Hit next
8 - In the “Feedback“ section, just hit “Finish”
9 - Your app should be visible under Applications > Applications:

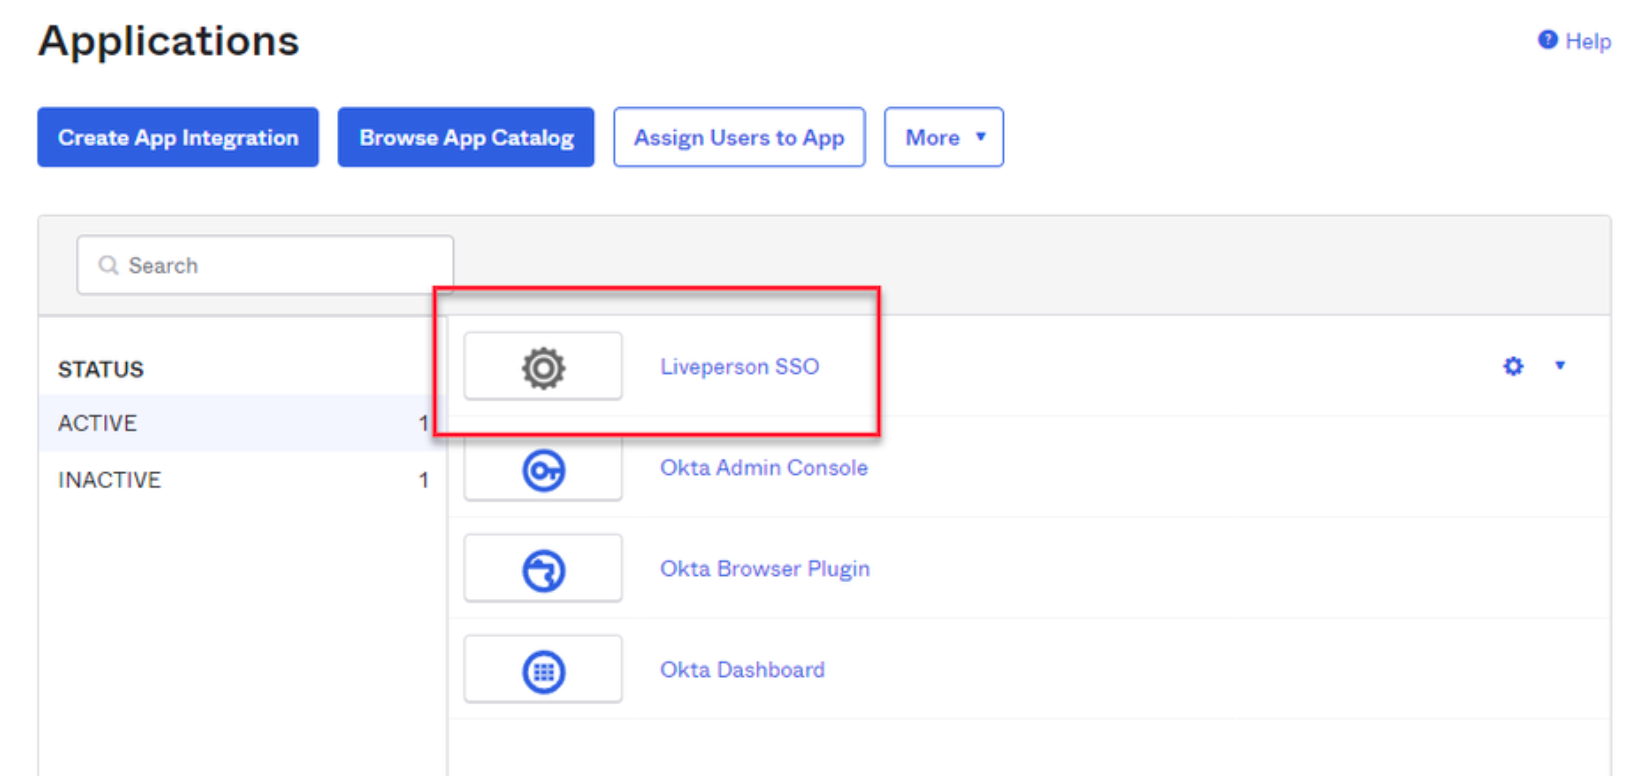
10 - Click on your app and go to the “Sign On” tab

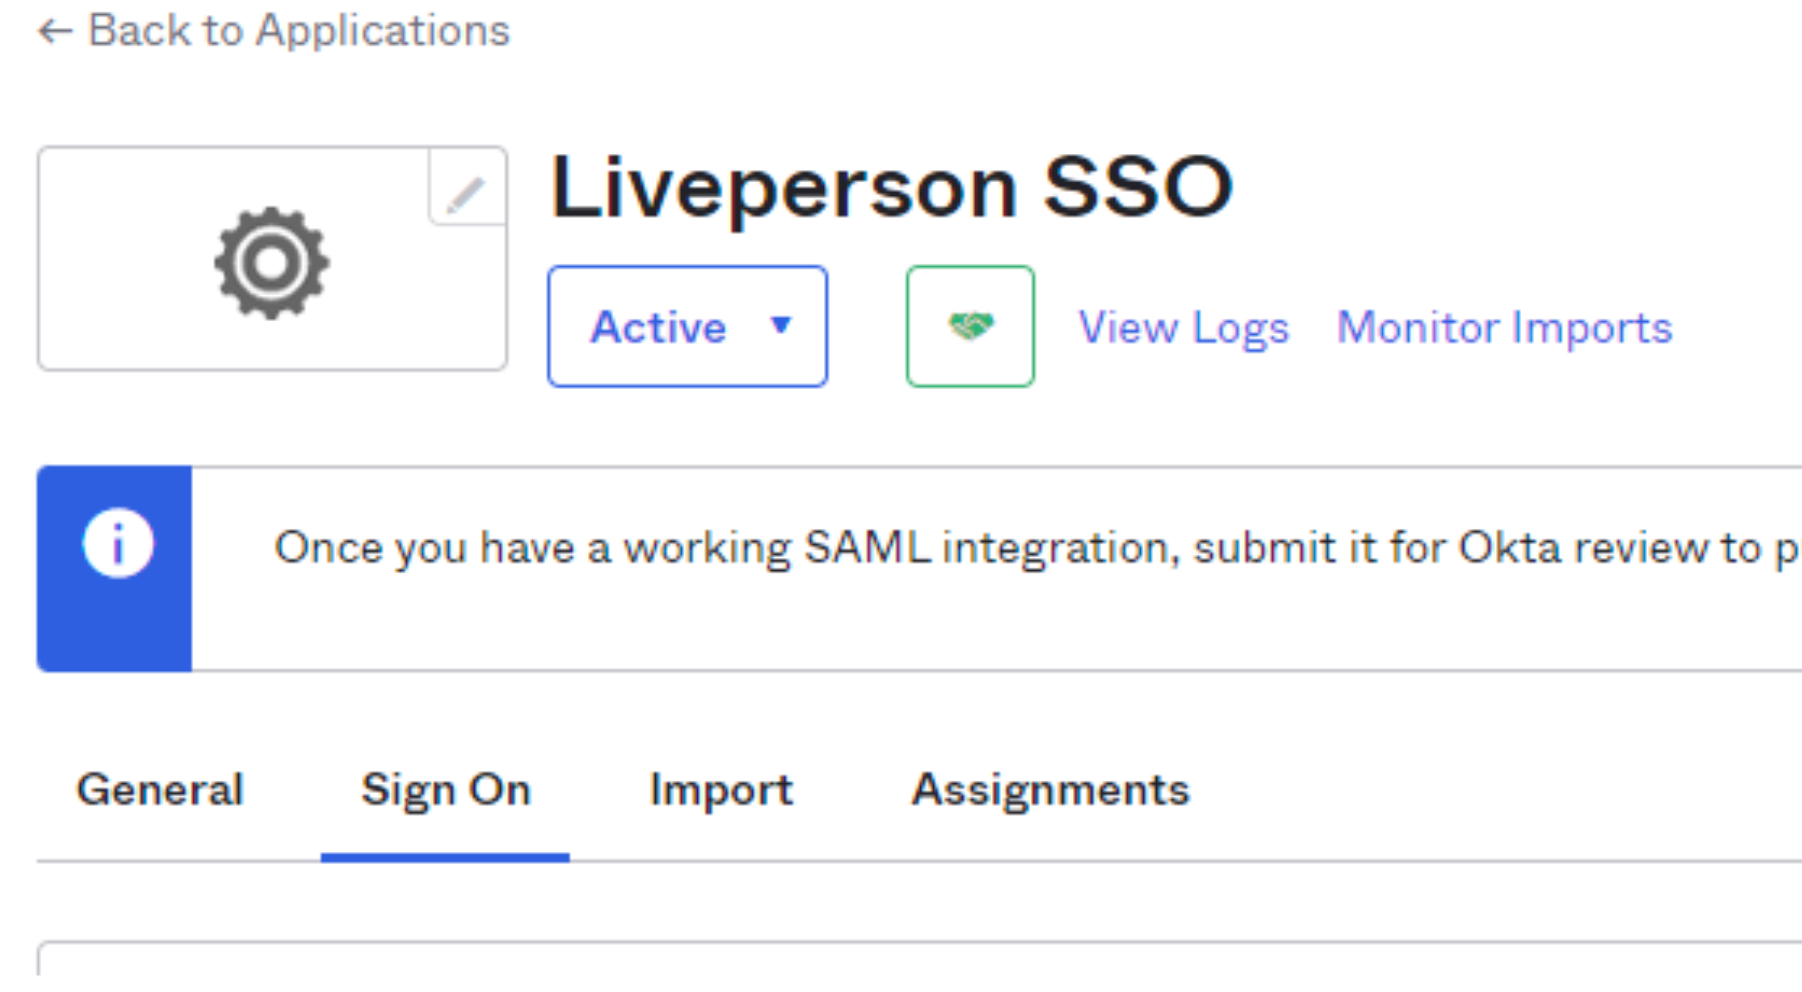
11 - In the SAML 2.0 section, expand the details and locate the “Sign on URL“. This value needs to be sent to the security team when you ask them to enable SSO for your LP account.

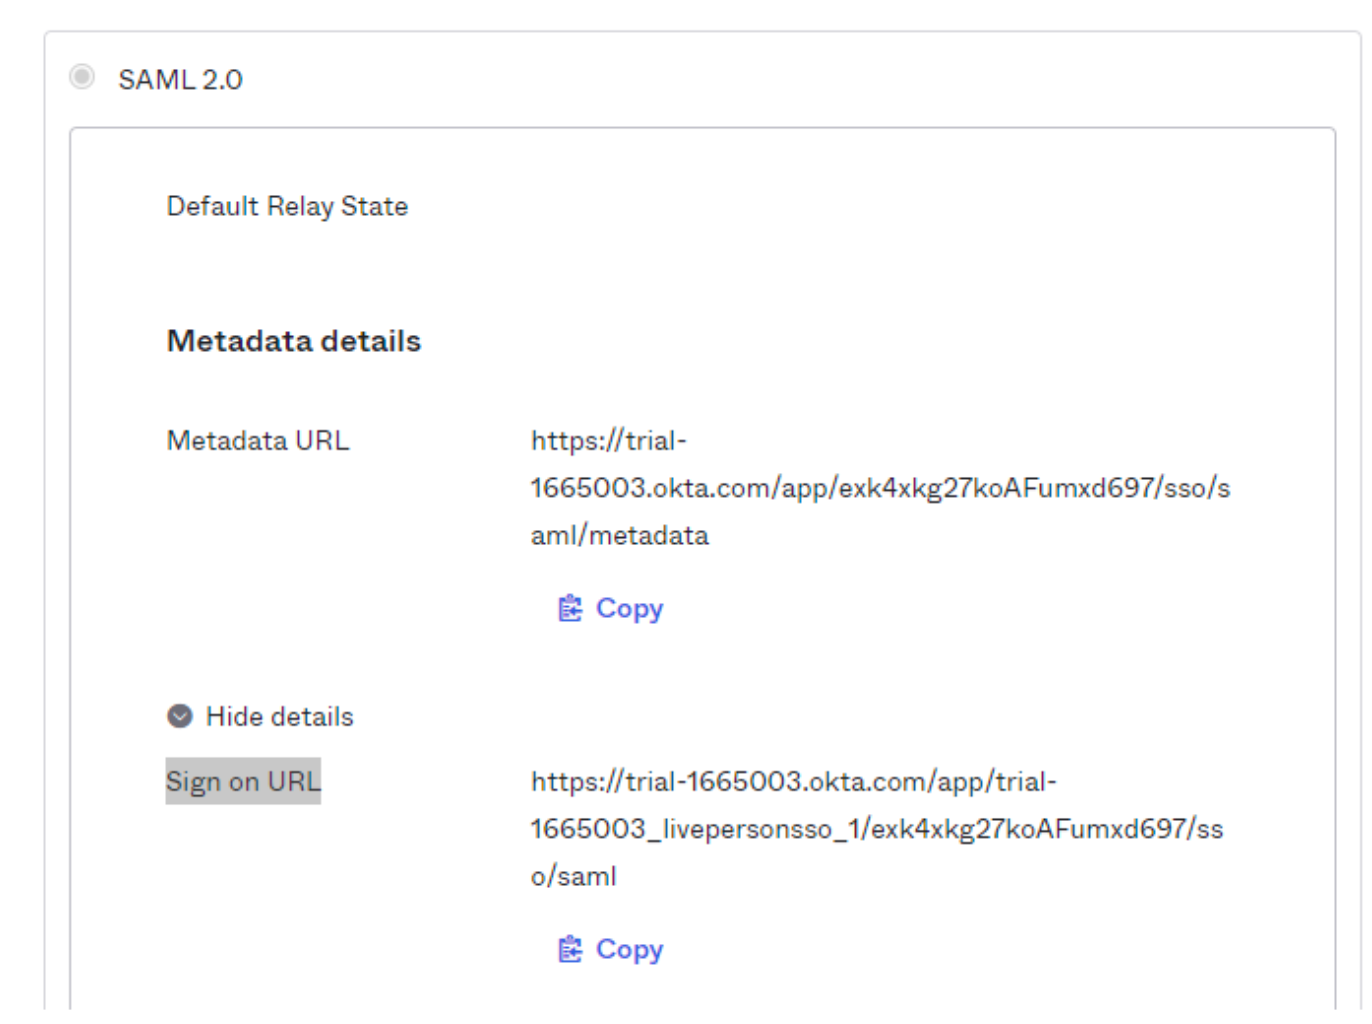
This step is effectively instructing Okta what information to pass to LivePerson to help it locate what agent has logged in. The siteId field informs the brand ID, and the loginName contains data of the agent username.
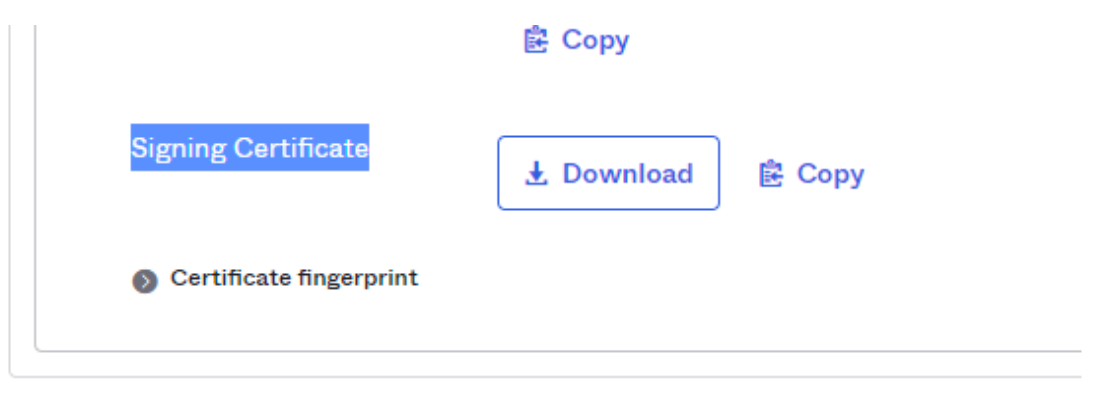
12 - A bit further down, click in “Download“ to download the signing certificate. This also needs to be sent to your LivePerson team when enabling SSO for your LivePerson account

13 - Now you have to add assign this app to your users. Click in the “Assign Users to App” button seen in the screenshot above
14 - In the next screen, select your app, and the users that should be assigned to it:

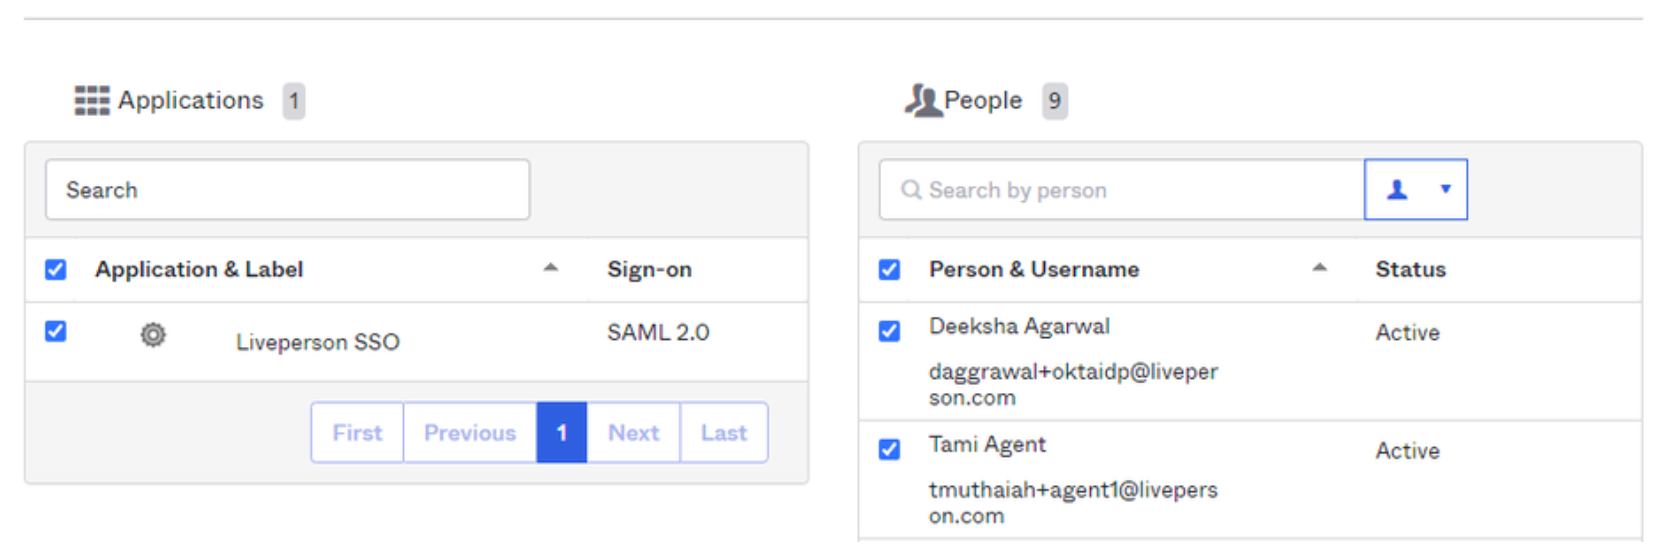
15 - Hit “Next” and then “Confirm Assignments“
After you take all the steps above, your Okta account should be ready to use as your identity provider. Don’t forget to send the “Sign on URL“ and the “Signing Certificate“ to the security team when you ask them to enable SSO for your LP account.
1.2 Enabling and configuring SSO in LivePerson
After completing the steps above provide the following to your LivePerson account team:
- Brand ID
- IDP certificate
- IDP sign-in URL
If you wish you may also ask to have credentials login to be completely disabled.
1.3 Configuring SSO in Tenfold
On the Tenfold side of things the setup is quite simple. All you need to do is:
1. Go to Company Settings > Messaging in the Tenfold Dashboard:


2. If you do not have the “Enable Messaging for this organization“ option checked, go ahead and do so:

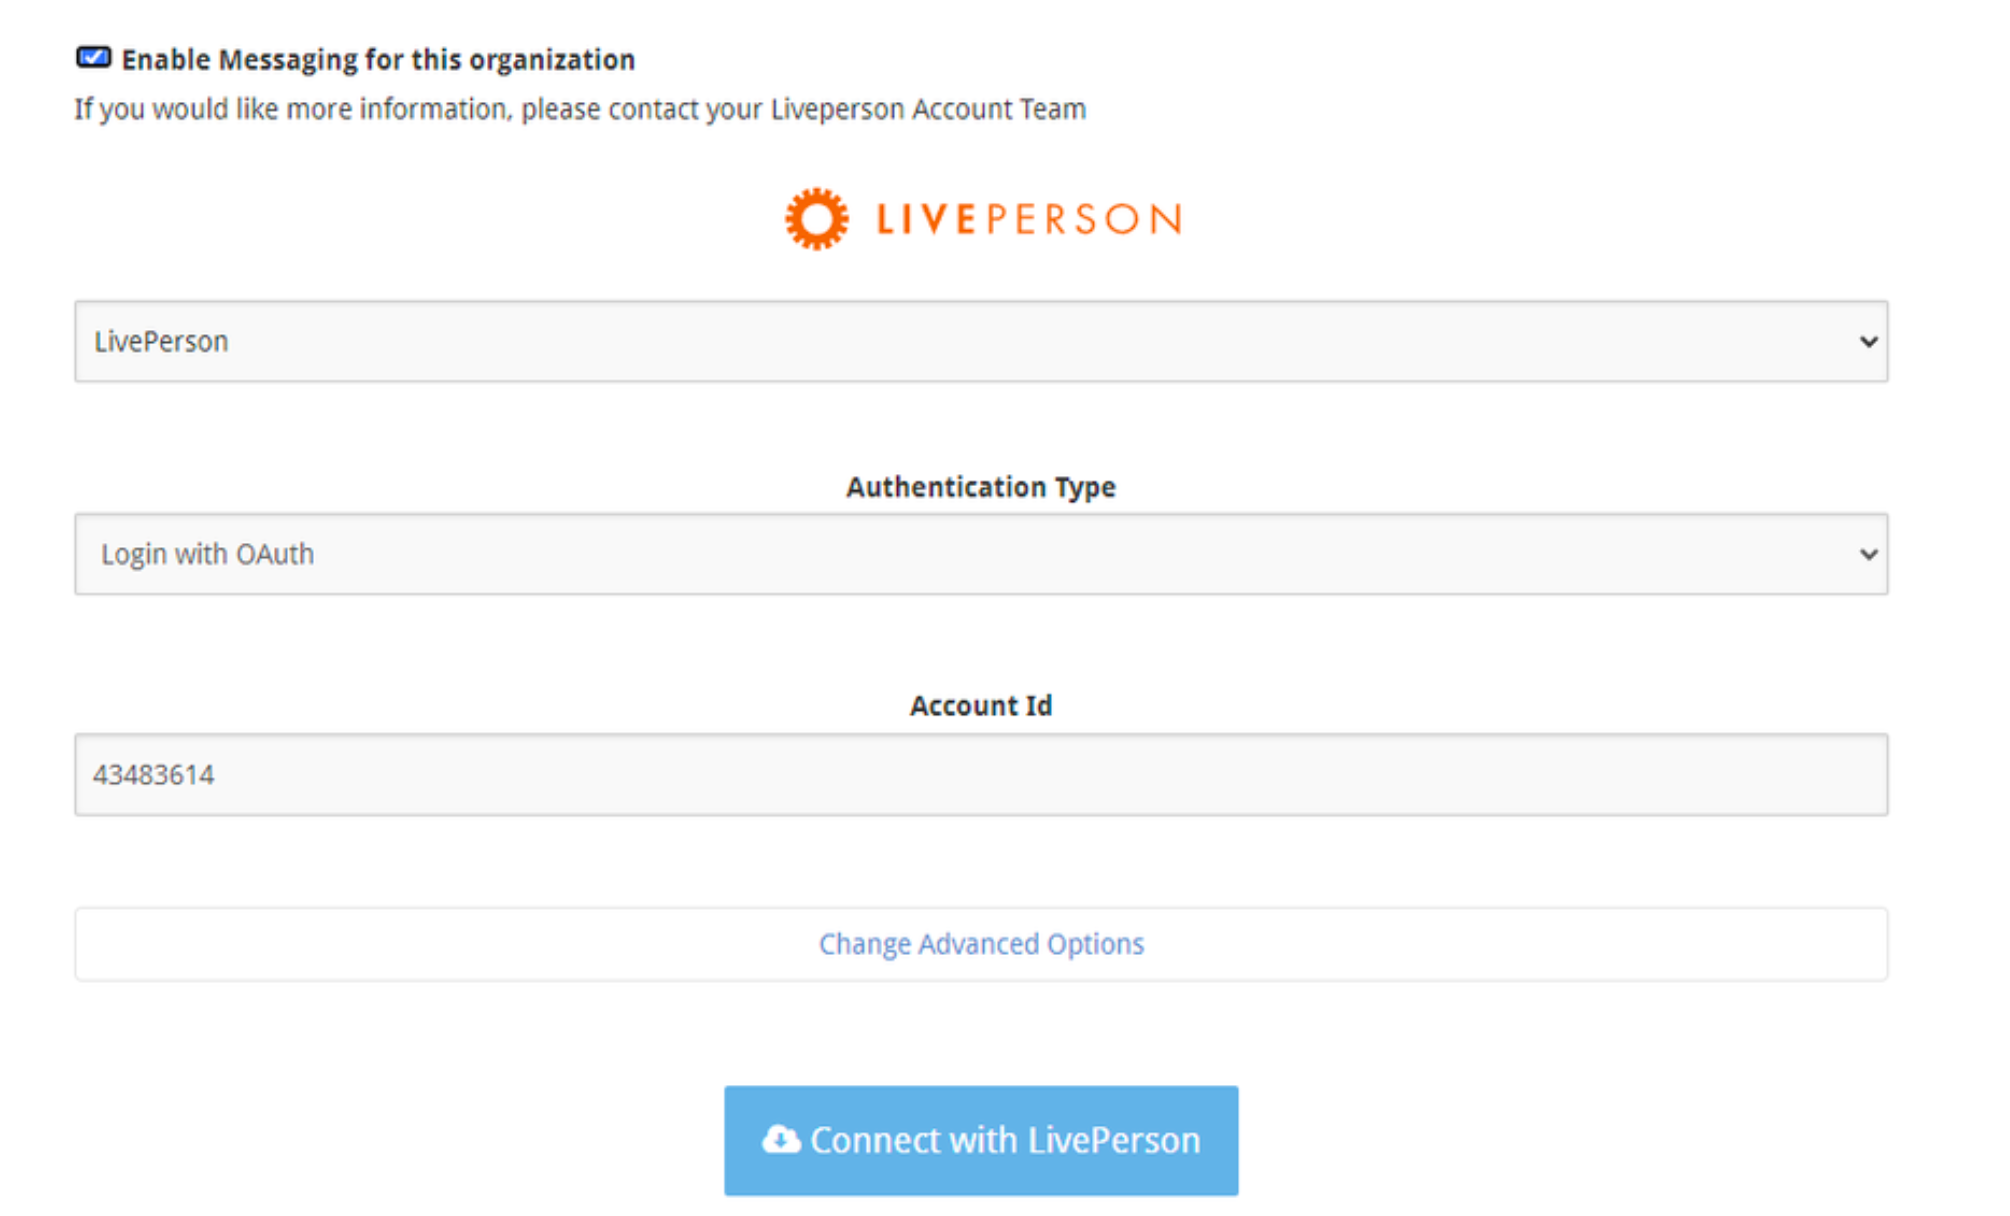
3. In the Authentication Type, select the “Login with OAuth“ option
4. Click “Save”
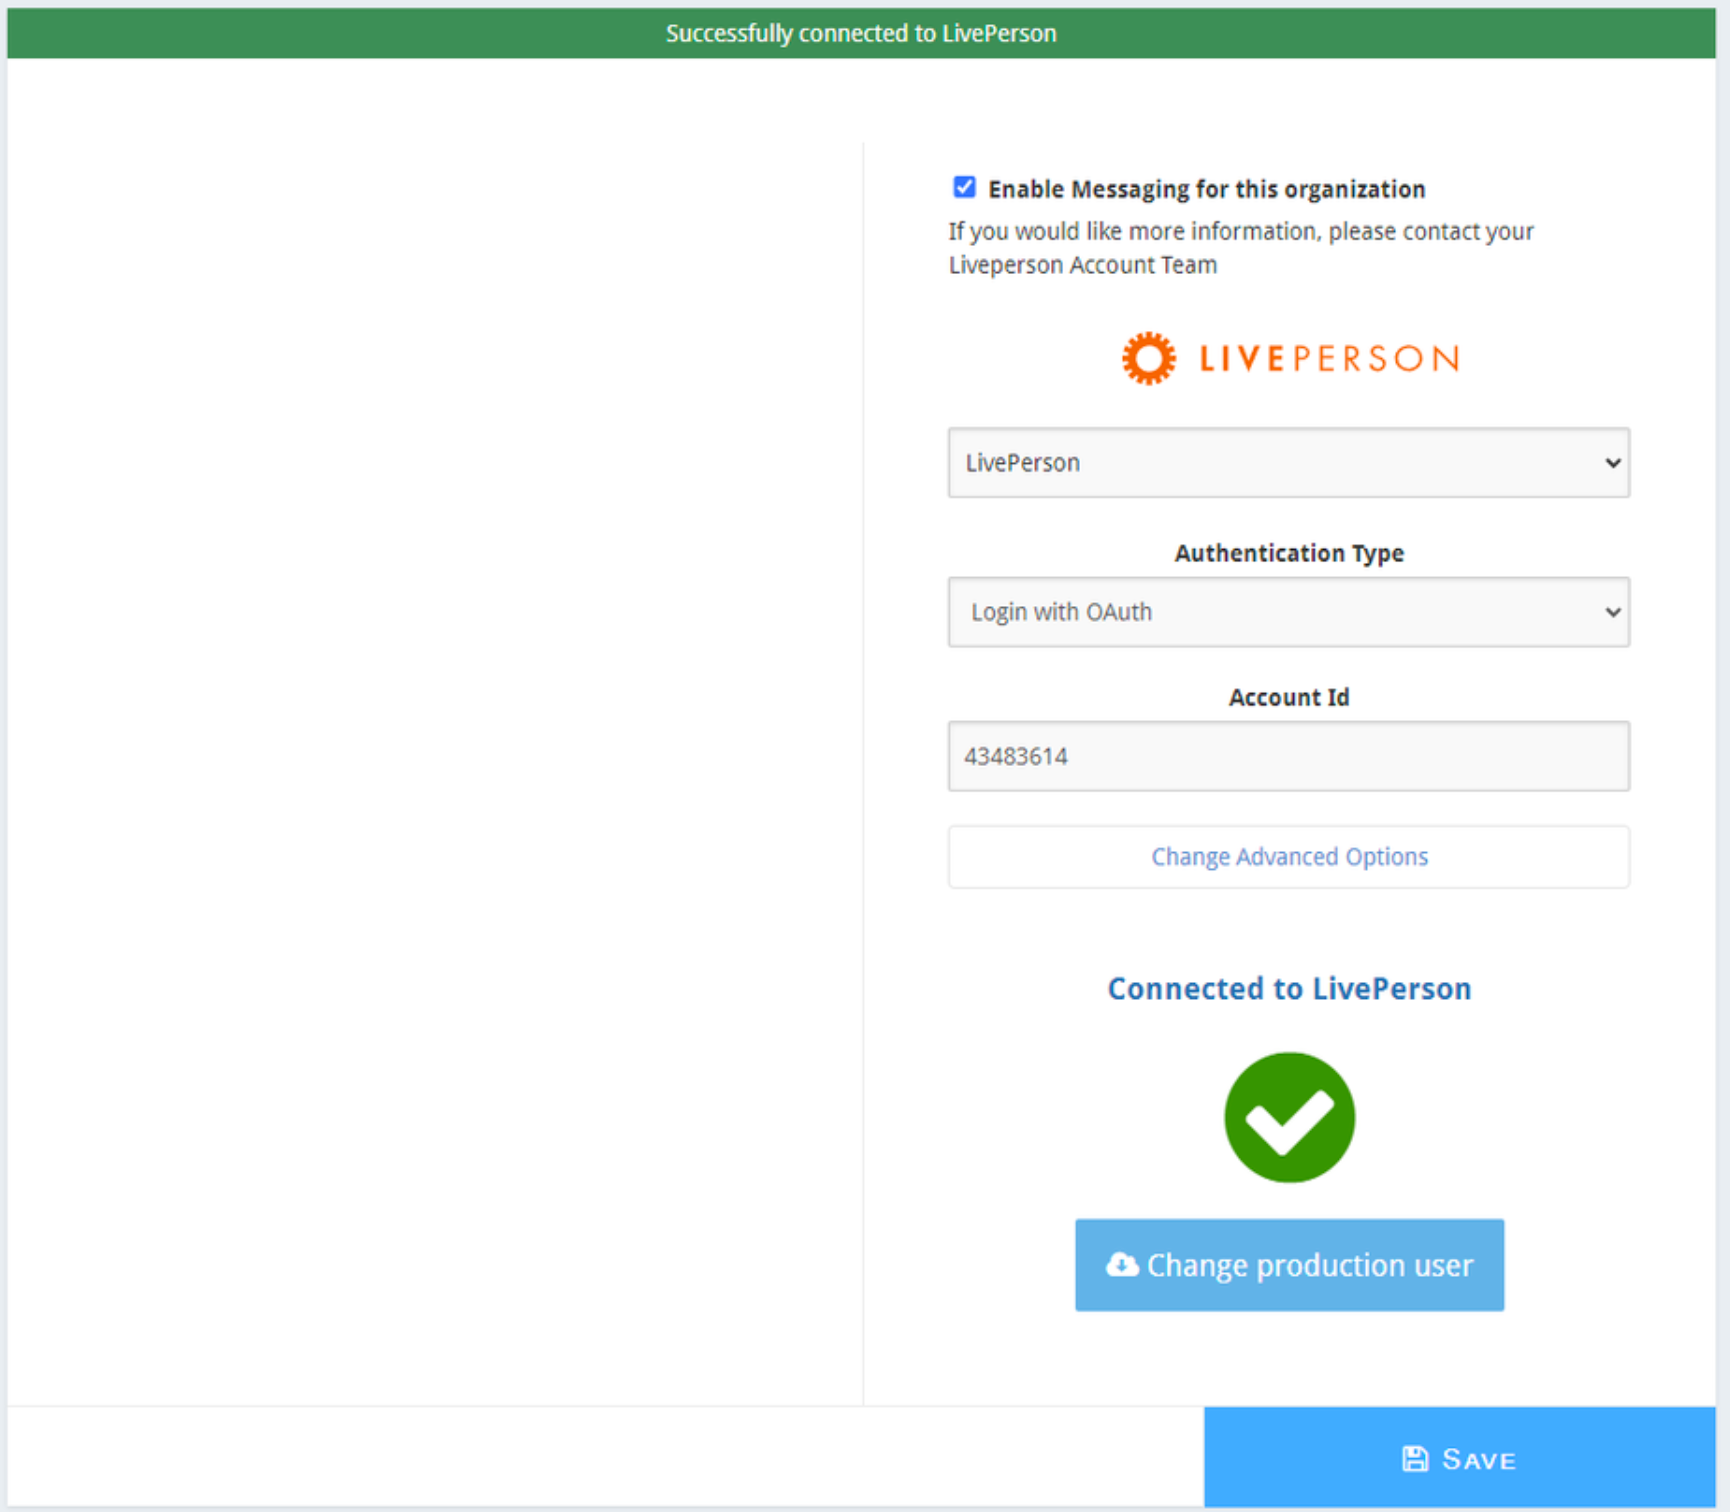
5. Click in Connect with LivePerson. You will be taken to LivePerson and then to your identity provider for authentication. Once you successfully authenticate, you should be taken back to dashboard with a confirmation that everything worked:

1.4 Auto populating the Account ID in the Salesforce Connector
As explained above, providing the Account ID is the first step in the SSO flow and it’s pretty much what tells Tenfold (and LivePerson) what type of login and what settings to use when logging you in. It is, however, possible to auto populate the account ID in Salesforce so agents don’t need to manually type it every time they login.
To do so,
1 - Go to Salesforce > Setup
2 - In the quick find box, search for Call Centers
3 - In the Call Centers page, look for LivePerson Embedded UI

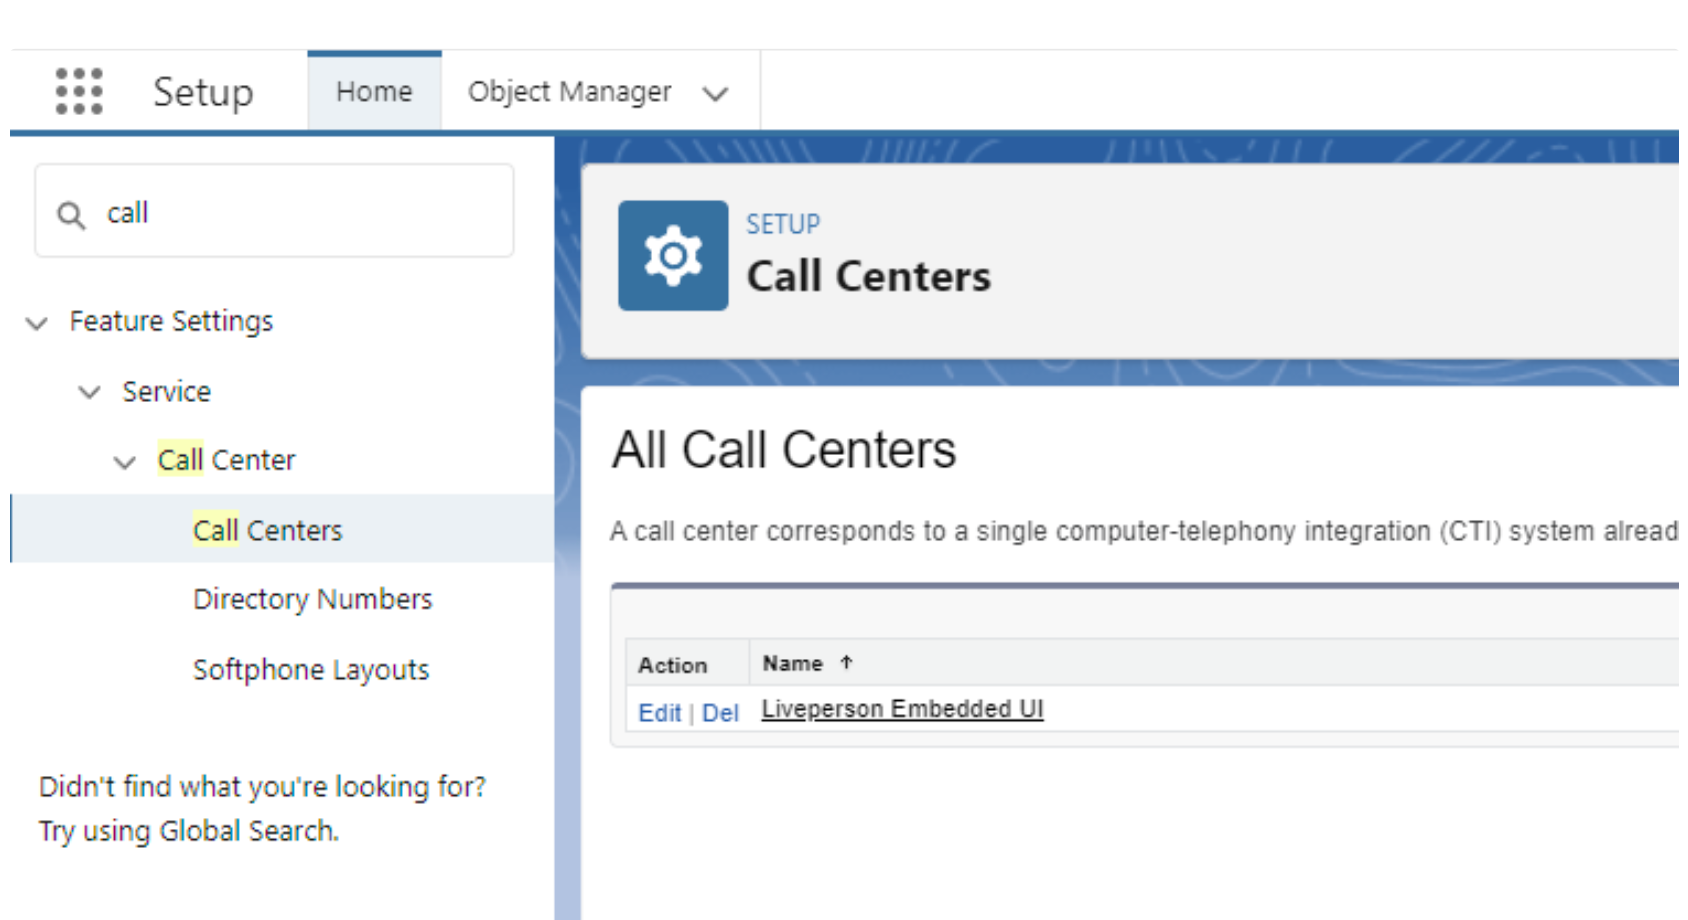
4 - Click on Edit
5 - In the field CTI Adapter URL, add &sso_domain=YOUR_ACCOUNT_ID at the end of the value currently in there. The resulting value of the field should be something like
6 - Click on Save
Step 5: Enable rich features to enhance the agent experience
Features allow your Organization to customize the application experience. Features management can be found in your Admin Dashboard at the top. Below are the set of features that can be enabled for the LivePerson application.
Cases & Opportunities
Enabling Cases and Opportunities allows your agents to link their customer interactions to existing (open or closed) cases or create a new case or opportunity while interacting with the customer. All cases and opportunities are listed conveniently under the suitcase and binoculars icons in the Agent UI, with a case or opportunity creation button (depending on the user selection) located at the bottom of the tab
Out of the box, the Create New Case or Opportunity button opens a window and sends the agent to the standard case or opportunity creation page in your CRM. It will pre-populate information such as phone, email, the contact/lead/account name and the case/opportunity number accordingly.
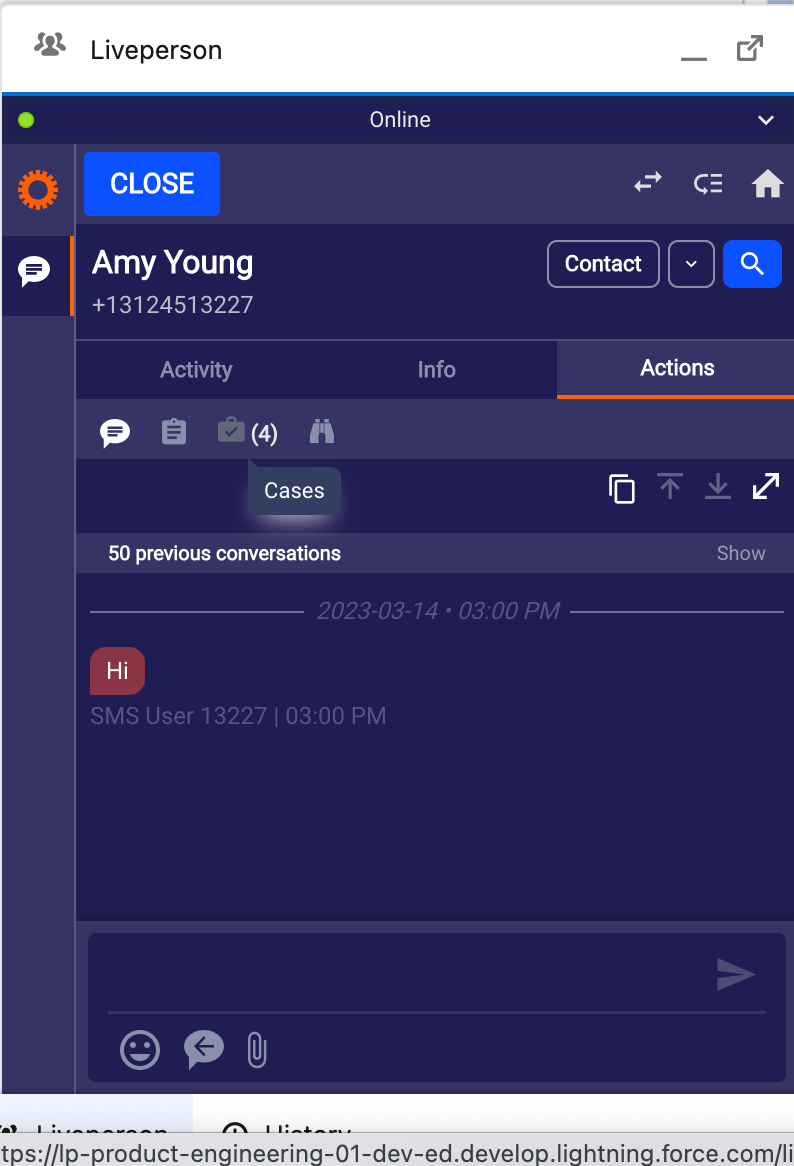
Create or relate a case or opportunity
- Begin by clicking a contact in your call history, or by searching for a contact in the search bar and clicking a contact in your search results.
- In the Actions tab, click the Cases icon or the Opportunities icon. After clicking these icons, the cases or opportunities associated with the contact display. The number on the briefcase icon indicates how many Cases and Opportunities already exist for this record. Admins can configure additional settings for what is shown (both Open and Closed Cases, or just Open Cases) and if they are automatically related in the Features section of the Dashboard.
- To create a new case or opportunity, click Create New Case or Create New Opportunity to open the CRM page when you can create it.

Cases
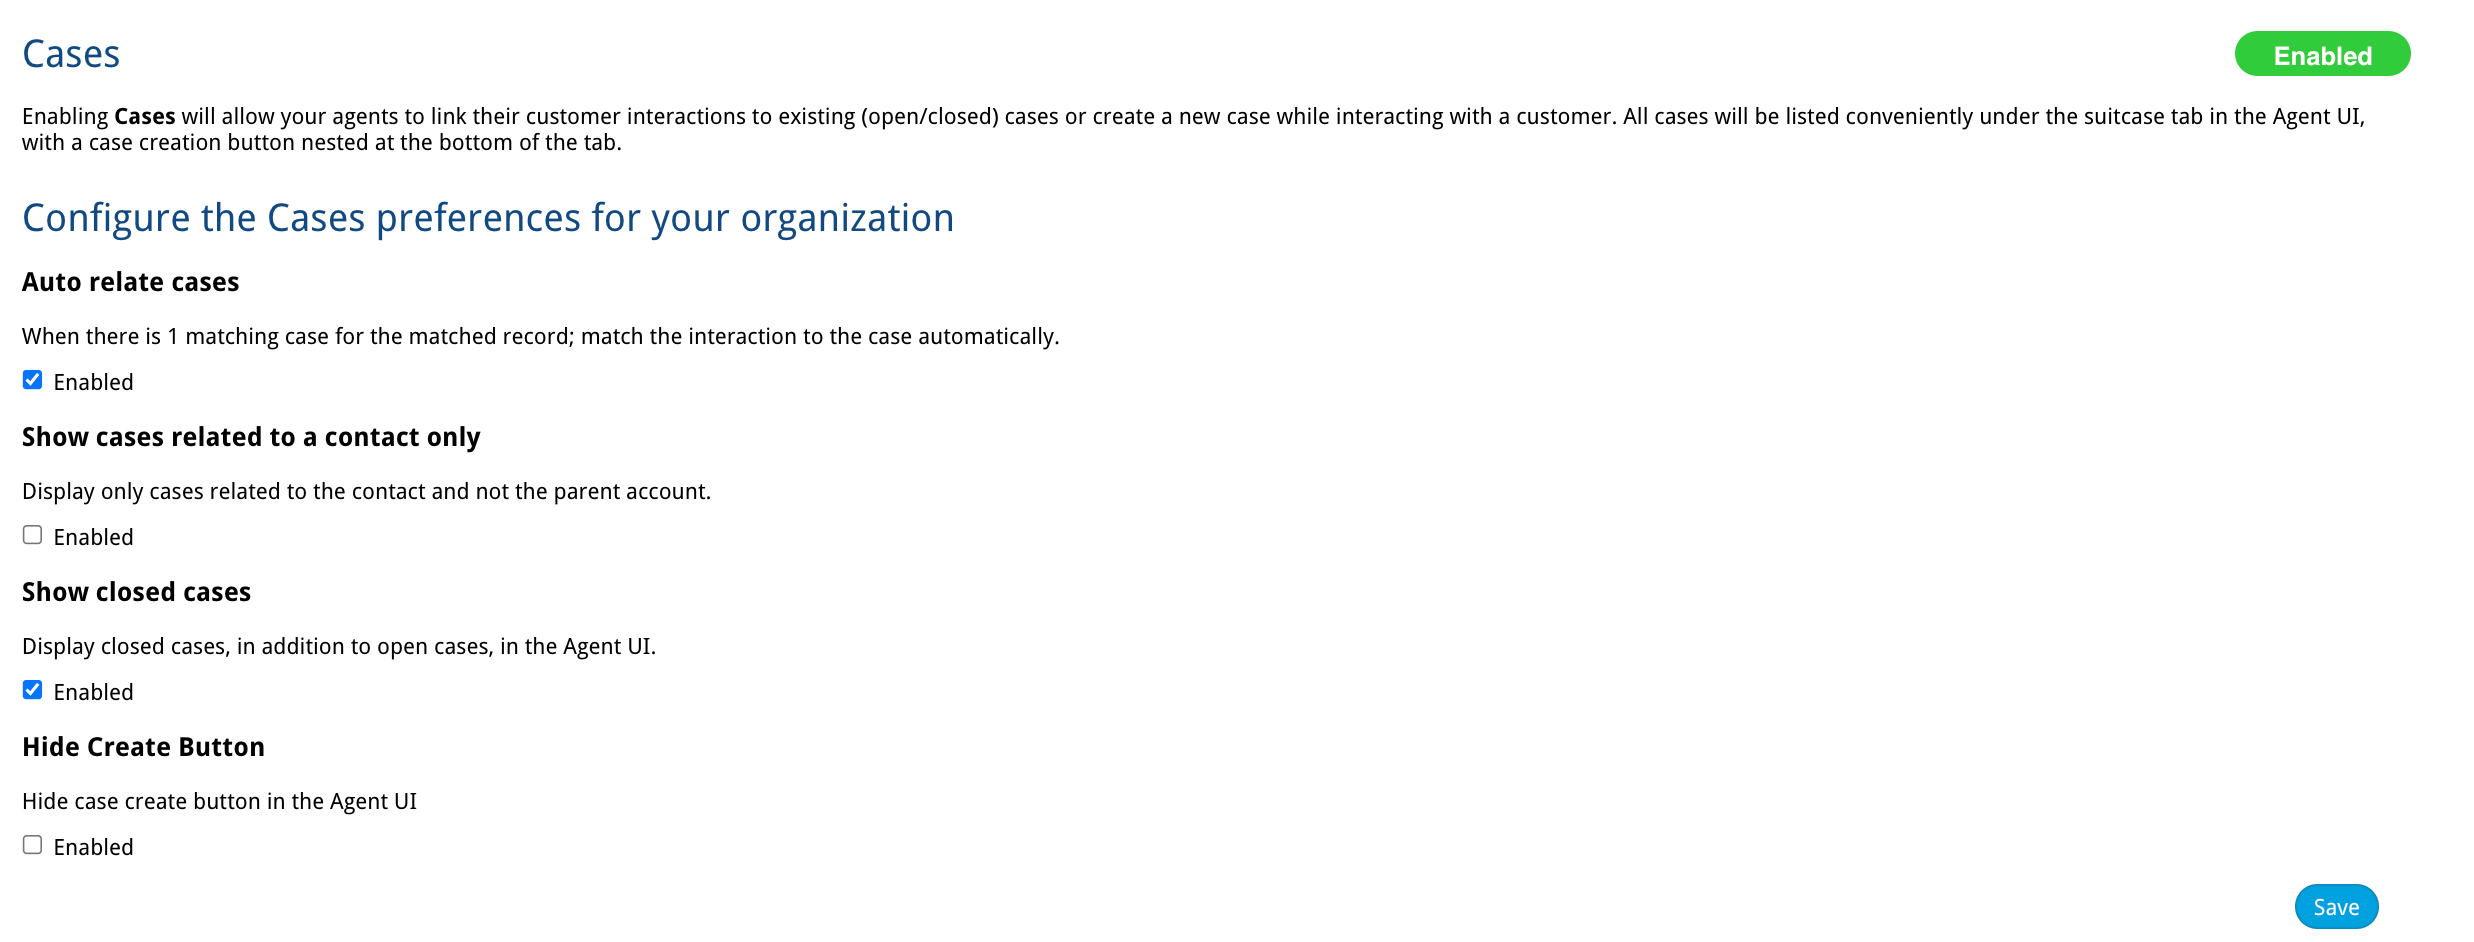
Preferences
Auto relate cases
Enabling this preference automatically associates single-matched calls within the UI to an open case that relate to that entity record. This only occurs when there is only one resource to relate to. If Auto relates Opportunities is also enabled, relating to Opportunities will trump Cases.
NOTE: When more than one resource is present, no resource is auto-related because, during conversations without human interaction, auto-relating resources would result in several incorrectly matched resources.
Show cases related to contact only
Enabling this preference filters the displayed cases to only those cases related to the Contact. By default, cases for the Contact parent account are shown, too.
Show closed cases
Enabling this preference shows Closed Cases related to the Contact or Account as well. By default, only Open Cases display.
Hide Create button
Enabling this preference hides the create case button in the Agent UI.

Additional notes
- If you do not see the expected Case or Opportunity listed, please make sure you have a matched Contact or Account.
- The UI only shows the ten most recent Cases or Opportunities associated with a record.
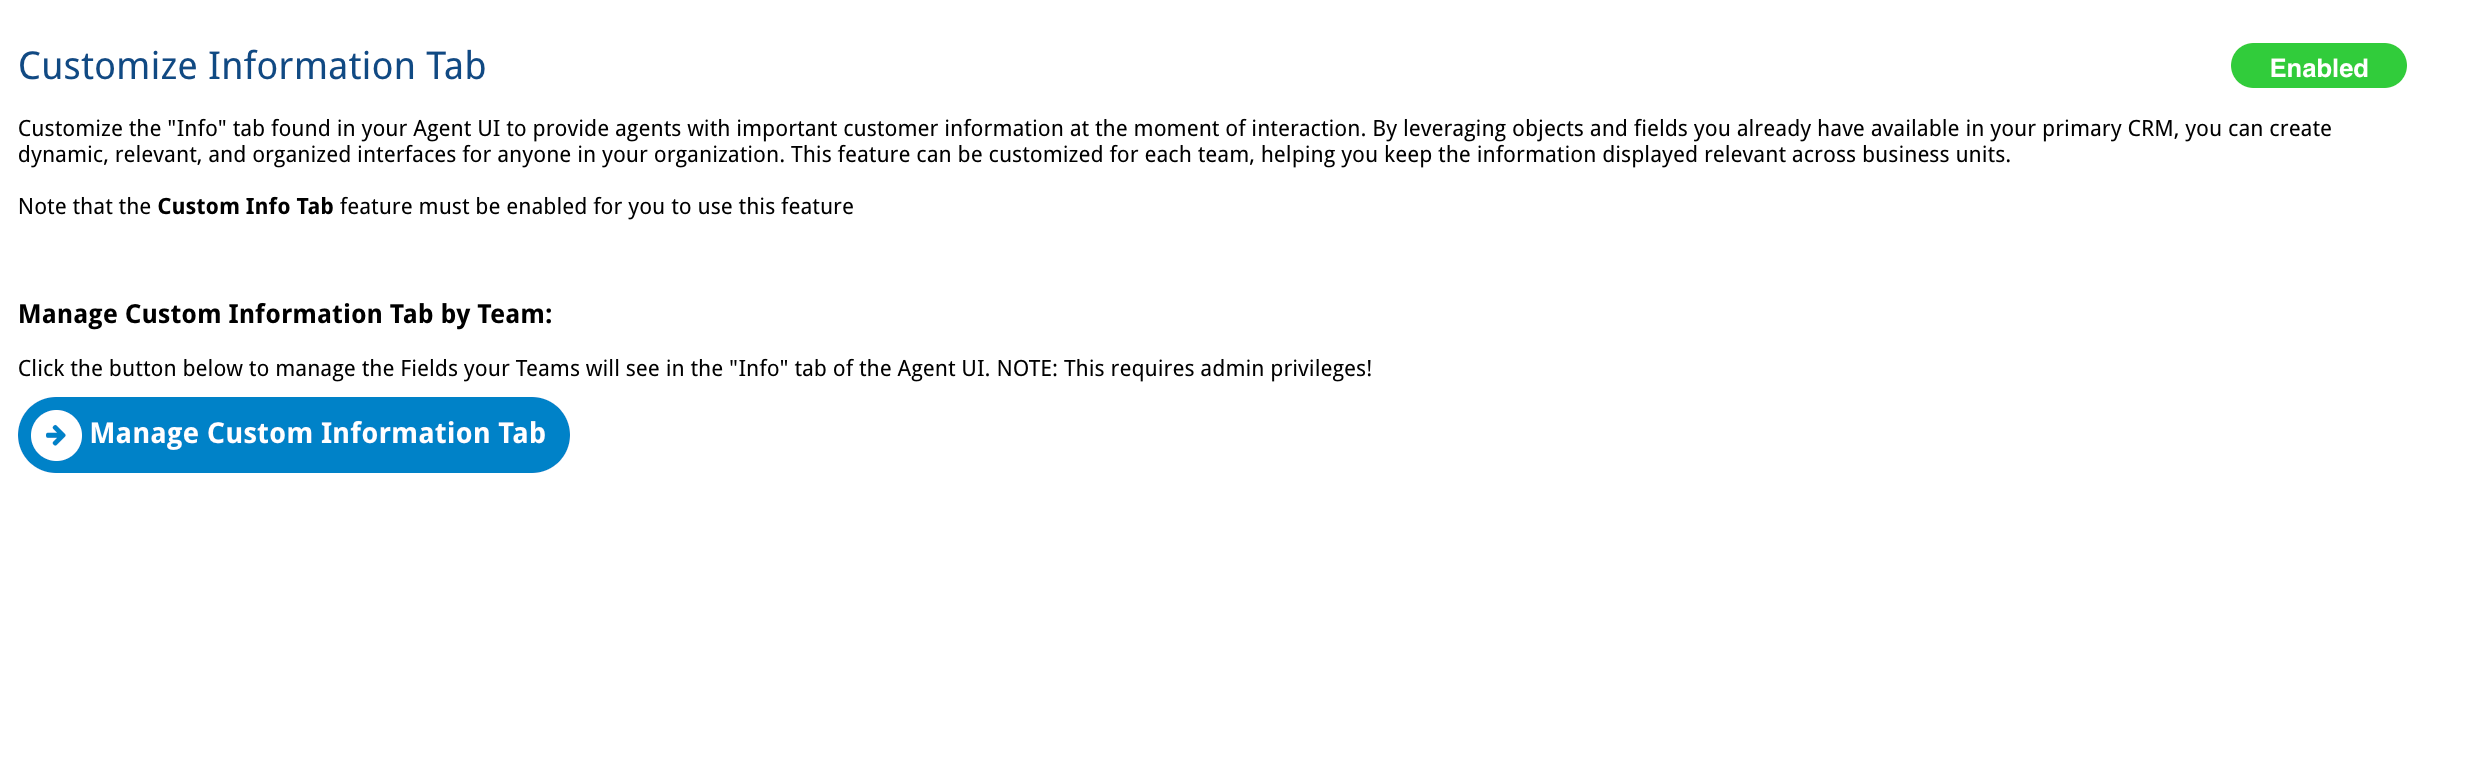
Customize Information Tab
The Info tab in the Agent UI includes 1) relevant customer information from the CRM and 2) relevant customer information that may be stored in the LivePerson SDEs that also exists in the Consumer Info Widget in Conversational Cloud. Please note, anything you customize in the settings to include from the CRM will appear at the top of the Info section in the application and the Consumer information in LivePerson will be shown below this.
Display your custom info in the UI
Customize the Info tab in the UI to provide agents with important customer information at the moment of interaction! By leveraging objects and fields you already have available in your primary CRM, you can create dynamic, relevant, and organized interfaces for anyone in your organization. This feature can be customized for your organization.
NOTE: The Info Tab will reflect phone numbers populated in the standard phone fields as well as record type by default.
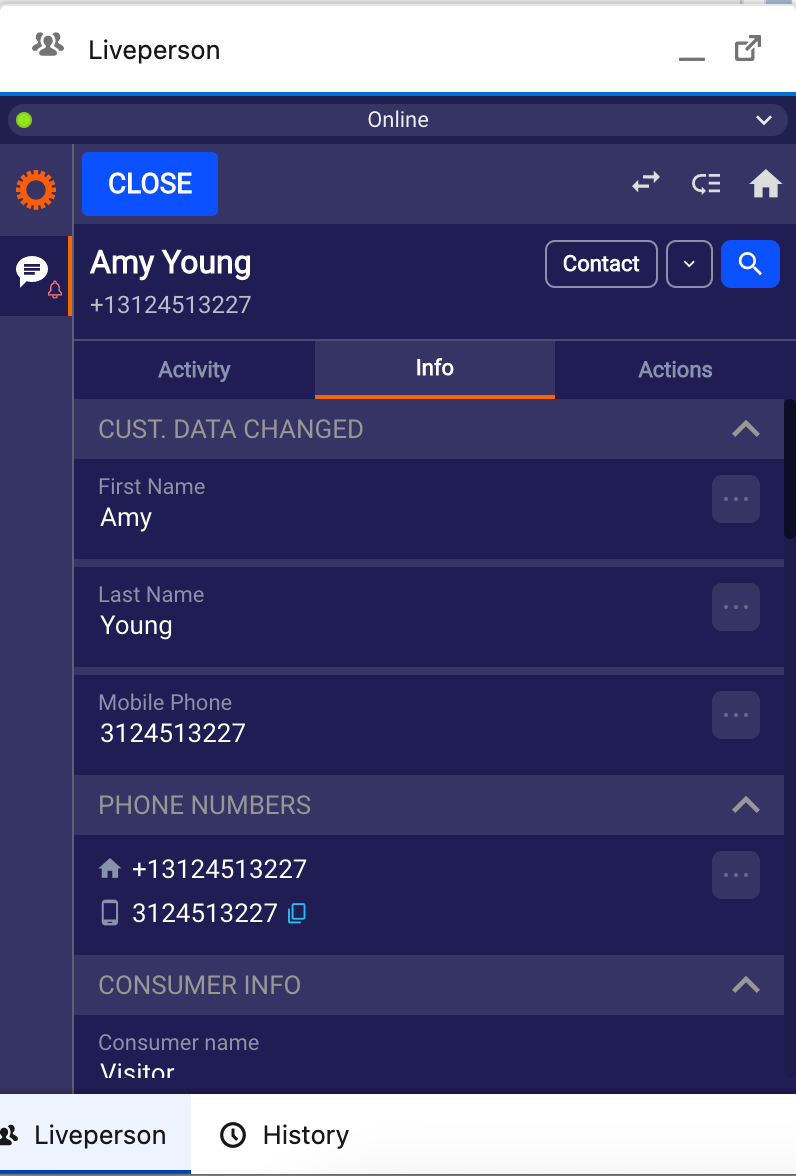
Info Tab
Agents who are actively engaging their customers in conversation can reference the Info Tab to help confirm basic information such as phone number, email address, and a variety of other fields.
The Info Tab is located between the Activity Tab and the Actions Tab in your LivePerson UI. To find the tab, click a single match call in your call history.

Configuration
Tenfold Admins leveraging Salesforce integrations can customize the Information tab using this guide:
- Navigate to your Tenfold Dashboard.
- Select the Features Tab
- From the features menu on the left-hand side, locate and select 'Custom Information Tab'
- Toggle the pill button in the top right corner to enable or disable the feature.

- Click Manage Custom Information Tab.
- From here, you can edit existing Info Tab Layouts, or click + Create New Layout to add a new one.
- Click on the blue bar labeled Layout 1 and give it a unique layout a name.

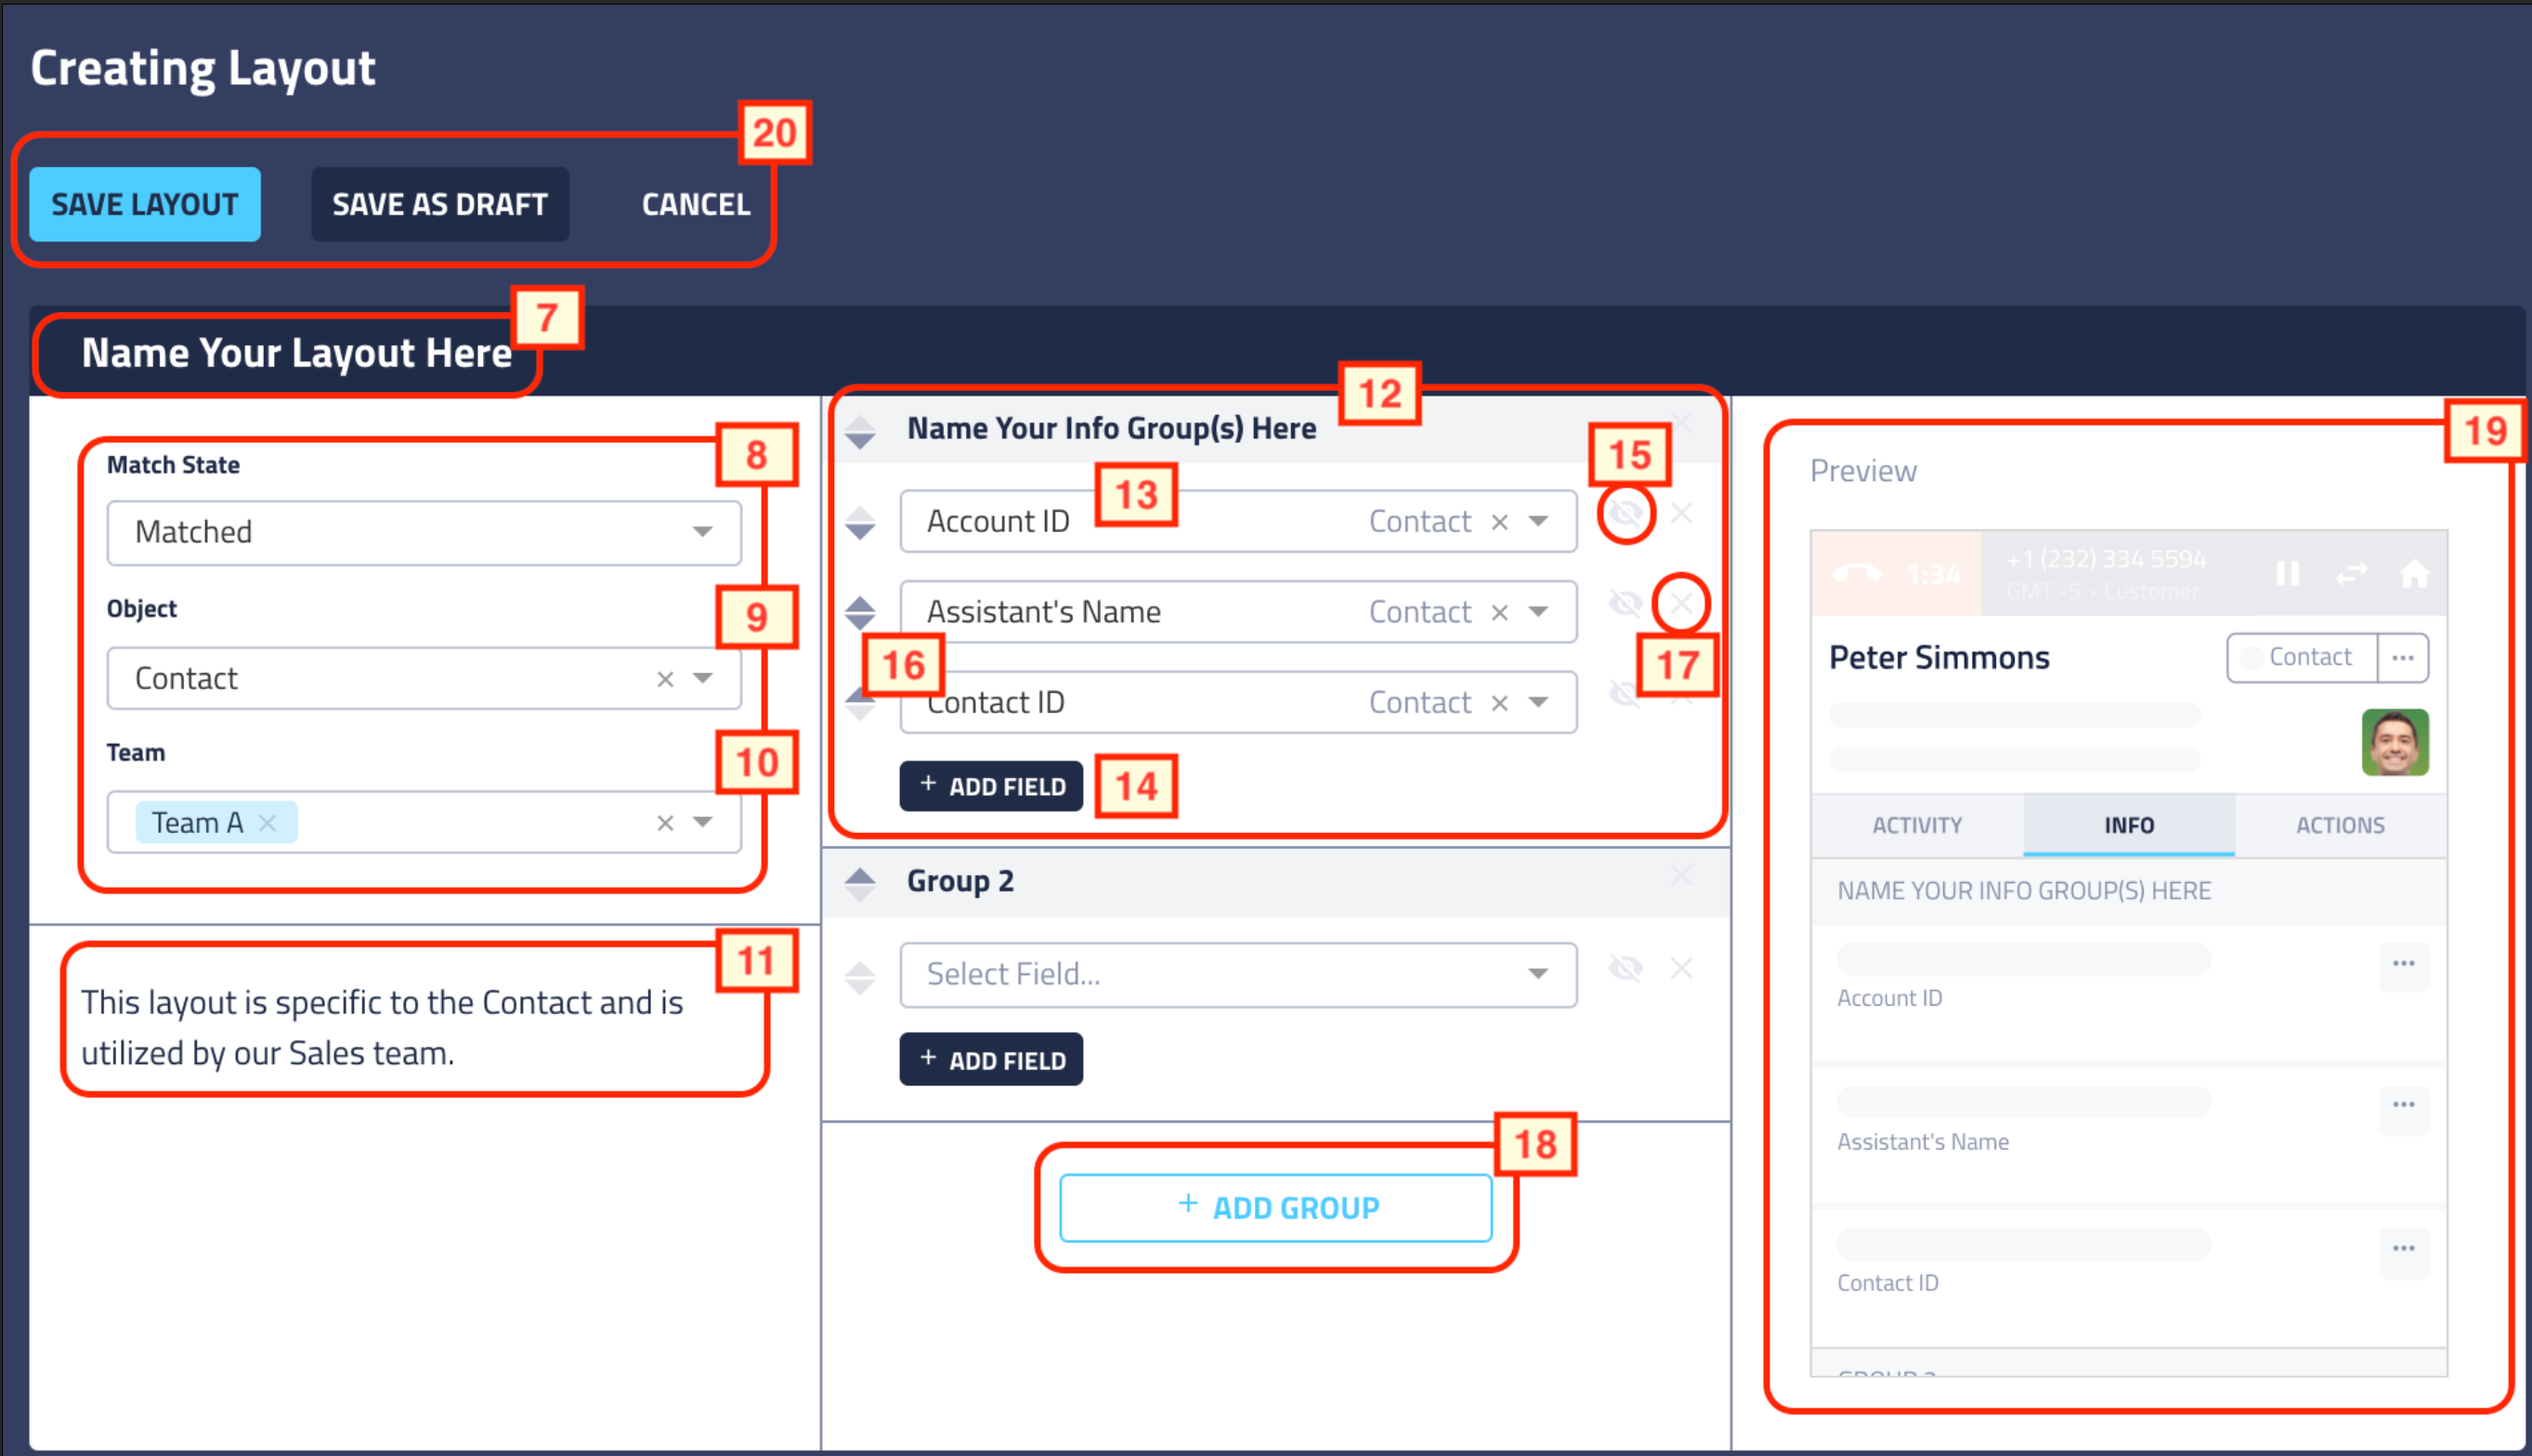
- The Custom Info Tab is visible in both the Single Matched interaction state and the unmatched interaction state, although the level of information available will be limited in an unmatched state. Select your desired Match State before proceeding with the configuration.
- Select the Object you would like to Configure (Lead, Contact, Account, Case, Opportunity, Event, User) NOTE: The associated information will only become visible if the consumer is linked to one of these objects. For example, you might configure the Object: Case. However, if the Contact or Account you are on the phone with is not related to a Case, that information will not reflect automatically in the information Tab. See Cases & Opportunities below for more information about Case/Opportunity relation.
- Select "All Users" for the teams. This will make the view applicable to all Agents.
- Give your Layout a brief description.
- Give your first info group a Name - be sure to reference the preview on the right-hand side to see how this will display in your UI.
- Select the field you would like to pull into your LivePerson UI
- Use the '+ Add Field' button to continue adding fields to your Info Tab layout.
- Selecting the eye icon will allow the application to hide a particular field in the event that it is not populated in the CRM.
- Use the up/down arrows to change the order in which your fields will be displayed.
- Click on the 'X' next to any field you wish to remove from the view.
- Feel free to add additional groupings of information by clicking on the '+ Add Group' button and repeating steps 13-17, as needed.
- Review your Layout before proceeding to save, publish, or abandon
- Click 'Save Layout' to publish this view and allow Agent users to begin using it! Alternatively, you may 'Save as Draft' until you are ready to finish your configuration or 'Cancel' if you would like to abandon the Layout entirely. Please note changes made to the Layout will be reflected in the Agent UI in real time when the agent goes back to the Info tab.
Data Memorialization
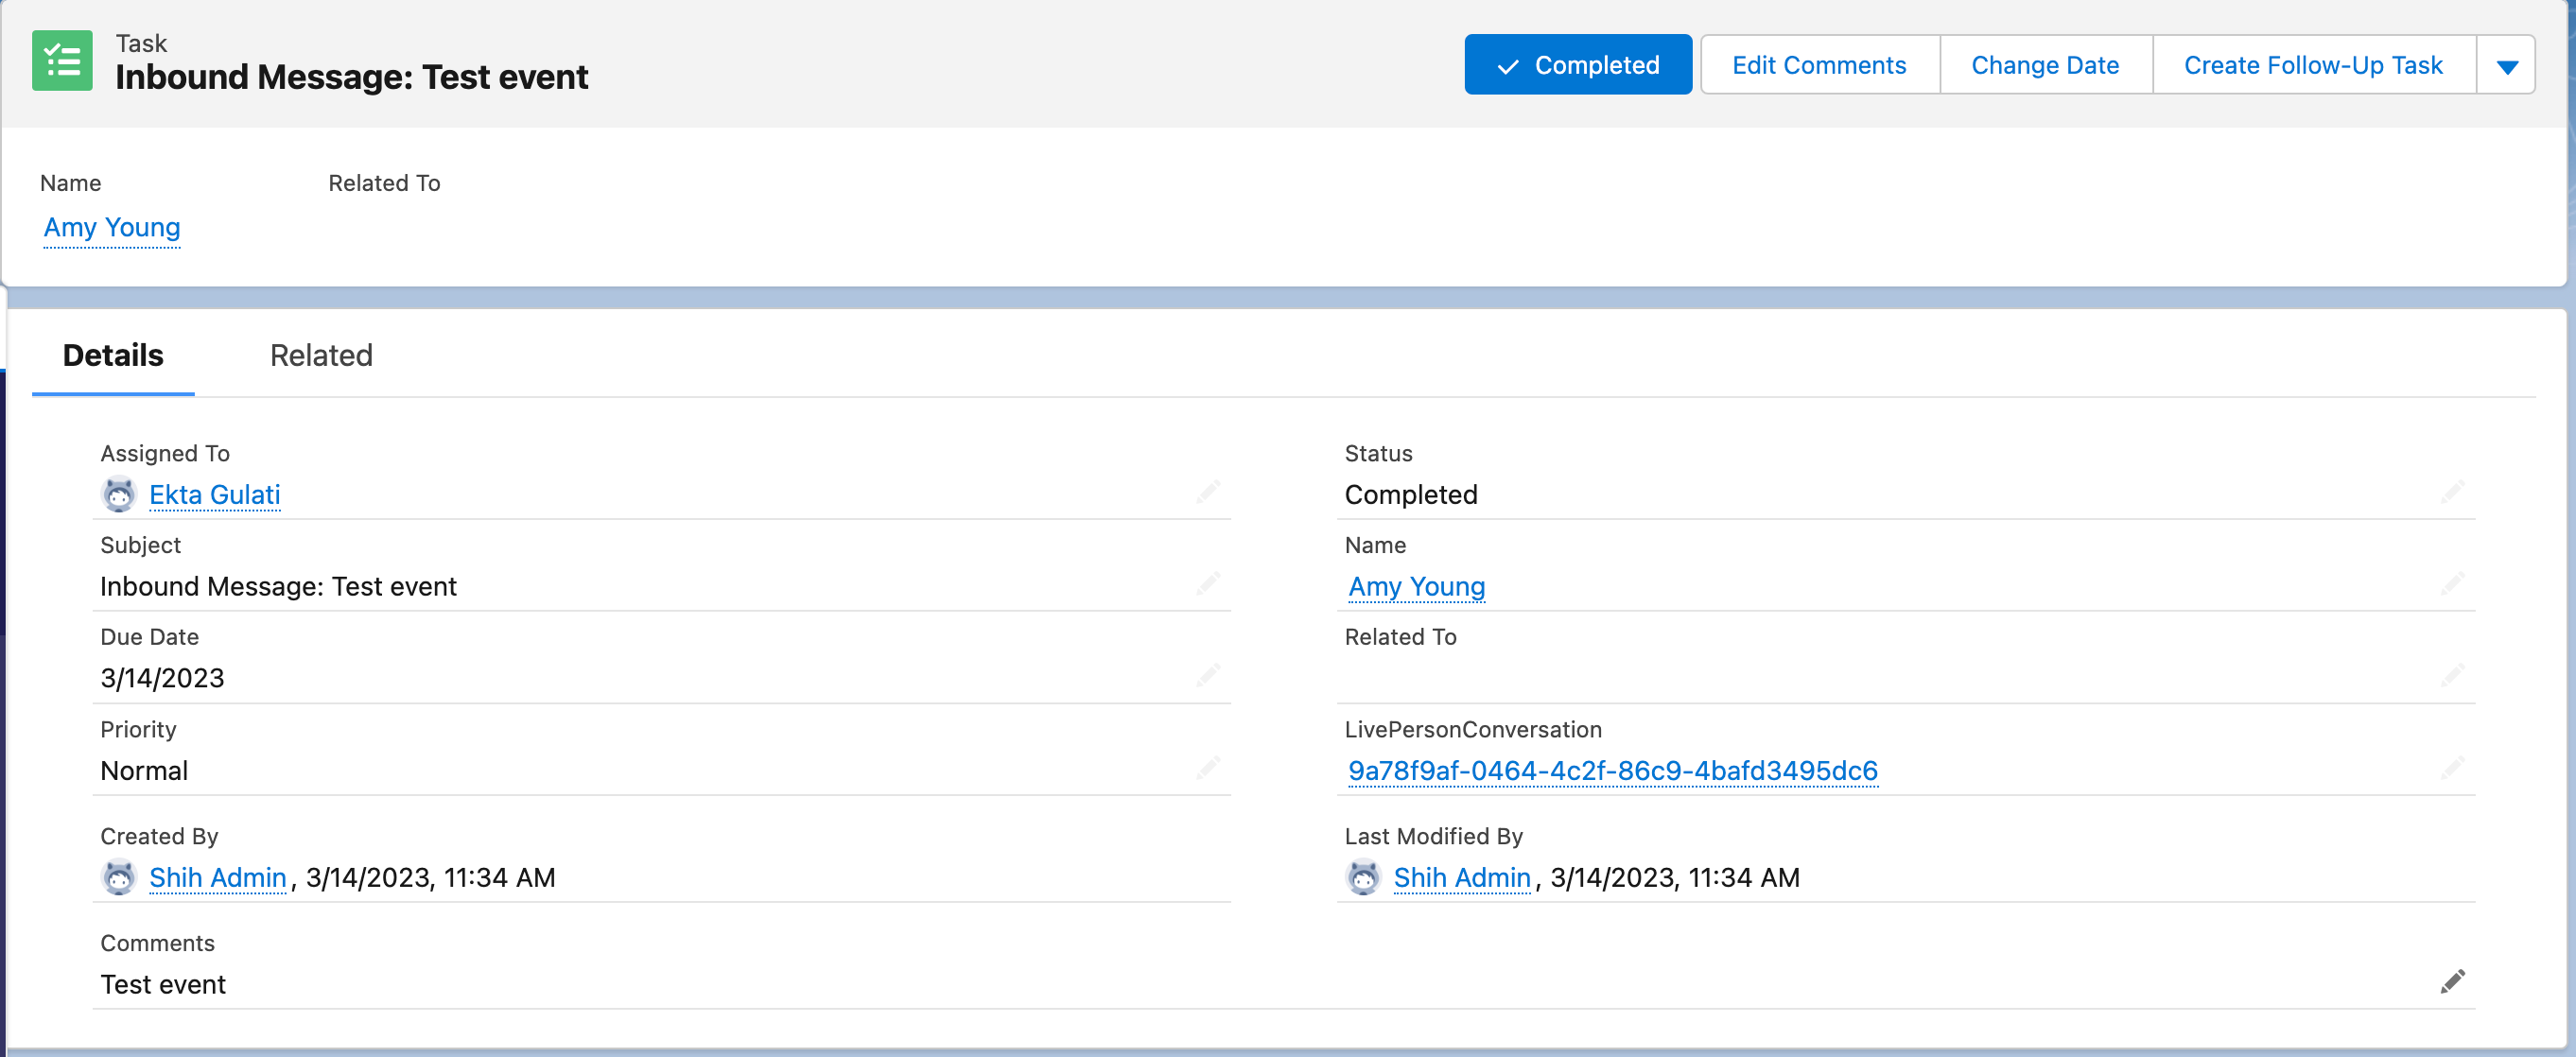
LivePerson creates a task in Salesforce for every inbound message and if enabled, will sync the Conversation transcript to Salesforce once the Conversation is closed (Auto-close or manual close). The task for the Inbound message will include a reference to the LivePerson Conversation record.

LivePerson Conversation Object
The LivePerson Conversation object includes Metadata such as the Skill, the Conversation start and end times, the Chat Transcript details, CSAT, the link to the matched Contact/Account/Lead the link to the related Case or Opportunity. The Conversation object cannot maintain a link to the Task ID. This is a limitation whereby only a one way link can be created. The Task will, however, maintain a link to the Conversation Chat Transcript ID.

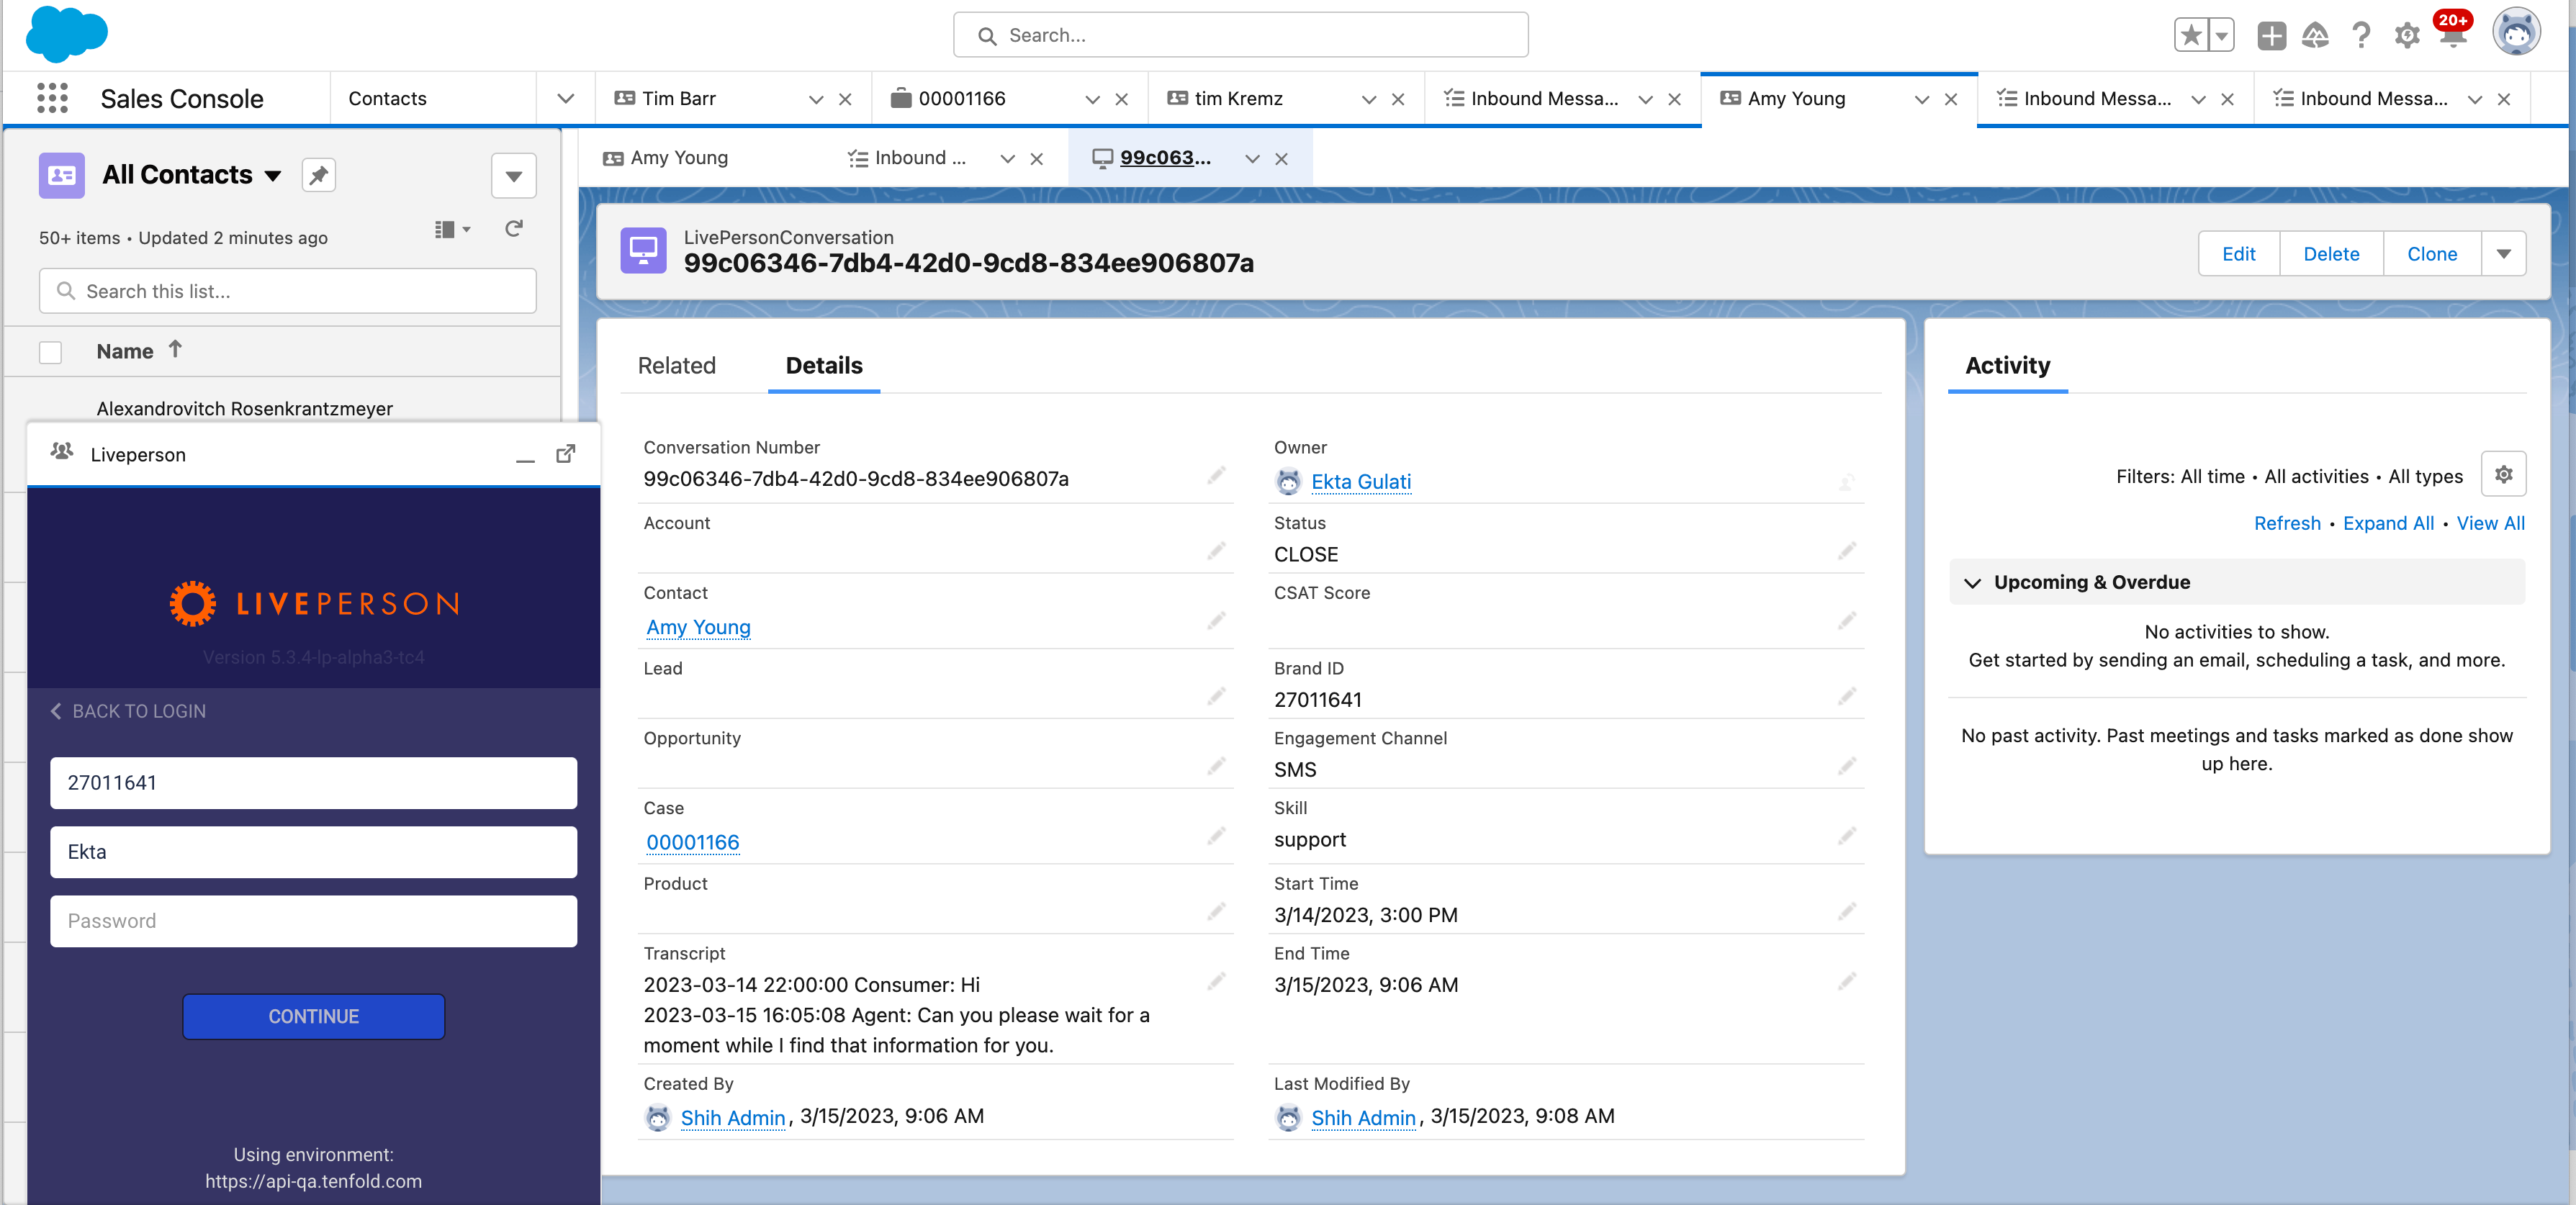
The Task Object will always be linked to the custom LivePerson Chat transcript object. However, if there is no task created automatically for the Conversation, this link is not required. The chat transcript will still be logged to the CRM if the Data Memorialization toggle for "Automatically Log Chat transcripts" is enabled. See configuration details below.
Please note, the CSAT score will only be updated for LivePerson Post Conversational Surveys. This will not be updated for Medallia Surveys.
Configure Data Memorialization
Admins in Tenfold can follow these steps to enable and configure the Data Memorialization feature for agents:
- Navigate to the Tenfold Dashboard.
- Click Features in the top navigation and then click the Data Memorialization link on the left-hand side.
- Ensure the button at the top right shows Enabled. If Disabled displays instead, click the button to enable the feature.
- The features that could be configured are as follows:
Automatically log conversation: Enable this if you would like to automatically log tasks to the CRM. If this is unchecked, then the task for the interaction will only be saved if the agent saves the note.
Preferred logging event: If the setting above is enabled, then you may choose to log the task upon the incoming message, accepting the incoming message or upon closing the message.
Preferred conversation state: You may choose All states or Matched only states to log tasks to the CRM.
(Messaging Only) Automatically log chat transcripts: You may choose to log chat transcripts to the CRM or not. Enabling this, allows chat transcripts to be synced to the CRM when the conversation is closed. - Click Save for Organization to save the Notes settings. Please note, any changes made to the settings will be reflected in the Agent UI in real time.
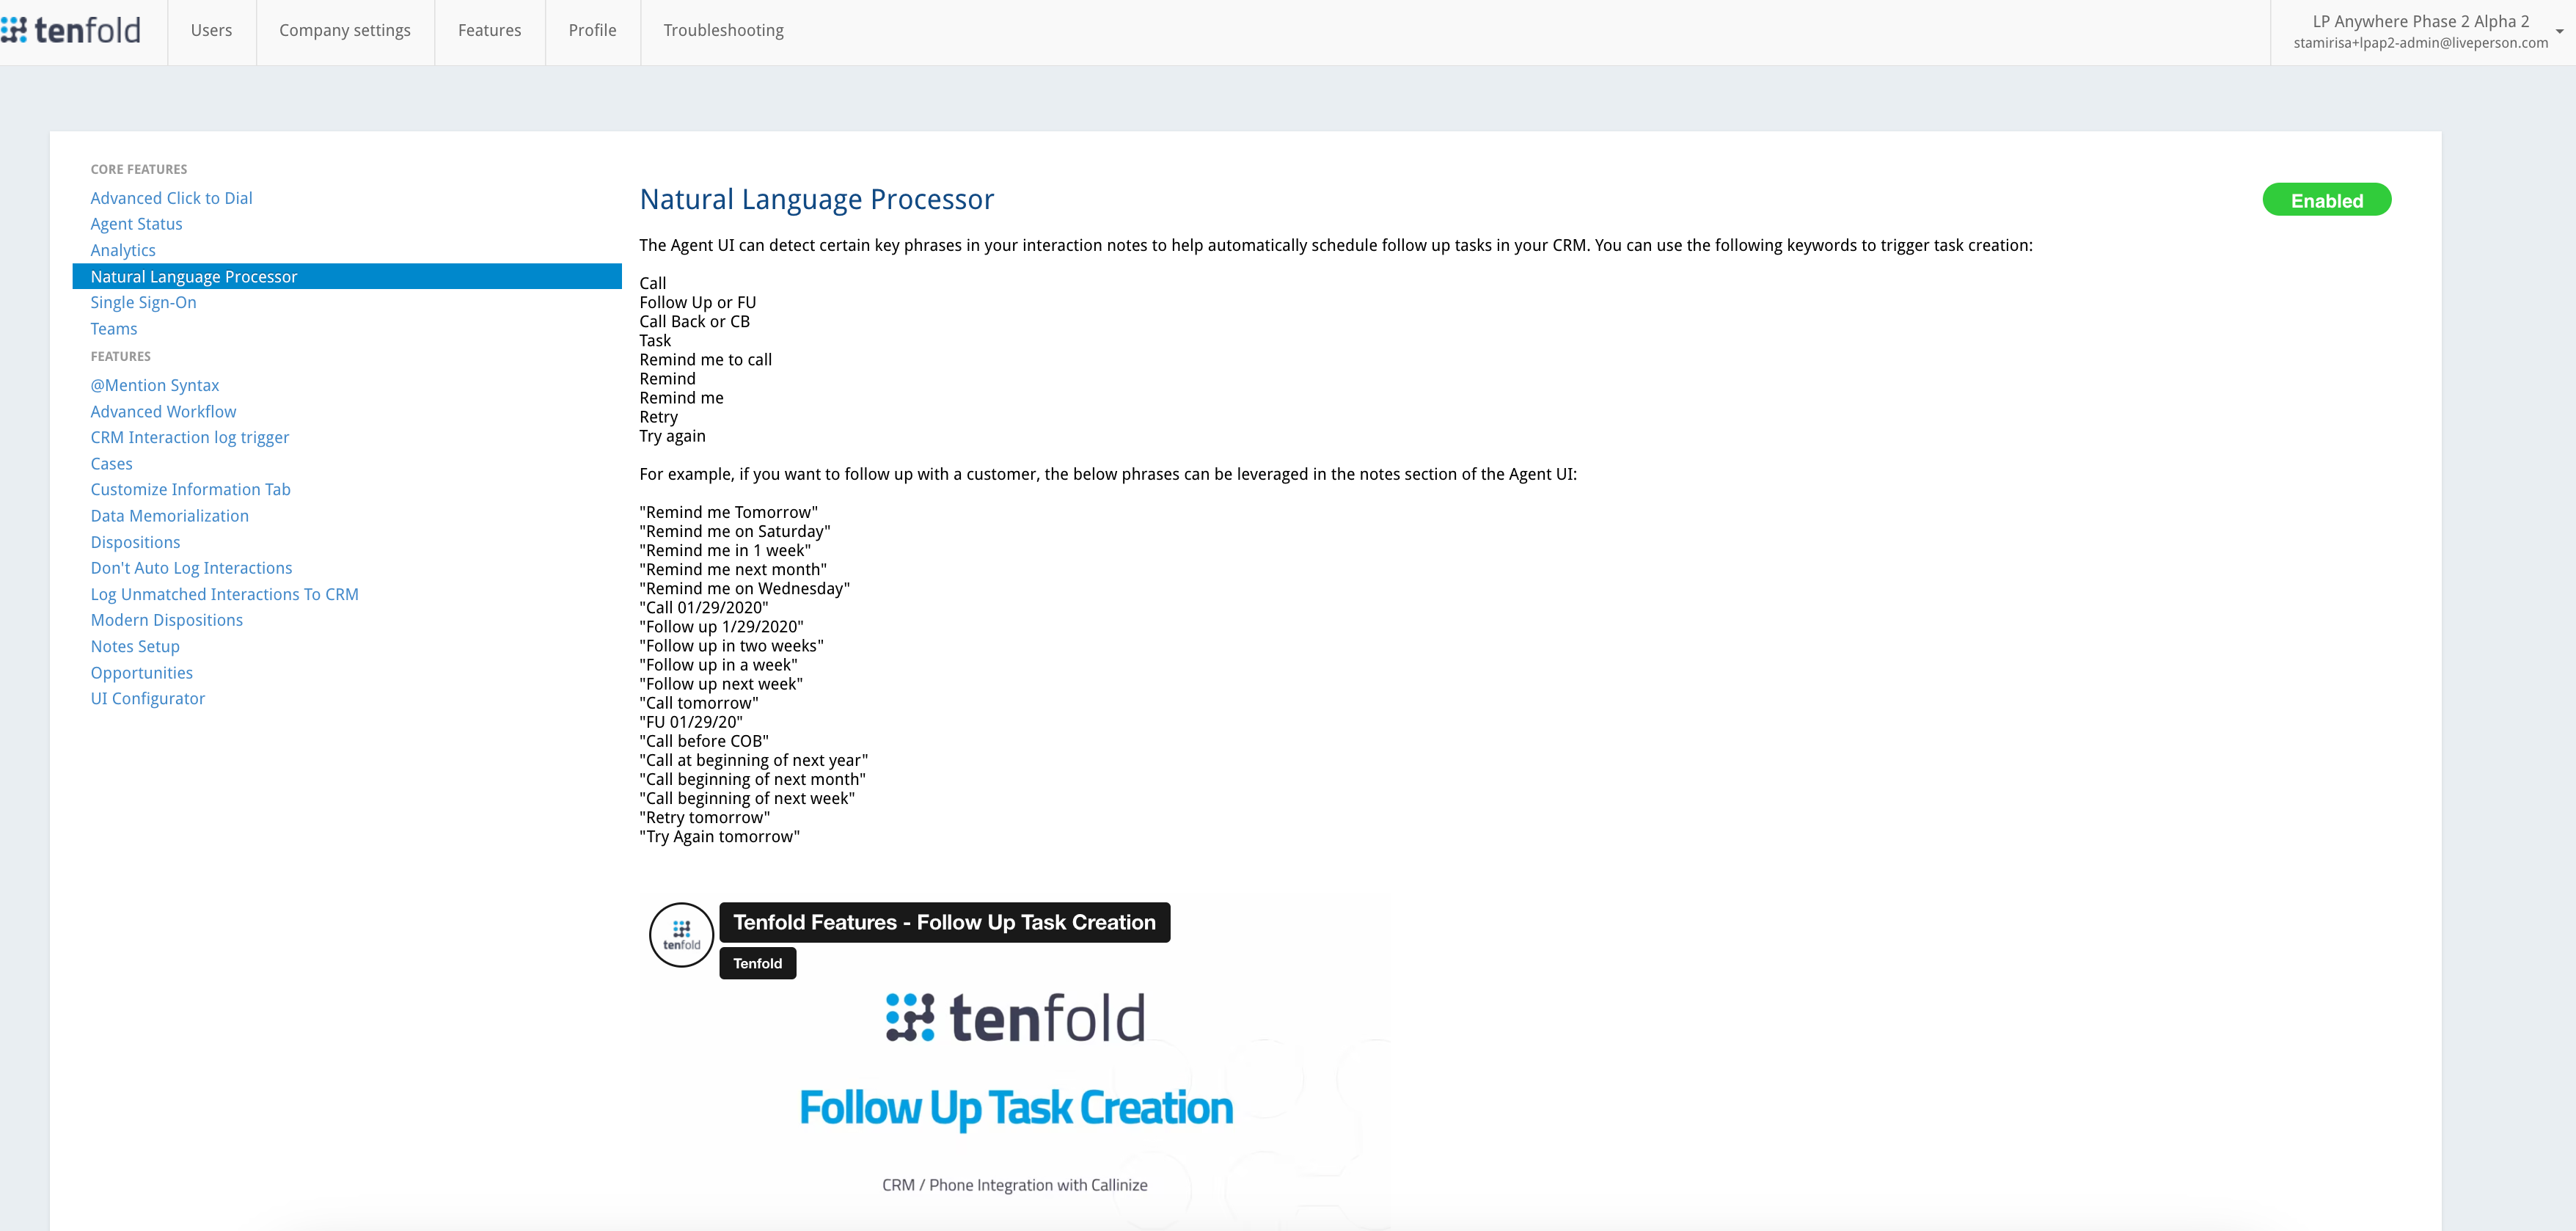
Natural Language Processor
LivePerson uses Natural Language Processing to parse the notes entered in the application and search for a Task Creation Phrase. This means you can automatically create a followup task by typing “Follow up on Friday." After entering the phrase in your note box, look for the enabled calendar icon in the top left corner of your note box. The change in the calendar icon indicates that an action phrase was detected. After you save your interaction, the application creates an open task in the CRM with a due date matching the date indicated in the task phrase.
NOTE: If you are not seeing an enabled calendar icon in your UI, try ending your sentence with punctuation, or press space bar. Check again to see if the application has recognized the task phrase. Recognized task phrases appear in bold after you save your notes. Line breaks within phrases may also interfere with Natural Language Processing and proper task creation.
Action Phrases include: “Follow Up”, “FU”, “CB”, “Task”, “Remind me to call”, “Remind”, “Remind me”, “Retry”, “Try again”
Action Date Phrases include: specific days of the week, “morning”, “afternoon”, “in a week”, “in two weeks”, “in three weeks”, “next month”, “in two months”
Date Formats: If the Action Date Phases above are not specific enough, you can enter a specific date conforming to standard date format .
Pro Tip: You can also click the Calendar icon and manually create a task.
Configuration
Admins in Tenfold can follow these simple steps to enable and configure the Notes feature for agents:
- Navigate to the Tenfold Dashboard.
- Go to the Features tab and select Natural Language Processing from the feature menu on the left-hand side.
- Check the top right corner of the page to confirm whether this feature is currently enabled or disabled. To toggle the feature on or off, simply click on the Enabled/Disable pill button.

NLP Set up
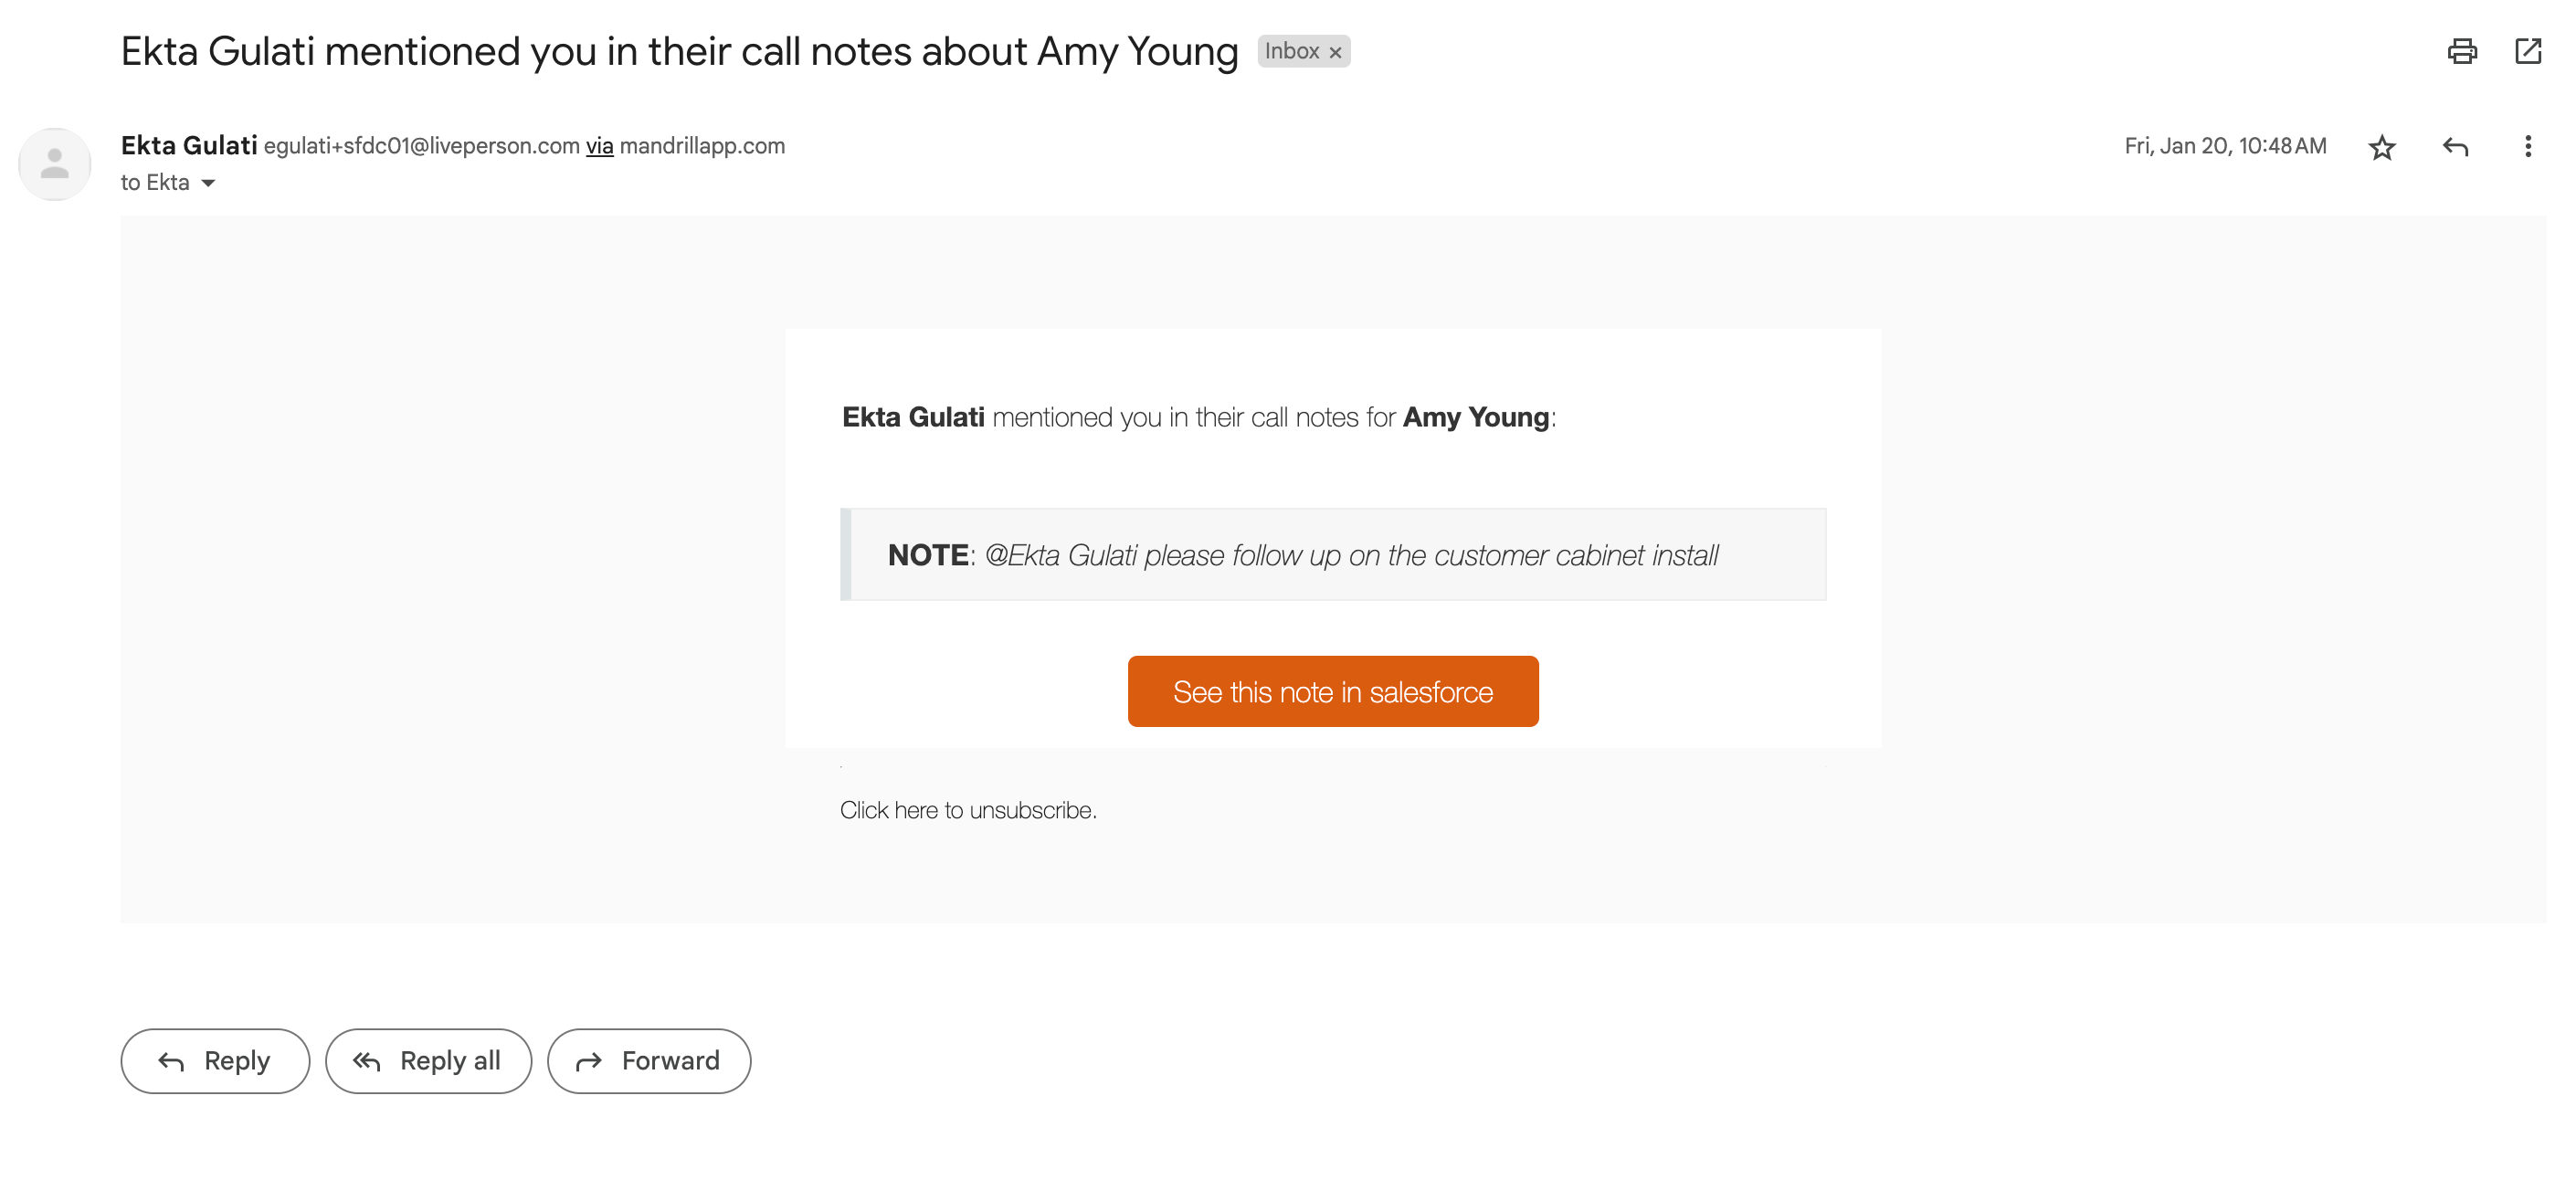
@Mention Use @Mention to share notes with colleagues
Type up your notes then use the @ sign to display a list of agent users you can cc on your call notes. Selecting a user from the list sends that person an email notification with a copy of the notes and a link to the call record. The user also sees a notification in the UI.
Use this feature to escalate internal issues, to hand off customers for followup between shifts, and to maintain visibility into customer interactions across your team.
How @Mention works
When enabled, the @mention feature allows the application to detect the use the @ symbol in notes taken in the LivePerson UI. Upon typing "@", the application automatically displays a list of CRM users by name or username (email address), based on your organization's preference. Users may then click on a user or type the complete name or username of the Agent user to @mention.
Selecting one or more users to @mention causes the bell icon, located just above the Tenfold note box, to light up. The bell icon indicates that Tenfold will send the mentioned users an email with a copy of your notes from this customer interaction.

mention use
Additionally, the Agent user that is @mentioned receives a notification in the IU, and also can open the interaction from their UI. New and historical in-UI notifications are viewable by navigating to Call History and clicking the bell icon in the top-right corner of the UI.

Configure @Mention
Tenfold Administrators can quickly and easily turn this feature on for their team by following these steps:
- Navigate to the Tenfold Dashboard Feature Tab.
- Using the Feature Menu on the left-hand side of the screen, locate and select @Mention Syntax.
- Check the top right corner of the @Mention feature page to confirm whether or not this feature is currently enabled or disabled. To toggle this feature on or off, simply click on the Enable/Disable pill button.
NOTE: This feature is only configurable at the organization level
Notes Setup
Interaction notes can be added by an Agent and will be saved back to the Conversational Cloud as part of the Conversation. You may customize Notes to enhance efficiency and ensure consistent note-taking across the organization. Options include the ability to override some settings for an admin user.
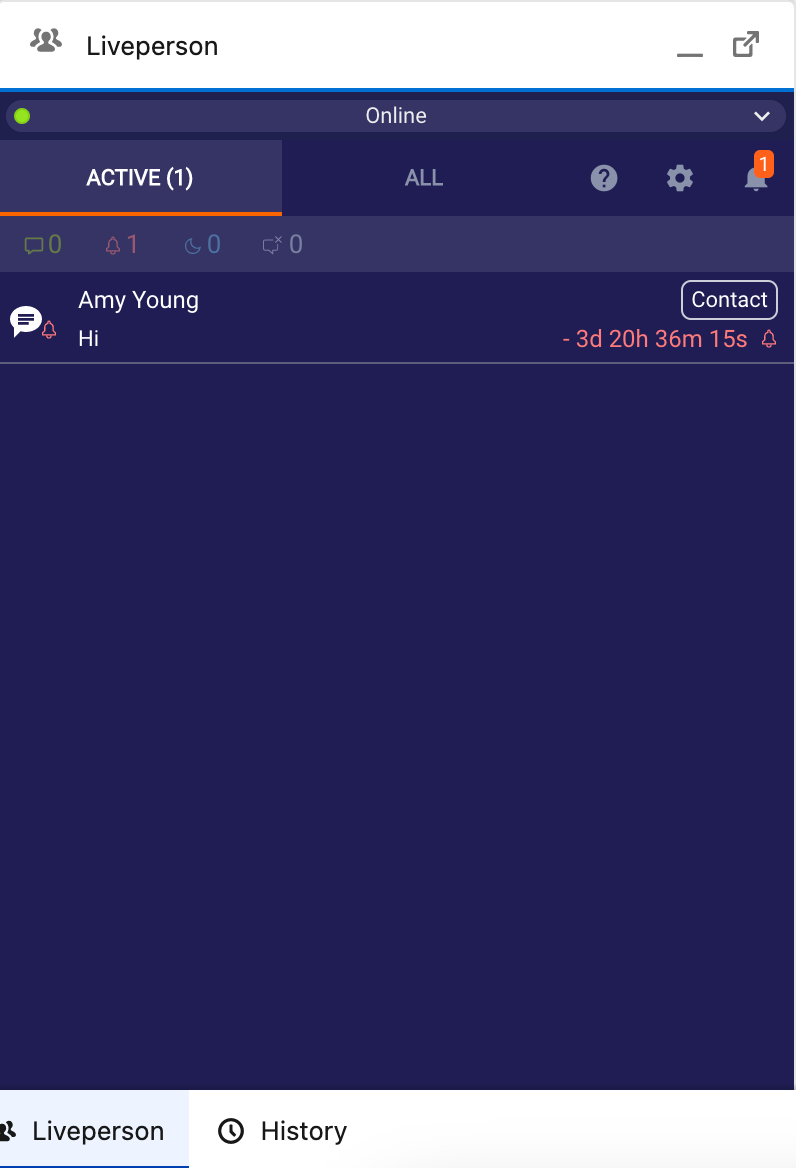
What are Notes and how do they work?
The Notes feature is a core component of the LivePerson functionality. Notes offer agent users the ability to quickly and efficiently jot down important details about a customer interaction in the LivePerson UI. A record of each interaction with the same contact/lead/account and its corresponding note is subsequently made available for review in your LivePerson UI (Shuffle Notes), and in your CRM (Task logging). To open the customer record and review notes in your CRM, click on the Task associated with the interaction (Inbound Message) in the Activity tab. This will be stored in the comments associated with the task that is automatically created for the interaction.

Activity tab
Consistent note-taking is crucial to ensuring a positive customer experience. We took this into consideration when we built the application Notes feature, and built in the @Mention and Natural Language Processing tools. By utilizing these features in conjunction with the Notes, you are on your way to ensuring proper documentation, visibility, and followup for all customer interactions—not to mention those efficiency gains!
Configure Notes
Admins in Tenfold can follow these steps to enable and configure the Notes feature for users:
- Navigate to the Tenfold Dashboard.
- Click Features in the top navigation and then click the Notes Setup link on the left-hand side.
- Ensure the button at the top right shows Enabled. If Disabled displays instead, click the button to enable the feature.
- Scroll down to "Configure the Note Box for you organization" and select the options to apply to all users. NOTE: All changes made in this section will affect the entire user base. Review the available custom configurations:
- Open the interaction on your CRM after saving it Select to automatically open the identified customer's CRM record (Lead, Contact, Account) in the browser after the user has saved an interaction.
- Save Follow up Task as Event Select to save followup tasks generated through Natural Language Processing or the Calendar Date Picker as Events in your CRM. Otherwise, followup tasks are logged as tasks.
- Click Save for Organization to save the Notes settings. Please note, any changes made to the settings will be reflected in the Agent UI in real time. i.e. The Agent can delete the task and recreate it, in which case it will create it as an event if the setting was changed.
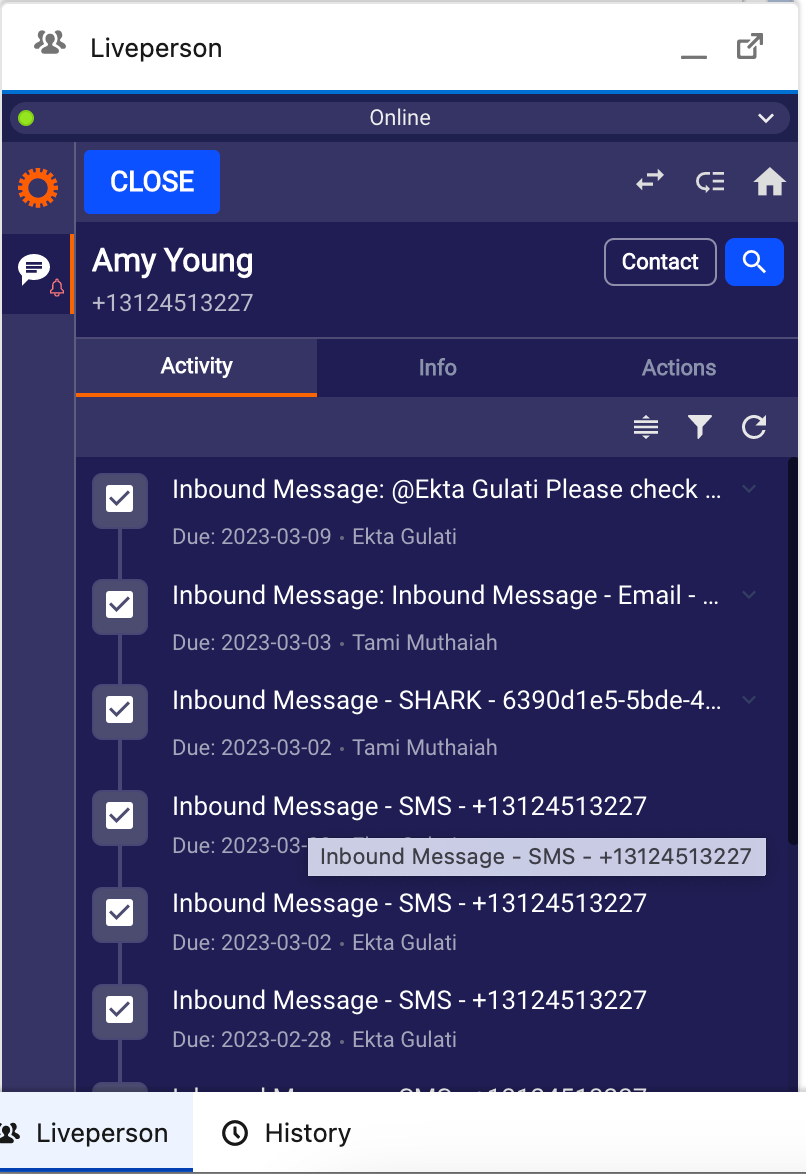
Please note, by default, all Inbound message interactions are logged based on the settings and configuration in the Data Memorialization feature. If there are notes associated, it will be logged with the following subject "Inbound Message: First line of notes". If a note is not created yet, then the activity will be logged with the following subject "Inbound Message - Channel - PhoneNumber/Email". The phone or email will be included based on the information present in LivePerson based on the channel the consumer is messaging on. The default task created for the interaction will always be logged in a completed state.
activity tab 2
Notes from previous interactions with the same matched contact/account/lead will show in the application. However, if there was no match, then this will not show any previous notes. In the case of no matches, the notes get saved back to LivePerson and will be associated with the task created for the inbound message.
The Calendar Date Picker is available by default to agent users in their application for the purposes of scheduling follow up tasks. The follow up task created from the Note will be logged In-Progress state.
Tip
Users often forgo taking notes because a manual note-taking process is time consuming and inconvenient. Our application strives to make the note-taking process as seamless as possible. Make use of Dispositions, NLP and @Mentions to help Agents create meaningful notes and follow ups.
Modern Dispositions
Quickly assign attributes and outcomes to calls
Expose CRM picklists and menus in the application by enabling this feature! Updating opportunity stage, case status, and other important customer information is made easy with Dispositions.
The value of Dispositions
Dispositions enable your users to quickly assign key attributes or call outcomes to every interaction without having to navigate across multiple pages in the CRM. Dispositions are fully customizable and may include any picklist field that is currently available in your CRM.
By using Dispositions, agents can designate an Opportunity Stage Lead status as “Qualified” or “Hot” to help establish priority, while designating the customer “Communication Preference” at the same time. Dispositions are highly adaptable and may also be configured to help record an interaction's purpose or outcome with labels like “Order status” and “Late Delivery". It is important to note that Agents will only see these fields if there is a match and based on the Contact/Account/Lead and if a case or opportunity has been related to the Conversation. Dispositions agents see in the app depend both on the configuration in the features and CRM records that are associated with the conversation.
Configure Dispositions in the Tenfold Dashboard
- Navigate to the Features tab of your Tenfold Dashboard and select Modern Dispositions from the Feature menu on the left-hand side of the screen.
- At the moment, for messaging, Dispositions are supported at the organization level. Select "All Users" under the team drop down.
- From the "Select the Module" list, select the module (Lead, Contact, Account, etc.) to configure. NOTE: You can configure Tenfold Dispositions for more than one module.
- Check the box next to the name corresponding to the picklist items to display in the Tenfold UI. To make these dispositions a requirement for users, select the "Required" box instead. Making a disposition a requirement means that the interaction will not save to your CRM until the user has selected or updated the required disposition. NOTE: If certain values in your picklist are no longer relevant, simply uncheck the value you wish to exclude from the Tenfold Disposition picklist in your UI.
- Scroll to the bottom of this page and click Save to apply the changes. NOTE: You may need to reload your browser, or log out and back in again to see these changes in your Tenfold UI.
Advanced Workflow
Use Launcher to Create Web Links
Create a weblink
The Launcher feature in Advanced Workflow lets you configure links to web sites which are accessible to users in the UI. Depending on the configuration, you may include Global links that appear irrespective of the interaction or Interaction based links that can be added to the Toolbar or as More links in the Agent UI. The interaction based links can use parameters from the Conversation or CRM objects. Please note, this feature also allows you to configure different links based on the LivePerson skill.
Here are some examples of the Agent UI with these specific link types.
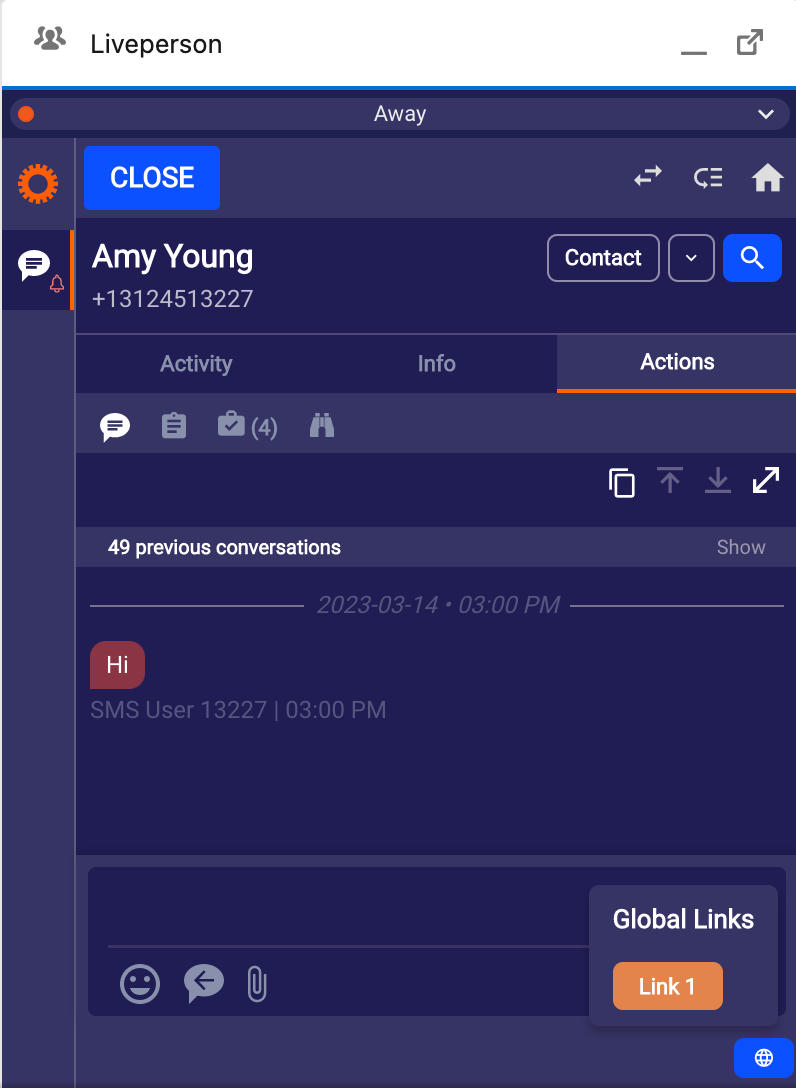
Global Links
Global Link Menu A globe displays in the lower-right corner of the UI. Clicking the globe icon opens a list of weblinks.

global links
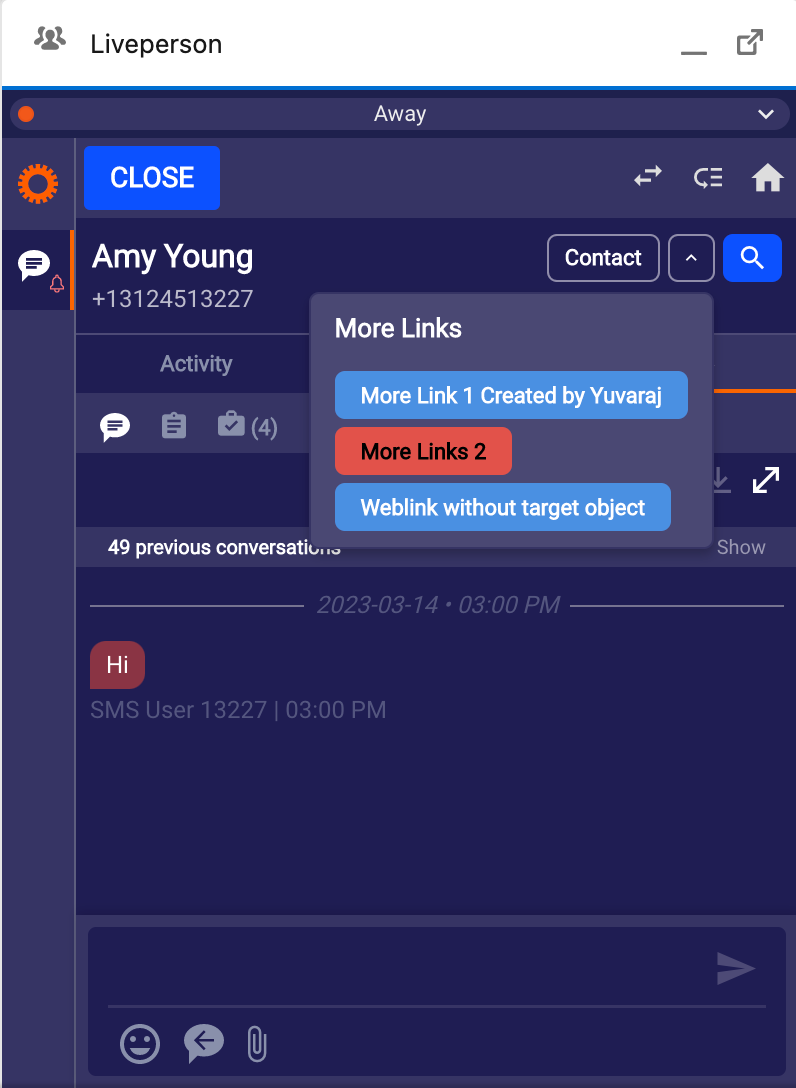
More Links
"More Links" Menu Displays as a list of links in a "Links" section on the back side of the contact card. The links only display during interactions, such as calls, and accept call attributes for use as parameters in the configured URL.
more links
ToolBar Links
Toolbar Displays in the lower-left corner of the UI. The links only display during interactions, such as calls, and accept call attributes for use as parameters in the configured URL.
To create weblinks using Launcher:
- In Tenfold Dashboard, click Features at the top of the page and then click Advanced Workflow in the left-hand navigation links.
- If Advanced Workflow is disabled, click the pill button at the top of the screen so it turns green and displays "Enabled."
- Click Manage Launcher.
- Click Create New Link.
- Select Messaging as the Interaction channel.
- Select the LivePerson Skills for which you would like the link to appear in the UI.
- From the Teams list, select All Users. The teams do not apply to the LivePerson Connector.
- From the Role list, select All Roles or leave it blank. The roles do not apply to the LivePerson Connector.
- Continue to the next section to see how to create a workflow using default parameters.
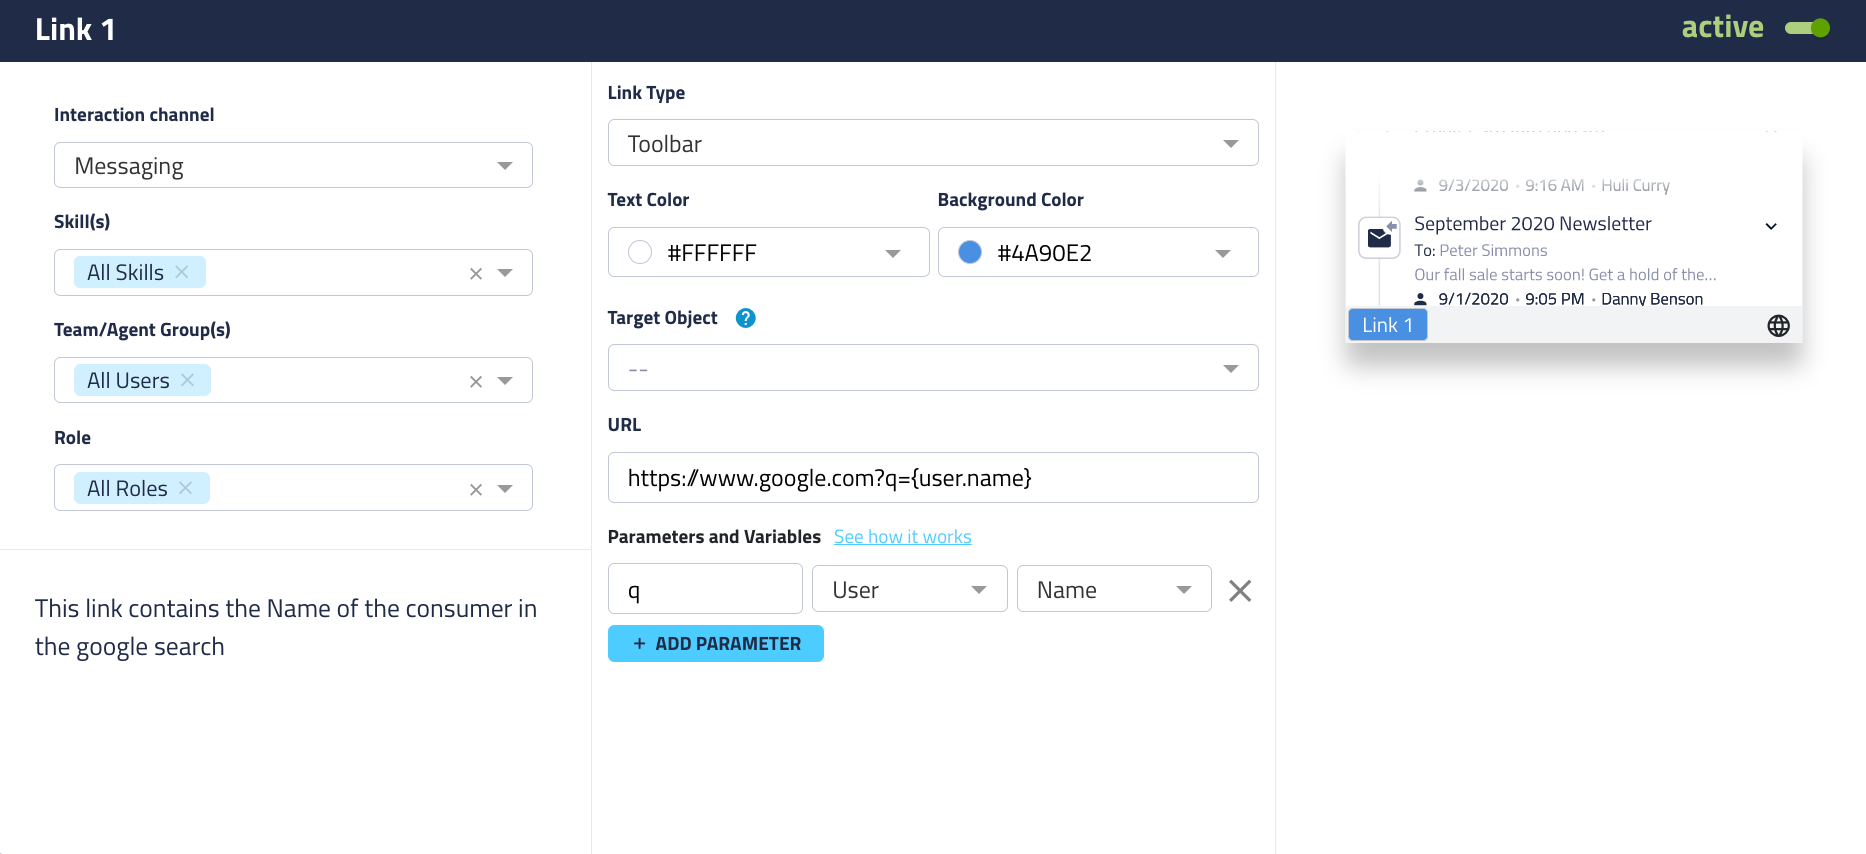
A weblink example using default parameters
The parameters included with the weblink workflow offer some common CRM information you can use in conjunction with URLs.
- At the top of the form which displays, click the "Link 1" default text and type a descriptive name for the workflow. This text displays in the Tenfold UI to help users understand what the link does.
- Click Add Description to enter some text describing the purpose of this link (optional). This information is only visible in Dashboard and will not be visible to the Agents.
- Under Link Type, select how this link will display. In this example, Toolbar is selected. As you make changes to the link configuration, your selections are reflected in the preview window.
- Configure the appearance of the link using the Text Color and Background Color selectors. Click inside the selection fields to open the color selector, or type hexadecimal color values in the fields.
- Enter the URL for the link in the URL field. NOTE: Be sure to include the protocol (http, https).
- Add your parameters. Example 1. URL using default parameter options This example will search Google for a consumers name. To include this information: First field = q Middle field = Call Third field = Phone Number In this example, user.name (user name for the record in context) defines the CRM object and property to search for. The variable name q is needed to supply the search engine with the CRM value (in this example, a phone number). Other URLs may require different parameters, so try setting up an example in the address bar of your browser first to see how the query looks before attempting to configure it in Tenfold.Every time the user clicks the link, the browser will submit these parameters along with the URL. However, since the phone number depends on the object currently in context, the value submitted will vary.Please note, you may also select a variable from the User, Organization or Chat dropdown to pass specific parameters in the URL. The Chat dropdown does not appear for the Global links because the Global links show outside of the context of the Conversation as well.
- Click Save to apply your changes.

default parameter
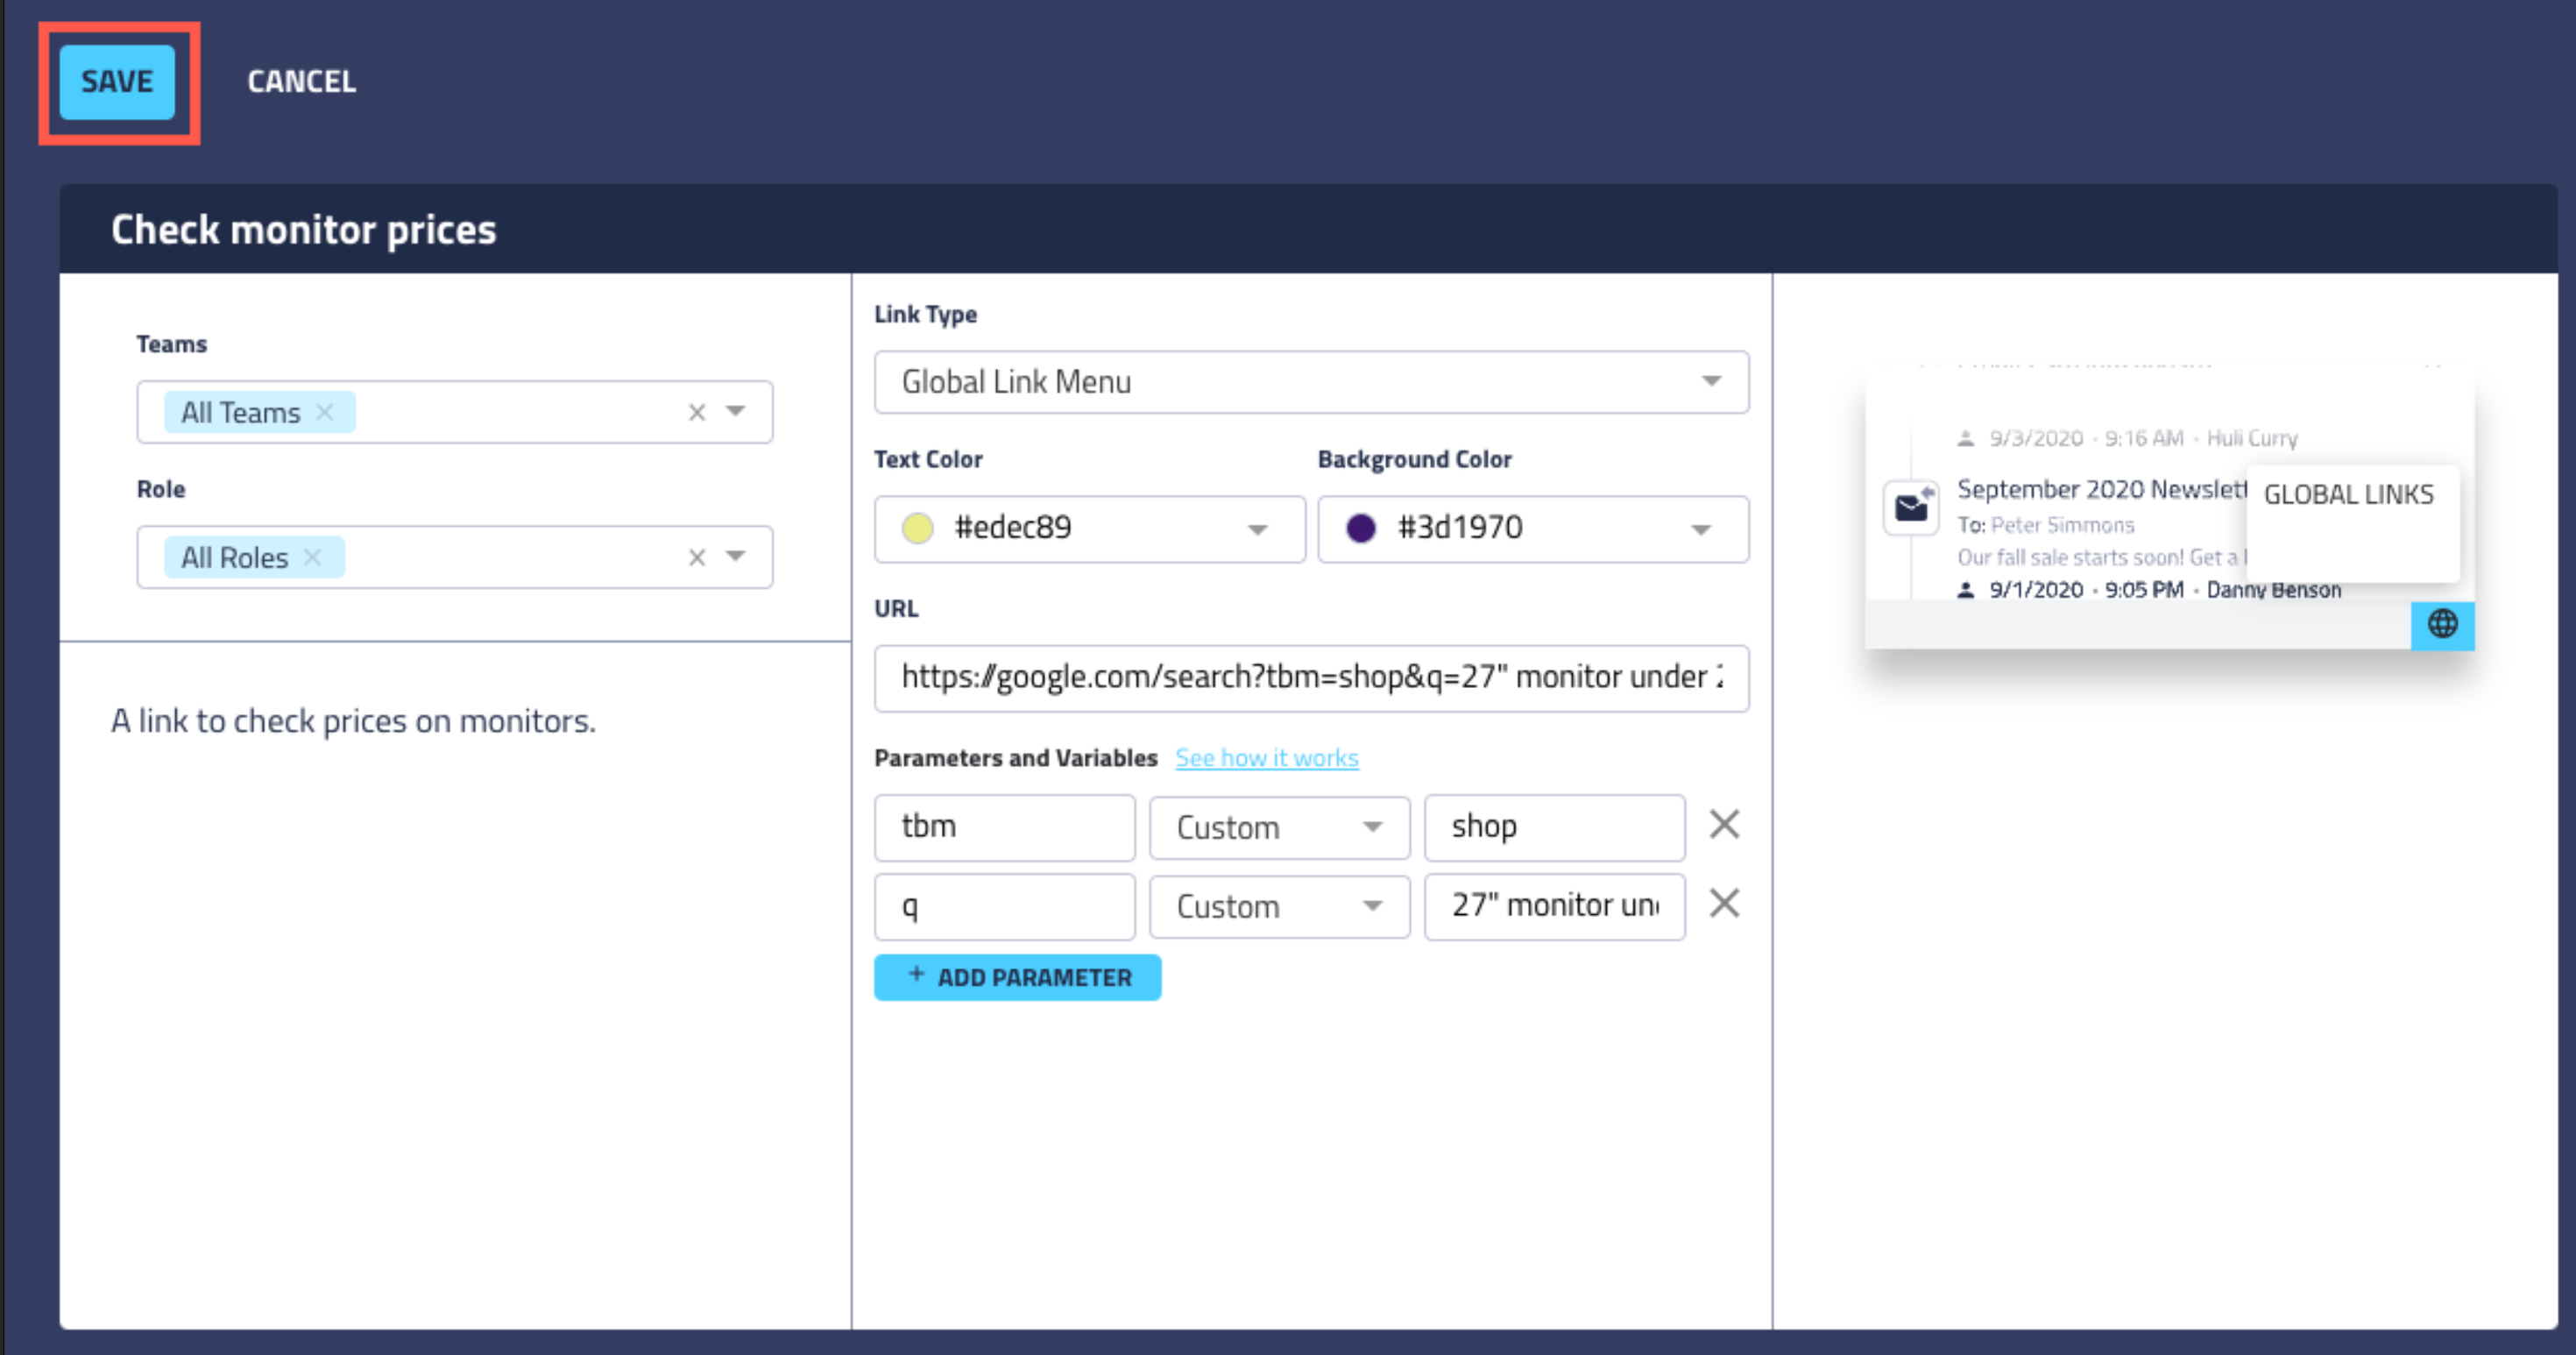
A weblink example using custom parameters
- Type a name for the workflow.
- Enter an optional description for the workflow.
- Under Link Type, select how this link will display. This example uses Global Link Menu.
- Configure the appearance of the link using the Text Color and Background Color selectors. Click inside the selection fields to open the color selector.
- Enter the URL in the URL field. Example 2. Simple URL To open https://shopping.google.com, you type:
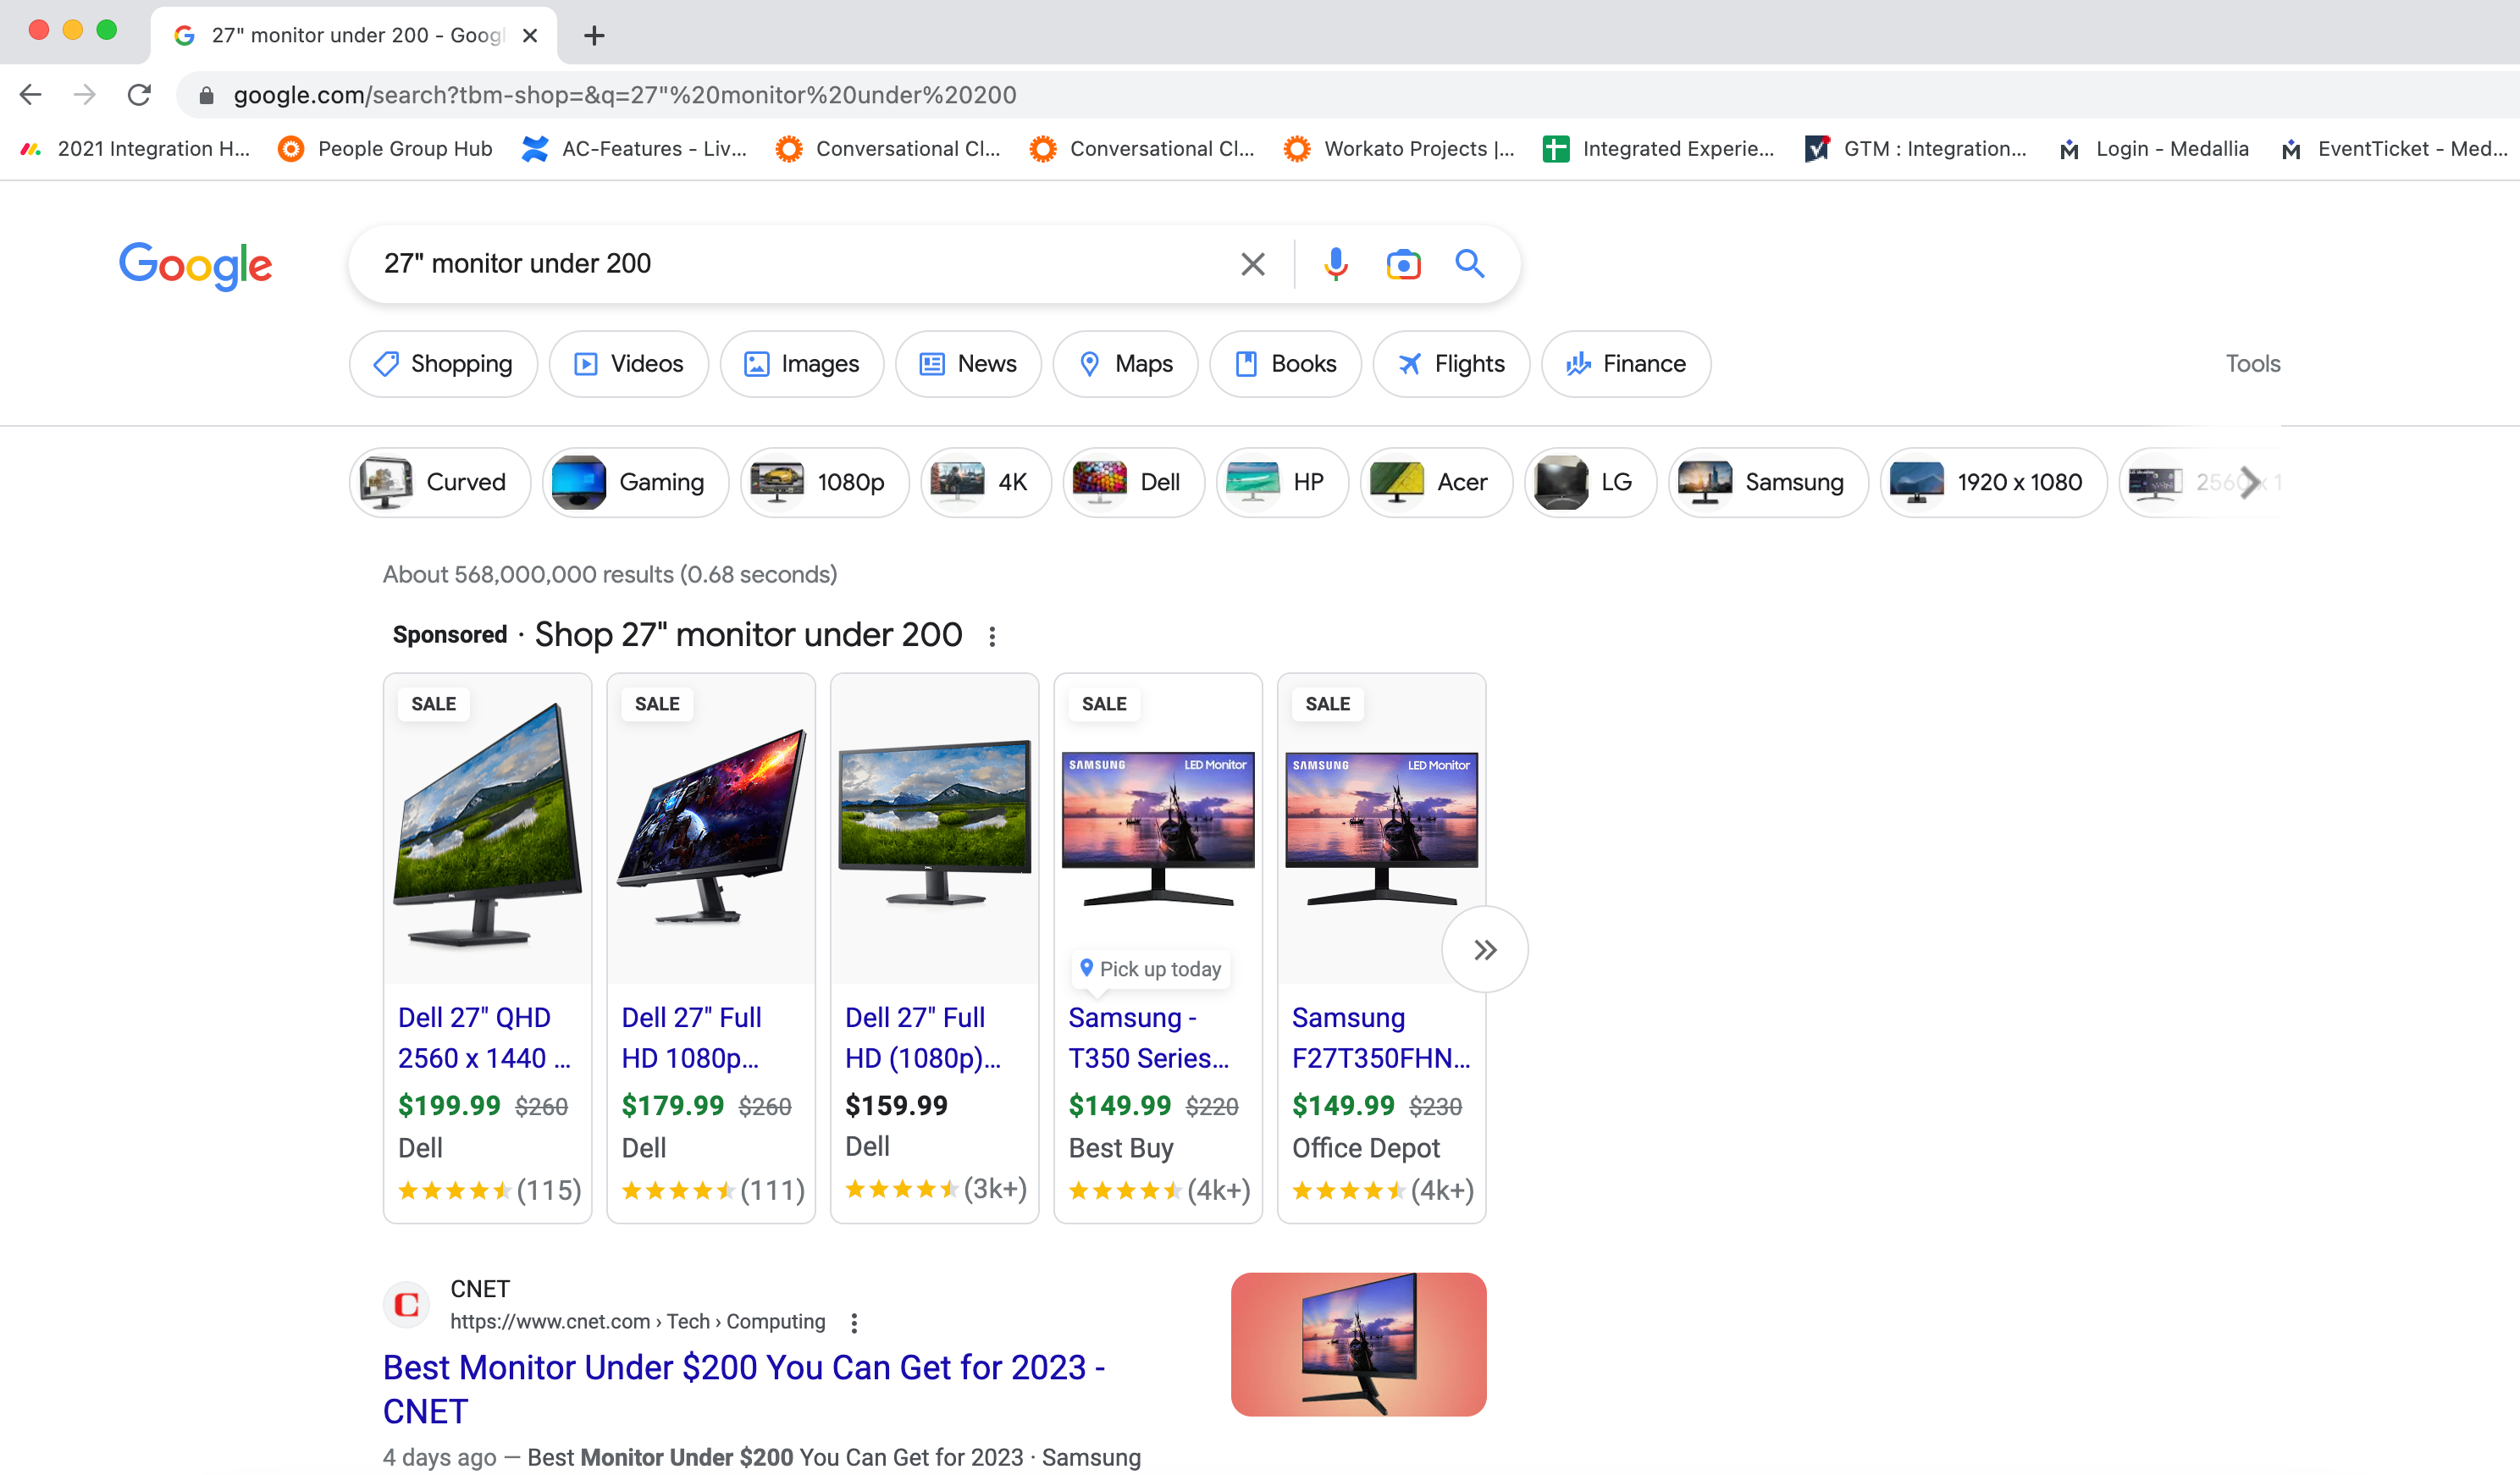
- Click +Add Parameter to add any parameters and variables you want to include. Example 2. URL with custom parameters These custom parameters search for a specific type of item. Note that each row includes an additional parameter. The parameters you can use depend on the website's support and configuration. This configuration searches for 27" monitors costing less than $200. tbm = required parameter in Google to direct the user to the shopping area q = required variable name in Google used to hold the value to search for 27" monitor under 200 = the string to search for (the value of the variable q) Tip Different systems require different parameters in the URL to perform searches or other tasks. It's helpful to try pasting your URL from the URL preview field into your browser address bar before saving your workflow. Testing while you're editing can save time when constructing your URL and parameters.
- Click Save to apply your changes. Be sure to refresh your UI if you are logged in to your CRM while editing the link.

custom parameter
Tip
Different systems require different parameters in the URL to perform searches or other tasks. It's helpful to try pasting your URL from the URL preview field into your browser address bar before saving your workflow. Testing while you're editing can save time when constructing your URL and parameters.
The weblink workflow in action
The link appears to the Agent user in the selected colors with the title text. It is accessible under the globe icon as illustrated above.
Clicking the link inserts the query in the address bar:

search
Note that the parameters in the URL query correspond to option selections in the UI.
You can use custom parameters to create queries on a variety of systems.
Launcher variables
Workflow Launcher includes menus for selecting parameters to use in webLink workflows. The standard list includes the following variables:
NOTE: Your list may include customized parameters specific to your organization.
Table 1. Launcher parameters (standard) supported in webLinks. Additional variables configured in the Attached Data feature are made available on the Chat object.
| Object | Property | Description |
| Chat | Channel Name | Indicates a channel that was used for the communication during a conversation. |
| Consumer Email | Consumer's email if received in LivePerson. | |
| Consumer Phone | Consumer's phone if received in LivePerson. | |
| Start Time | A date and time when the conversation started. | |
| End Time | A date and time when the conversation ended. | |
| External ID | ||
| Skill ID | Agent’s skill. | |
| Skill Name | Agent’s skill. | |
| Chat Status | The status of the conversation. | |
| User | Name | Name of the logged in Tenfold user. |
| CRM Unique Id | Unique identifier assigned by the CRM to the logged in Tenfold user. | |
| CRM Username | Unique username for the CRM user. | |
| Username | The Tenfold username of the currently logged in Tenfold user. | |
| Organization | Company | Name of the logged in Tenfold user's company as defined in Tenfold Dashboard under Company Settings. |
| Locale | The locale of the currently logged in Tenfold user. | |
| Timezone | Time zone of the logged in user as defined in Tenfold Dashboard under Company Settings. | |
| Created At | Timestamp of when the user object was created in the Tenfold platform. |
Configure the Workflows using Manager Workflows
The Manage Workflows option under Advanced Workflow lets you configure a variety of automations using a JSON-based configurator.
To create a workflow:
- In Tenfold Dashboard, click Features at the top of the page and then click Advanced Workflow in the left-hand navigation links.
- If Advanced Workflow is disabled, click the pill button at the top of the screen so it turns green and displays "Enabled."
- Click Manage Workflows.
- Click Create New Workflow.
- At the top of the form which displays, click the "Link 1" default text and type a descriptive name for the workflow. The text displays in the UI to identify the webLink.
- Select Messaging for the Interaction Channel
- From the Skills, select the Skills that will have access to the workflow.
- From the Teams list, select All Teams or the specific teams that will have access to the workflow. The teams do not apply to the LivePerson Connector.
- From the Role list, select All Roles that will have access to the workflow. The roles do not apply to the LivePerson Connector.
- Under Add Description, enter some text describing the purpose of this link (optional).
In the right panel, some code displays. Replace the default code with your own workflow information. Example 1. A simple workflow This workflow searches the CRM for the phone number when an incoming call does not match any contacts. {
"label":"Search the internet when no match is found",
"roles":[
"<your_selected_roles>"
],
"_teams":[
"<your_workflow_teams>"
],
"type":"onCall",
"match":"noMatch",
"type":"openCustomUrl",
"urlTemplate":"https://www.google.com/search?q={callPhoneNumber}"
}
}
There are two main parts to any workflow. The trigger (not highlighted above) is activated when there is a call (type is "onCall") when there is no matching phone number in the CRM. And the action, which is the event the trigger causes the happen, is shown below in red: The trigger and the action each have a type property. The type defines the kind of trigger and the kind of action. For more information on triggers, actions, and supporting components, see Advanced Workflow reference (section below). You can configure workflows in many different ways using a variety of triggers, actions, and variables.
Click Save to apply your changes. Be sure to refresh your UI if you are logged in to your CRM while editing the link.
Supported variables
The following variables can be used in workflows using trigger types other than webLink.
Table 1. Workflow variables supported in Manage Workflows (workflows other than webLink). Additional variables configured in the Attached Data feature are made available on the Chat object.
| Property | Description | Notes |
recordId | Unique identifier assigned by the CRM to the matched record from the CRM. For example, a contact, account, or lead. | |
recordName | Name of the matched record from the CRM. For example, the name of the contact, account, or lead. | |
recordEmail | Email address associated with the matched record from the CRM. | |
| recordPhone | Phone number associated with the matched record from the CRM. | |
recordType | Type of CRM record for the matched record. For example, a contact, lead, or account. |
Advanced Workflow Reference
Workflow triggers
The top level of the workflow includes the information about the trigger. A trigger is a set of conditions that must happen (such as clicking a link or receiving a call) before the action portion of the workflow can occur.
Tenfold includes the following workflow triggers:
- webLink Adds links with custom labels to the UI. This trigger is the same as the one used to create workflows for Launcher; however, it is possible to go beyond the basic abilities configured in Launcher by using webLink in custom workflows.
- onChat Performs an activity as defined by the action section when an inbound message is received.
- resolveMultiMatch Performs the defined action when a multi-match call is resolved to a single match.
- resolveNoMatch Performs the defined action when a no-match call is resolved to a single match.
- onClickCreateRecord Performs the defined action when a user creates a new record in the UI.
- onNoteSave Performs the defined action when a user saves note for an interaction.
Required trigger properties
All workflow triggers must include the following properties:
Table 1. Required trigger properties for all workflows
| Name | Supported values | Description |
| _teams | specific teams configured for the CRM | Teams assigned to the workflow. "_teams":[ |
| action | Defines the resulting behavior when the trigger condition is met. For more information, see Actions. "action": { | |
| id | generated string | Unique identifier of the workflow generated by Tenfold. IMPORTANT: Do not change this value. |
| label | user-created string | User-friendly name identifying the workflow. "label" : "Example Workflow Label", |
| roles | admin user other roles configured for the CRM | User roles that can access the workflow. "roles":[ |
| type | The kind of trigger used in the workflow. |
Workflow actions
The workflow proceeds to the action portion when the conditions for the trigger are met. The action section of the workflow is inside the action {...} of the workflow code.
Tenfold includes the following actions:
- openCustomUrl Opens a URL in a browser tab.
- openMatchingRecord Opens a record in context in the CRM.
- openCrmSearch Opens search in the CRM. Support is limited to Salesforce and MS Dynamics.
- openCrmFlow Opens a Salesforce Lightning Flow.
- openCrmUrl Opens a relative URL (only in Salesforce Lightning); uses the Salesforce API to open a specified view.
- runApex Runs a Salesforce OpenCTI method.
- sendRequest Sends an http request. This action can support use cases where it is necessary to make a request to some service on a localhost:port.
Actions define what happens when the conditions for the trigger are met. In the action section of each workflow, there is a type variable which holds the action type. The workflow types and the actions supported by each are listed below. You may select specific LivePerson skills for which you would like to enable these workflow actions.
Table 2. Workflow triggers and the actions they support
| Triggers | ||||||
| Actions | webLink | onChat | resolveMultiMatch | resolveNoMatch | onClickCreateRecord | onNoteSave |
| openCustomUrl | ✓ | ✓ | ✓ | ✓ | ✓ | |
| openMatchingRecord (Supported with Lightening component) | ✓ | ✓ | ✓ | |||
| openCrmSearch | ✓ | ✓ | ✓ | |||
| openCrmFlow (Supported with Lightening component) | ✓ | ✓ | ||||
| openCrmUrl | ✓ | ✓ | ✓ | |||
| openRelatedResource (Supported with Lightening component) | ✓ | |||||
| relateInteractionFromEngagementAttr (Supported with Lightening component) | ✓ | ✓ | ||||
| runApex | ✓ | |||||
| sendRequest | ✓ |
Worfklow actions and properties
openCrmFlow
Opens a Salesforce Lightning Flow.
This action supports the following:
| Name | Supported Values | Description |
| name | string | Flow API name "name":"<Flow_API_name>" |
| args | name = Flow variable name type = the data type of the variable value = the name of the variable which passes a value to the workflow | Name of a Lightning Flow variable that is configured as "Available for input" in the variables settings. "args":[ |
Supports the args property which holds input information for the Lightning Flow.
Example 1. openCrmFlow
{
"id" : "<workflow_id>",
"type":"onCall",
"label":"Open Lightning Flow",
"roles":[
"admin",
"user"
],
"_teams":[
],
"callDirection":"Inbound",
"callType":"External",
"action":{
"type":"openCrmFlow",
"name":"Tenfold_Call_Initiation",
"args":[
{
"name":"input_UUID",
"type":"String",
"value":"{callAttachedData.UUI}"
},
{
"name":"input_CCID",
"type":"String",
"value":"{callAttachedData.UCID}"
}
]
},
"note":"CCC Open Lightning Flow ",
"display":"global"
}
NOTE: Opening a Lightning Flow requires additional configuration on the CRM side.
openCrmSearch
The action openCrmSearch searches the CRM for information. Applicable to Salesforce and MS Dynamics.
This action supports the following:
| Name | Supported Values | Description |
| searchTemplate | Tenfold variables. | Variables which can be passed to the CRM to use as search parameters. "searchTemplate": "{<variable_name>}" |
Supports name and value parameters which can be used with the URL to construct a search query.
Example 2. openCrmSearch
{
"id":"<workflow_id>",
"_teams":[
],
"roles":[
"user"
],
"type":"onCall",
"action":{
"type":"openCrmSearch",
"searchTemplate":"{callPhoneNumber}"
},
"match":"noMatch"
}
openCrmUrl
Opens a relative URL (only in Salesforce Lightning); uses the Salesforce API to open a specified view based on passed parameters.
This action supports the following:
| Name | Supported Values | Description |
| urlTemplate | A URL relative path. | A URL inside Salesforce which receives the parameters sent from the workflow. "urlTemplate":"<path_to_CRM_URL>", |
Supports name and value parameters which can be used with the URL to construct a query.
Example 3. openCrmUrl
{
"id":"<workflow_id>",
"_teams":[
],
"roles":[
"user"
],
"action":"openCrmUrl",
"urlTemplate:":"/internal-salesforce-relative-url/{callPhoneNumber}/{recordType}",
"parameters":[
{
"name":"id",
"value":"{callId}"
},
{
"name":"module",
"value":"{recordType}"
}
]
}
openRelatedResource
Opens a case or an opportunity that is related to the conversation. For specific use cases where the case is created in the bot flow and prior to the agent interaction, there is a mechanism to first relate the case from the LivePerson engagement attribute as provided in the example below. (This requires the engagement attribute to be updated prior to transferring the message to the agent.
This action supports the following:
| Name | Supported Values | Description |
| relateInteractionFromEngagementAttr | A case id or opportunity id from Salesforce is related to the interaction. "type": "onChat", "label": "relate from attr", "action": { "type": "relateInteractionFromEngagementAttr", "module": "Case", "id": "messages[0].text", "waitForCallAttribute": { "path": "messages[0]" } }, "display": "global", "enabled": false } | |
| openRelatedResource | A Case or Opportunity in Salesforce is opened after it is is related to the interaction | A URL inside Salesforce which receives the parameters sent from the workflow. { "id": "<workflow_id>", "type": "onChat", "label": "on chat open related resource!", "action": { "type": "openRelatedResource", "waitForCallAttribute": { "path": "relateResourceCrmRecord" } }, "display": "global", "enabled": false } |
Supports name and value parameters which can be used with the URL to construct a query.
Example 4. relateInteractionfromEngagementAttribute
{
"id": "<workflow_id>",,
"type": "onChat",
"label": "Relate resource from engagement attribute",
"action": {
"type": "relateInteractionFromEngagementAttr",
"module": "Case",
"id": "consumer.imei",
"waitForCallAttribute": {
"path": "consumer.imei"
}
},
"display": "global",
"enabled": true
}
Example 5. openRelatedRecord
{
"id": "<workflow_id>",,
"type": "onRelatedResource",
"label": "Open related resource on relate",
"action": {
"type": "openRelatedResource"
},
"display": "global",
"enabled": true
}
openCustomUrl
The action openCustomUrl opens a new URL in a new browser tab. Included parameters are converted into a query string.
This action supports the following:
| Name | Supported Values | Description |
| urlTemplate | name and value parameters | The URL you want to open. May contain variables from the Tenfold platform. "urlTemplate" : "https://www.google.com/search", |
Supports name and value parameters which can be used with the URL to construct a query.
Example 6. openCustomUrl
{
"id":"<workflow_id>",
"_teams":[
],
"roles":[
"user"
],
"type":"webLink",
"display":"contact",
"label" : "Look up name",
"action":{
"type":"openCustomUrl",
"urlTemplate":"https://www.google.com/search",
"parameters":[
{
"name":"q",
"value":"{recordName}"
}
]
}
}
openMatchingRecord
The action openMatchingRecord opens a record which is in context in the CRM.
This action does not support any properties or variables.
Example 7. openMatchingRecord
{
"id":"<workflow_id>",
"_teams":[
],
"roles":[
"user"
],
"type":"resolveMultiMatch",
"action":{
"type":"openMatchingRecord"
}
}
runApex
Executes an Apex method from an Apex class that’s exposed in Salesforce.
| Name | Supported Values | Description |
| className | string | Apex class of the method to execute. |
| methodName | string | Method to execute. |
| params | Method parameters to pass. The string must include field value pairs and be formatted as a valid query string. |
Example 8. runApex
{
"type" : "onCall",
"onSingleMatch" : true,
"action" : [
{
"type" : "runApex",
"className" : "ExampleClass",
"methodName" : "ExampleMethod",
"waitForAttachedData" : true,
"params" : {
"inputData" : {
"category" : "{callAttachedData.category}",
"intent" : "{callAttachedData.intent}",
"description" : "{callDescription}"
}
}
},
{
"type" : "relateResource",
"param" : "{returnValue.runApex.caseId}"
}
],
"callDirection" : "Inbound",
},
sendRequest
Sends a REST request to Salesforce to a service on a local port.
| Name | Supported Values | Description |
| requestType | GET | POST | |
| urlTemplate | string | |
| requestBody | The body of the REST request. |
Example workflow: Open a URL from the CRM for no-match events
You can configure the application to automatically open a specific URL in the CRM for no-match events. Note that the configurator has automatically generated an ID. You must copy the unique ID created in your account for the workflow to work correctly. In place of the prepopulated code, paste the following code.
Organization Level Setup
{
"type":"onCall",
"match":"noMatch",
"action":{
"type":"openCrmUrl",
"urlTemplate":"<your_CRM_URL>"
},
"id":"<your_workflow_id>",
"_teams":[
"<your_selected_teams>"
],
"roles":[
"<your_selected_roles>"
],
"label":"No Match - Open CRM URL",
"note":"Upon No Match event, open the a designated URL in the CRM."
}
Be sure to replace <your_CRM_URL> with the relative path to the URL from your CRM to use in the workflow.
Example workflow: Search the CRM for a matching record for multi-match events
You can configure the application to automatically show the search results in the CRM for a multi-match event. Note that the configurator has automatically generated an ID. You must copy the unique ID created in your account for the workflow to work correctly. In place of the pre-populated code, paste the following code.
Organization Level Setup
{
"id":"<your_workflow_id>",
"type":"onChat",
"label":"Open Global Search on MultiMatch",
"roles":[
"<your_selected_roles>"
],
"match":"multiMatch",
"_teams":[
"<your_selected_teams>"
],
"action":{
"type":"openCrmSearch",
"searchTemplate":"{callPhoneNumber}"
},
"note":"Upon Multi Match event, open Global Search in the CRM."
}
Skill Level Setup
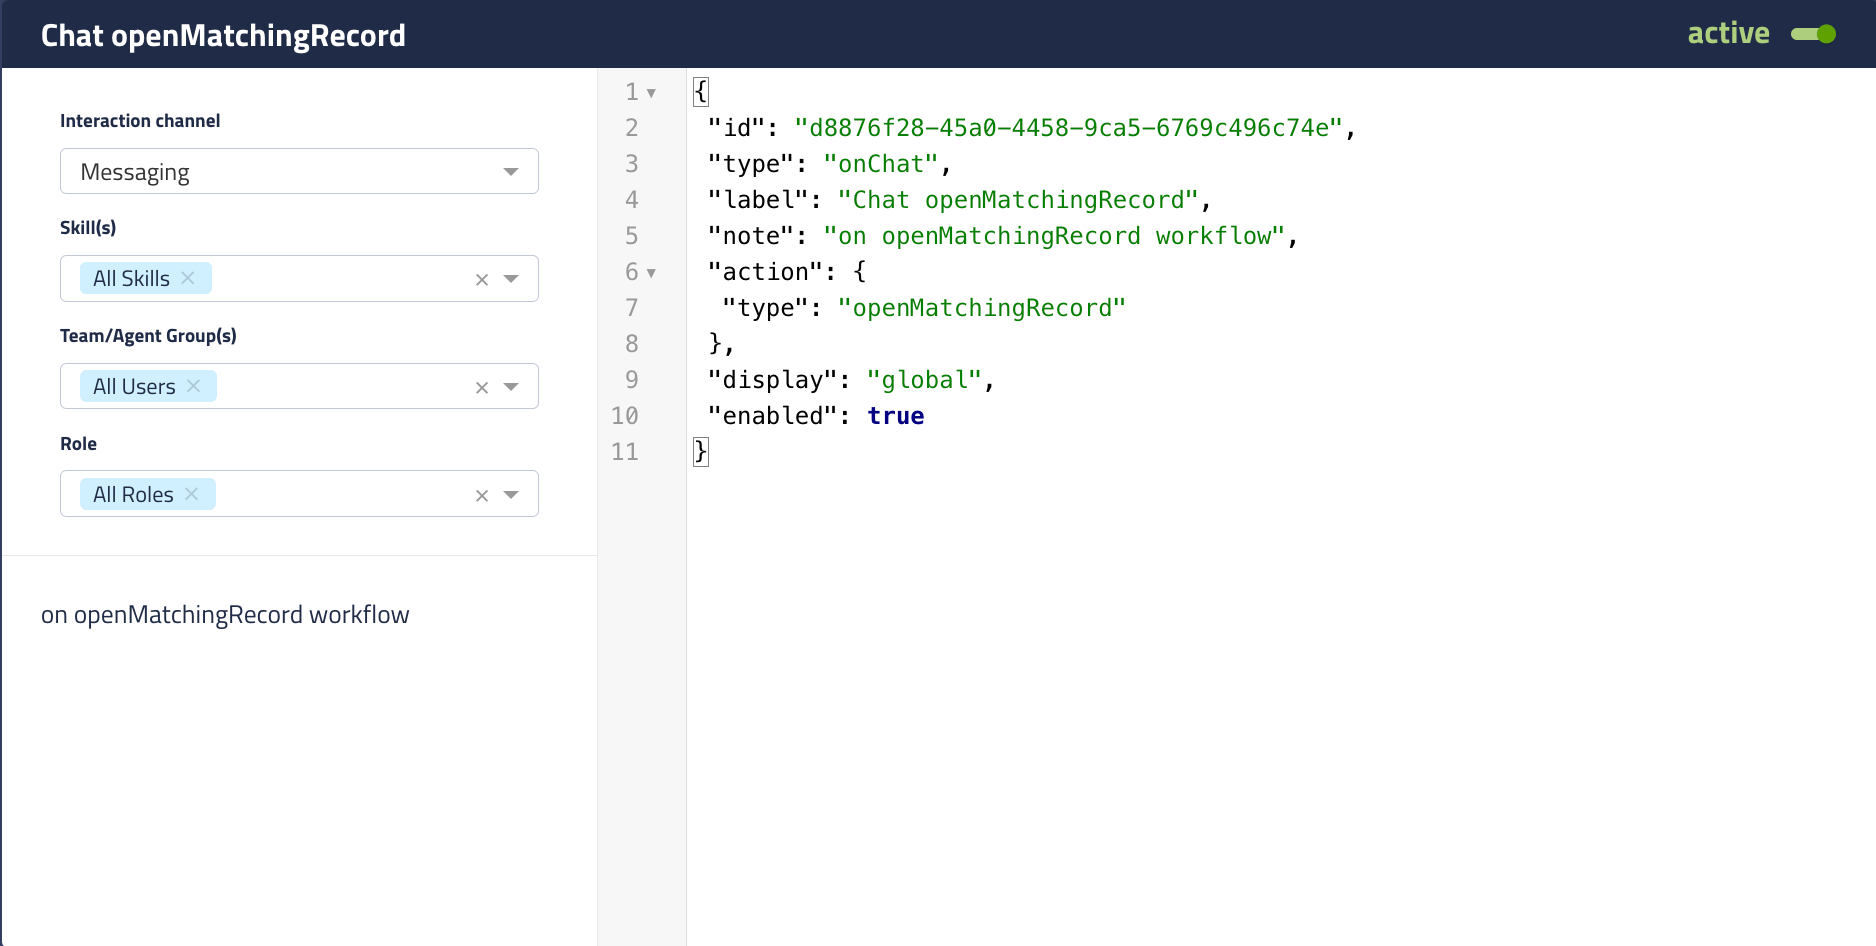
Example workflow: Open the matching CRM record for single-match events
This is the most sought after use of the OpenMatchingRecord functionality. This enables the matching CRM contact/account/lead to autopop when accepting the incoming message. Note that the configurator has automatically generated an ID. You must copy the unique ID created in your account for the workflow to work correctly.
Organization Level Setup
You may copy the code below and replace it with the default code in your configuration, but be sure to replace the ID with the orginal ID provided.
{
"id": "d8876f28-45a0-4458-9ca5-6769c496c74e",
"type": "onChat",
"label": "Chat openMatchingRecord",
"note": "on openMatchingRecord workflow",
"action": {
"type": "openMatchingRecord"
},
"display": "global",
"enabled": true
}

Open match record
Missing Something?
Check out our Developer Center for more in-depth documentation. Please share your documentation feedback with us using the feedback button. We'd be happy to hear from you.