Contact Center Setup
Contact center setup
For SIP-based call flows, configure your contact center to allow both inbound and outbound calls between your contact center and LivePerson’s CPaaS provider. To help with this configuration, LivePerson has provided a few guides on what needs to be configured for both inbound and outbound flows to work for the following contact centers:
Genesys Cloud
- Genesys Engage
Note: We’ll be adding documentation for more contact centers at a later date: Avaya, Cisco Unified Call Manager, and Twilio. Please reach out to your LivePerson account team if you want to discuss other contact center solutions and their setup.
Genesys Cloud
To transfer calls over SIP between Genesys Cloud and Conversational Cloud, configure the following:
- Create a new SIP trunk that allows traffic between Genesys Cloud and Telnyx.
- Whitelist the Telnyx IP Addresses.
- Update the SIP Invite for the call transfer to include the X-Telnyx-Token custom header.
Create and configure the external SIP trunk
For Genesys Cloud, you need to configure a new Generic BYOC Carrier external trunk to allow communication between Genesys Cloud and Telnyx. To configure the SIP trunk, make sure your user has the Telephony -> Plugin -> All permission setting enabled.
To create and configure an external SIP trunk:
- Go to Admin -> Telephony -> Trunks -> External Trunks tab.
- Create a new external trunk and select your protocol (TLS or UDP). TLS for secured media.
- Update the Inbound SIP Termination Identifier box to use the FQDN that you provided to the LivePerson team when setting up the Telnyx configuration.

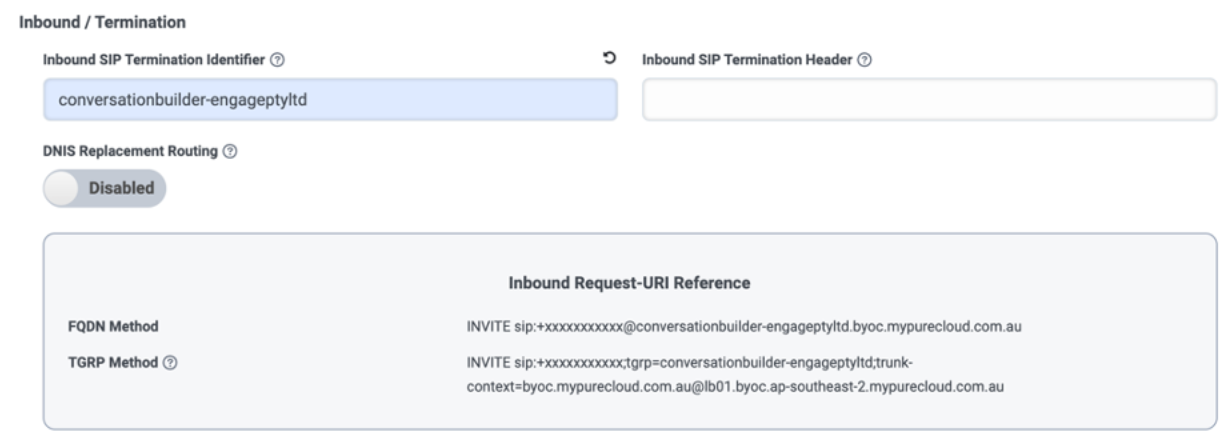
4. Update the Outbound SIP Termination Identifier box to use the FQDN address for the region you are located in. For more info, see the Telnyx documentation here: https://sip.telnyx.com/.
5. Update the SIP Servers to include the Primary and Secondary IP Addresses of Telnyx for the region you are located in. These IP addresses should match the region of the FQDN address you selected in the step above.

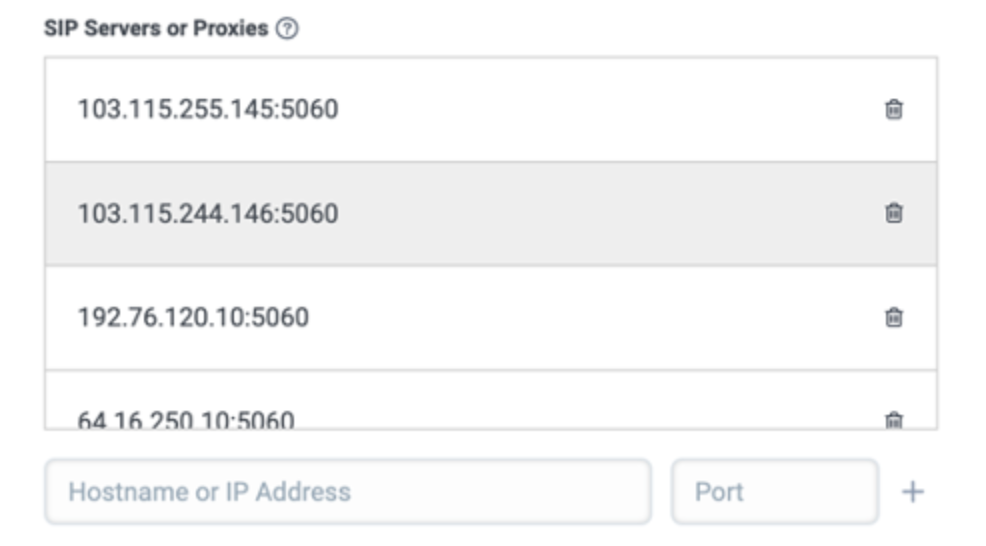
- If you selected TLS for your protocol, the port needs to be 5061, and if you selected TCP/UDP for your protocol, the port needs to be 5060.
6. Update the SIP Access Control section to include the same IP addresses that you used in the step above.
7. In the Protocol section, enter the following information if you want to pass the conversation ID that is related to the escalated phone calls.

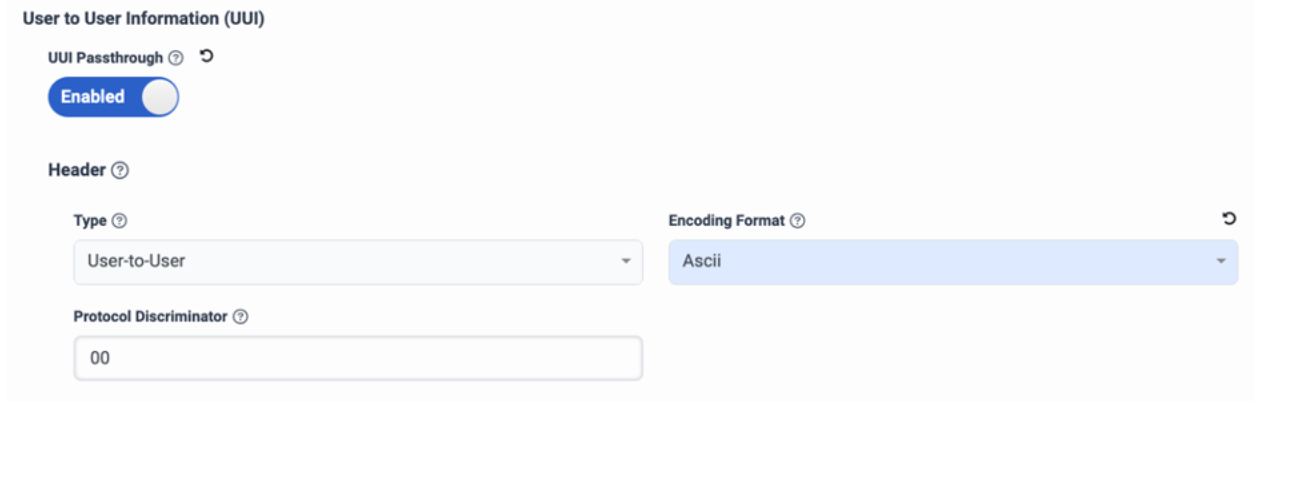
8. In the Custom SIP headers panel, add a new custom header called X-Telnyx-Token and update the value to be the token that is provided to you from the LivePerson team.
For more info on how to configure an external trunk, see the official documentation here: Genesys Cloud - External Trunk.
Genesys Engage with AudioCodes Mediant VE SBC
To transfer calls over SIP between Genesys Engage and Conversational Cloud, configure the following within AudioCodes:
- Media Realm
- Audio Coders Group
- IP Profile
- Proxy Set
- IP Group
- IP-to-IP Routing Rules
Media Realm
To control the UDP port range and maximum number of media sessions for a particular IP Group, configure a Media Realm in AudioCodes.
To configure the Media Realm, go to Setup -> Signaling & Media tab -> Core Entities folder -> Media Realms.

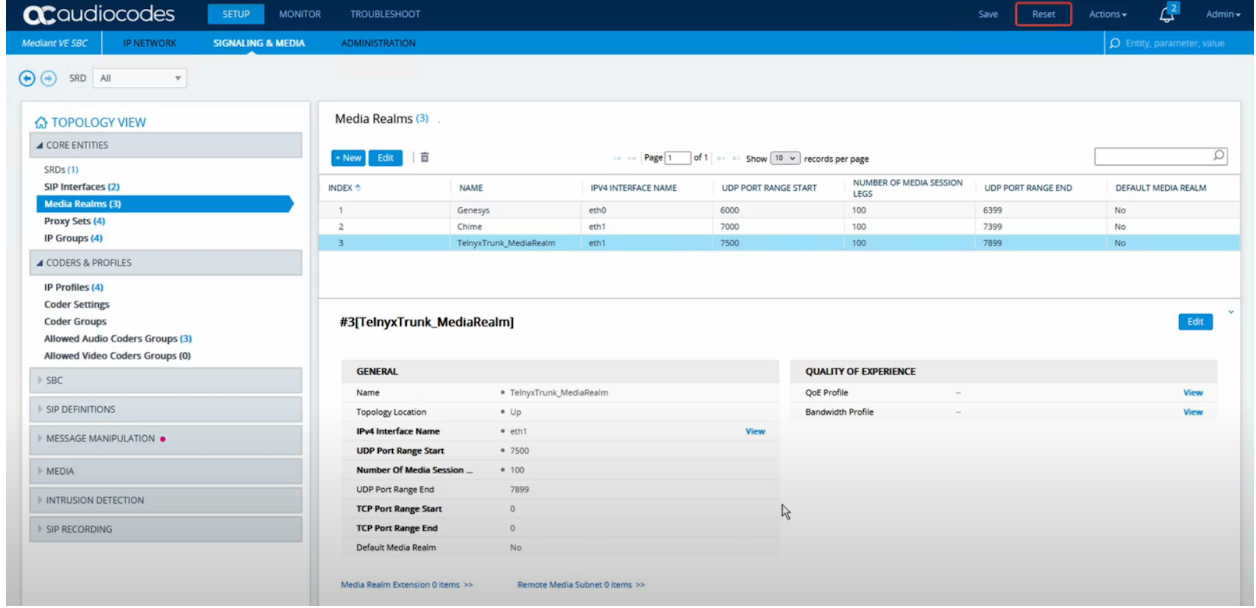
For more info on how to configure Media Realms, see the official documentation here: AudioCodes - Media Realms.
Audio coders group
For the SIP calls to go through, configure the supported audio codecs for Telnyx: G711. After you create the Audio Coders Group, this group can be associated with the IP Profile that will be created.
To configure the Media Realm, go to Setup -> Signaling & Media tab -> Coders & Profiles folder -> Coders Groups.
For more info on how to configure Audio Coders Groups, see the official documentation here: AudioCodes - Coders Groups.
IP profile
The IP Profile lets you configure the settings tied to the signaling and media of a call. An example of this is enabling secure audio. In order to create an IP group, you need to create an IP profile that will be associated with the group.
To configure the IP profile, go to Setup -> Signaling & Media tab -> Coders & Profiles folder -> IP Profiles.
For more info on how to configure an IP profile, see the official documentation here: AudioCodes - IP Profile.
Proxy set
To configure the IP group, you need to create a proxy set, which represents the destination of an IP group in AudioCodes. The proxy set is where you configure the primary and secondary IP address for Telnyx.
To configure the proxy set, go to Setup -> Signaling & Media tab -> Core Entities folder -> Proxy Sets.
After you create the proxy set, click on the row to edit the proxy addresses for the new proxy set. For the proxy addresses, create two records:
- One for the primary IP address of Telnyx for your region
- One for the secondary IP address of Telnyx for your region
For more info, see: https://sip.telnyx.com/.
For more info on how to configure proxy sets, see the official documentation here: AudioCodes - Proxy Sets.
IP group
The IP group represents the SIP entity in your network with which AudioCodes communicates with (Telnyx). The IP group is made up of a number of sub-resources that need to be configured to make the communication between Genesys Engage and Conversational Cloud work properly.
To configure an IP group, go to Setup -> Signaling & Media tab -> Core Entities folder -> IP Groups.
For more info on how to configure IP groups, see the official documentation here: AudioCodes - IP Groups.
IP-to-IP routing rules
After configuring your IP group, create two new IP-to-IP routing rules to match traffic from your new IP group and to then route this traffic to Genesys Engage.
To configure IP-to-IP routing rules, go to Setup -> Signaling & Media tab -> SBC folder -> Routing -> IP-to-IP Routing.
For the first rule, match all traffic from the Telnyx IP group and have this traffic routed to your Genesys Engage IP group.
For the second rule, match all OPTIONS requests from the Telnyx IP group, and route this traffic to an internal action. Place this second rule above the first rule that you created, so it is evaluated first.
For more info on how to configure IP-to-IP routing rules, see the official documentation here: AudioCodes - IP-to-IP Routing Rules.
Showing contextual information
When you configure your voice bot to transfer the voice call to your contacter center, in Conversation Builder you have the option to pass additional custom SIP headers as part of the SIP Invite request. To show these custom headers to your contact center agents, configure the following:
- Set up Genesys Administrator to capture data from the SIP Invite.
- Set up Genesys Administrator to display the captured data as a Business Attribute.
Tips
- When passing data from the voice bot to your contact center, make sure that your SIP headers conform with any policies that have been set up in your AudioCodes SBC instance. For more details on how to configure your SIP message policies, see the official documentation here: AudioCodes SBC - Configure Message Policy.
Capture user data from SIP invite
To capture the data from the custom SIP headers, configure Genesys Administrator to store the custom SIP header data in the AttributeUserData.
Steps to capture the user data:
- Log into Genesys Administrator as an Admin user.
- Navigate to Provisioning -> Environment -> Applications.
- Select SIP, followed by sipserver.
- Navigate to the Options tab, and add the following item:
- Section: INVITE
- Name: userdata-1
- Value: User-to-User (replace with your custom SIP header)
- Click Save.
Once these steps are completed, Genesys copies the custom SIP header and the value that was passed to the AttributeUserData in all internal events and requests, which makes it available to present to your contact center agents.
For more info on how to configure and use user data, see the official documentation here: Genesys Engage - User Data.
Display captured data to agents
After you have configured Genesys to capture the custom data from the SIP Invite, configure Genesys Administrator to display the captured data as a Business Attribute.
Steps to configure the Business Attribute:
- Log into Genesys Administrator as an Admin user.
- Navigate to Provisioning -> Routing/eServices -> Business Attributes.
- Click New and provide the following details:
- Name: Casedata
- Display Name: Case Data
- Click Save
- Find the newly created Business Attribute and double click on the attribute to view the details; then click the Attribute Values tab.
- Add a new Attribute Value for each key you want to display from the AttributeUserData:
- Name: User-to-User
- This should match the value you provided when storing the user data.
- Display Name: UUI
- Add the option, and then provide the following details:
- Section: interaction-workspace
- Name: display-type
- Value: string
- Name: User-to-User
After creating the new Business Attribute, expose the attribute in the WDE (Workspace Desktop Edition) configuration.
Steps to configure the WDE:
- Log into Genesys Administrator as an Admin user.
- Navigate to Provisioning -> Environment -> Applications.
- Select WDE, and then select the WDE application.
- Click the Options tab.
- Click New and add the following details:
- Section: interaction-workspace
- Name: interaction.case-data.format-business-attribute
- Value: Casedata
- Click Save.
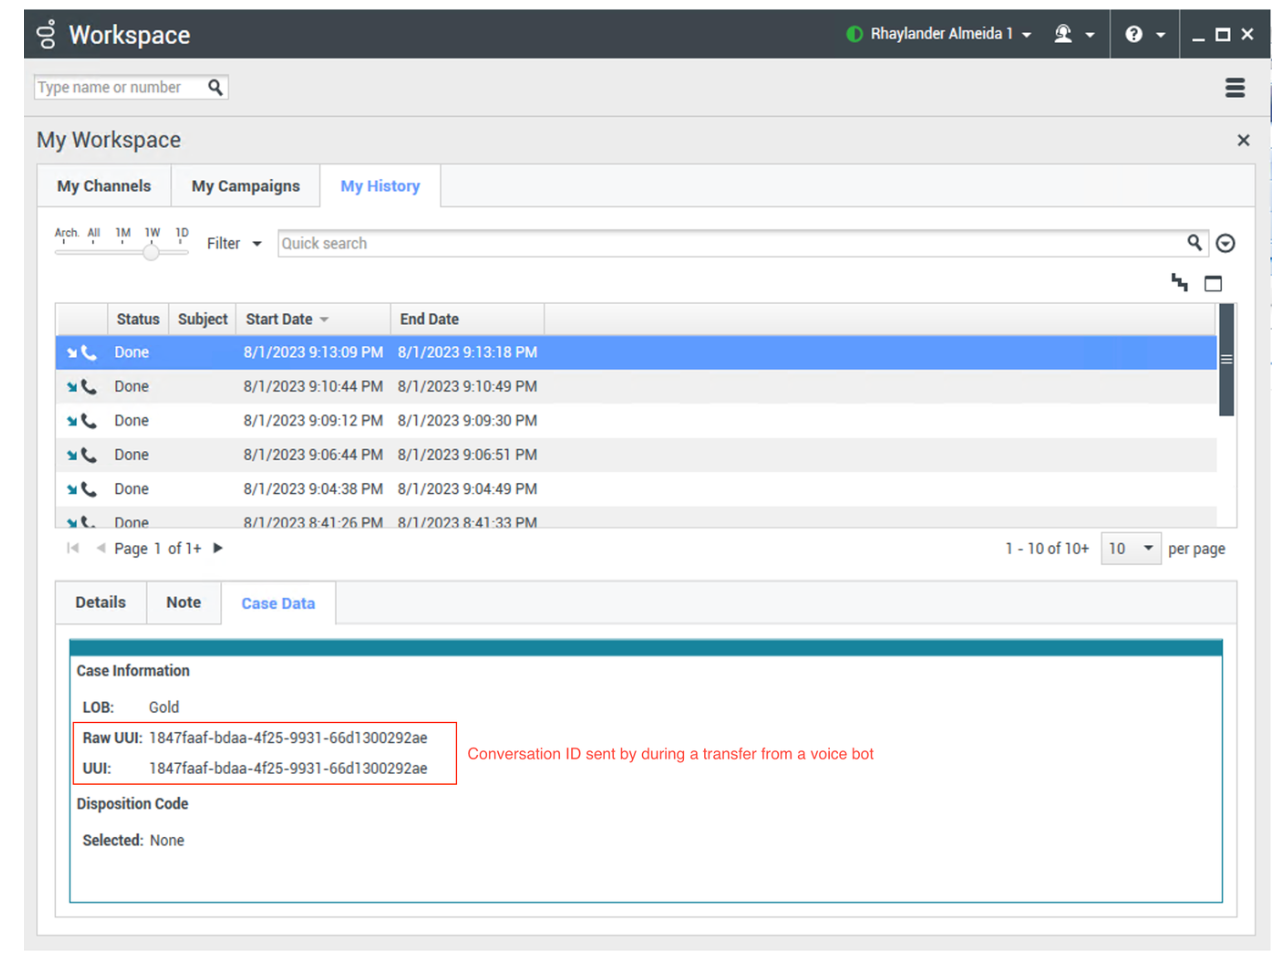
After configuring the WDE, you should be able to make a voice call to the voice bot, and when the call is transferred to the contact center, the new data should be visible under the Case Data section.

Missing Something?
Check out our Developer Center for more in-depth documentation. Please share your documentation feedback with us using the feedback button. We'd be happy to hear from you.