Shift scheduler configuration guide
LivePerson enables you to define your account’s working hours, to set the most accurate expected response time for your consumers during a messaging conversation.
You may define your account’s working hours in two ways:
- Manual definition (default) - whenever your contact center starts a shift, manually set the Shift Scheduler to “Online.” Whenever your contact center is closed, manually set the shift scheduler to “Off hours.”
- Automatic Scheduler - define your workdays per day of the week as well as special occasions ahead of time.
You may choose from each of the methods above according to your brand’s needs.
Terminology
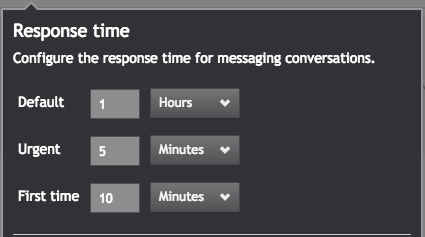
- SLA = Service Level Agreement. The response time configured within the Agent Workspace to handle messaging conversations for either all conversations (default), urgent conversations, or first-time consumers. The SLA can be set per the account level (default) or be overridden per skill.

- TTR = Time To Response. This time is set according to the current shift status (online/off-hours). If the shift is currently active, the TTR equals 0. If the shift is currently inactive, the TTR equals the time until the next shift will start.
- ETTR = Expected Time To Response. The expected response time is when the consumer will be answered by an agent. The ETTR is displayed to consumers during a messaging conversation via the Automatic Messages mechanism.
ETTR = TTR + SLA. For example: - If the default SLA is 1 hour and the account is currently on an active shift, the ETTR = SLA = 1 hour.
- If the default SLA is 1 hour and the account is currently offline, and the next shift will begin in 12 hours from now, the ETTR = 12 + 1 = 13 hours.
Manual working hours
1. Click the downward arrow next to the user name and click "Shift Scheduler"

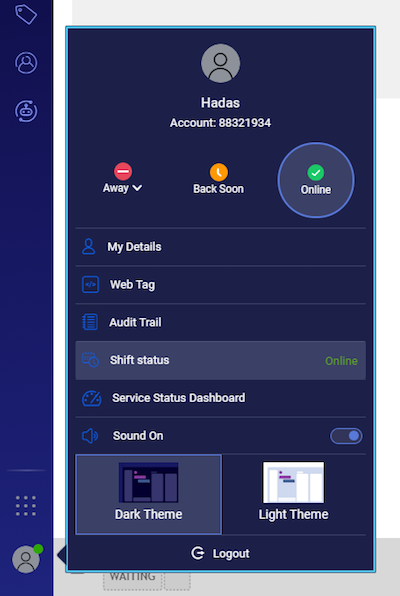
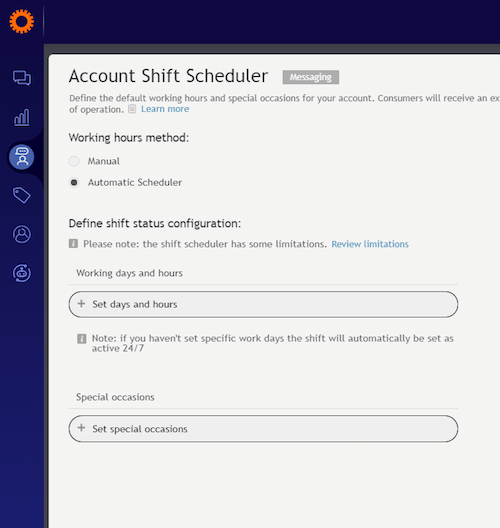
2. The Account Shift Scheduler screen will now be displayed. Choose the “Manual” option.
3. Define your current shift status:
- Choose “Online” when your contact center is active.
- Consumers will get auto messages with an expected time to respond which equals the conversation SLA.
- Choose “Off-hours” when your contact center is inactive.
- Define the next shift start date
- Define the next shift start time
- Consumers will get auto messages with the expected time to respond which equals the time until the next shift time + the conversation SLA.
- The Conversational Cloud will automatically set to “Online” again on the next shift date and time.
- Save the page.
Automatic scheduler

The configuration of scheduled Workdays allows you to set hours of operation for specific days of the week and assign them as the account's default settings or for each skill, which overrides the default settings. During the specified hours of operation, consumers will receive working hours auto messages and the expected time to get a response message for the skill as defined in the account. Outside of the specified hours of operation, consumers will receive off-hours auto messages and the expected time to respond including the time until the next shift begins.
The expected time to respond is also available for the agent, so it is clear to him when the consumer is expecting his reply.
The configuration of Special Occasions allows you to set specific dates in which there is an exception to the hours of operation defined by the Workdays API or through the Conversational Cloud UI, for example, working hours during public holidays. The expected behavior on the visitor side as far as Automatic Messages and time to response is the same as Workdays.
Note: Special occasions do not modify hours of operation defined by Workdays, but instead override them.
See limitations, clarifications, and best practices for working hours management.
Configuration
(Needed for both API + UI)
- Configure Automatic Messages on your account:
- To enable Automatic Messages on your LivePerson Conversational Cloud account, please contact your LivePerson account team.
- Mobile App (SDK) customers:
- Use SDK versions 2.8 or higher.
- The TTR toaster is no longer supported, even if it’s still enabled. Therefore, it is recommended to turn the TTR toaster message off.
- In case you are using the “off hours by several logged-in agents” feature - it is recommended to disable it. The working hours feature is the permanent solution to the use case this workaround was intended for.
Contact your account team to disable it. - Customize Automatic Messages on your account.
Workdays & special occasions in the Conversational Cloud
Accessing schedule/special occasion libraries
Scheduling items or special occasion items can be created through the Schedule or Special Occasion libraries within the Conversational Cloud. You may access the library in 2 ways:
Via the Account Shift Scheduler page:
- Click the downward arrow next to the user name and click "Shift Scheduler."
- The Account Shift Scheduler screen will now be displayed. Choose the “Automatic Scheduler” option.
- Under the “Define shift status configuration,” click the “Set days and hours” button to access the Schedule library, or click the “Set special occasions” button to access the Special Occasion library:
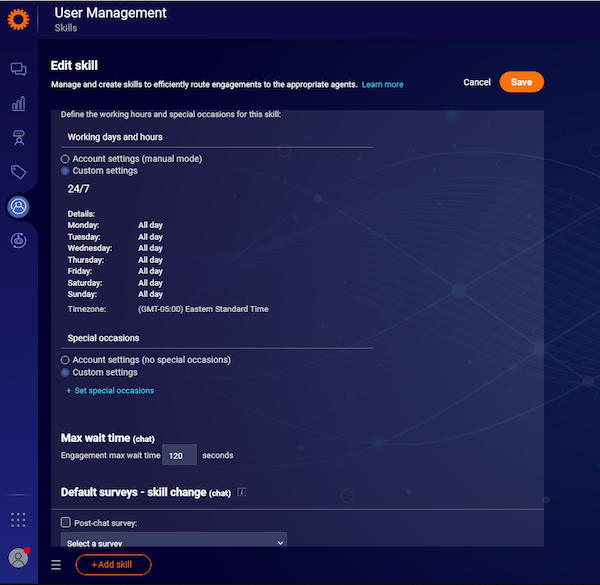
Via the Skills page:
- Go to the Skills tab, and from the skills list select the desired skill. Click the skill to edit it.
- Scroll down to the “Working hours” section.
- Under the “Working days and hours” section, choose the “Custom settings” radio button.
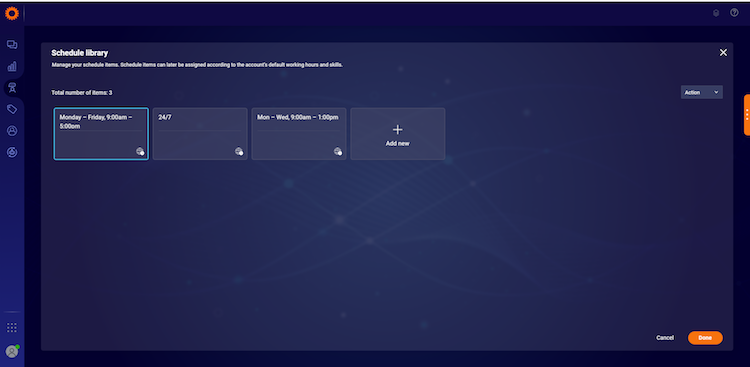
Click the “Set days and hours” button to access the Schedule library (see image) - Under the “Special occasions” section, choose the “Custom settings” radio button. Click the “Set special occasions” button to access the Special Occasion library. The Schedule library / Special Occasions library will now be displayed on your screen:

Creating a new workday item
1. Access the Scheduling library on your LivePerson Conversational Cloud account.
2. Click “Add new”
3. Fill in the Schedule item name, description (optional), and timezone
4. Define the hours of operation for each day of the week.

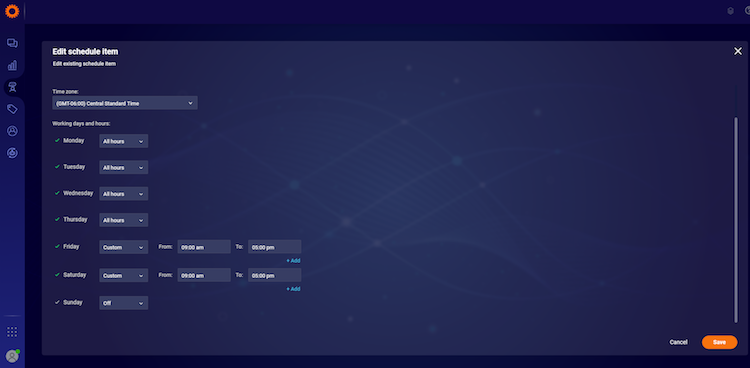
You may choose between:
- All hours (default) - this day will be considered as active from 12:00 am until 11:59 pm.
- Custom - manually type the activation hours of the day. The input must be in the following format: “HH:MM am/pm” and in 5-minute intervals only.
The only exception is 11:59 pm, which can also be defined to define a shift that lasts until midnight.
- Off - this day will be considered inactive from 12:00 am until 11:59 pm.
5. Defining multiple shifts per day.
You may also define multiple shifts per single day of the week. Simply click the “+Add” button to split the day’s activation hours and add the shifts hours.
6. Save the page.
7. The new scheduling item will now appear in the schedule library.
Creating a new special occasion item
8. Access the Special Occasion library on your LivePerson Conversational Cloud account.
9. Click “Add new”
10. Fill in the Special Occasion item name, description (optional), and timezone
11. To add new occasions to the list, click the “Add line” button
12. A new occasion line will be added to the table. Fill in the occasion name, timeframe, shift status, and shift time
13. For the shift status, you may choose between:
- Off (default) - this occasion will be considered inactive from 12:00 am until 11:59 pm, in its defined timeframe.
- All hours - this occasion will be considered active from 12:00 am until 11:59 pm, in its defined timeframe.
- Custom - manually type the activation hours of the day. The input must be in the following format: “HH: MM am/pm” and in 5-minute intervals only.
The only exception is 11:59 pm, which can also be defined as a shift that lasts until midnight.
14. Defining multiple shifts per occasion:
You may also define multiple shifts per occasion. Simply hover the occasion line, then click the “+Add” button to split the occasion activation hours, and add the shifts hours.
15. Save the page.
16. The new special occasion item will now appear in the special occasion library.
Assigning Workdays/Special Occasions per account
- Access the Schedule/Special occasions library via the account Shift Scheduler page
- Choose the item which you would like to assign as your account default.
The item will be marked with an orange border. - Click “Done”:
- The Account Shift scheduler page will be displayed, and a summary of the Schedule/Special Occasion item details will be presented on the screen for you to review.
- Click “Save” to save your Account Shift Scheduler changes.
Assigning workdays/special occasions per skill
- Access the Schedule/Special occasion library via the account Skills page
- Choose the item which you would like to assign as your account default.
The item will be marked with an orange border. - Click “Done”:
- The Skill page will be displayed, and a summary of the Schedule/Special Occasion item details will be presented on the screen for you to review.
- Click “Save” to save the skill with its new working hours changes.

Workdays & special occasions using APIs
Creating a new workday item
See Workdays API -> Create Workdays Object on the Developer Center.
Creating a new special occasion item
See Special Occasion API -> Create Special Occasion Object on the Developer Center.
Assigning workdays/special occasions per account
The “isDefault” field determines whether a workdays object is the default for the entire account. Only one object can be set as the default for each account.
Assigning workdays/special occasions per skill
To assign a workdays item to a specific skill, you should use the Skills API, and assign a workingHoursId or specialOccasionId field to the skill.
Refer to Skills API - Appendix for additional details.
API Permissions
To generate App Keys to access the API, follow the following steps:
1. Log in to your LivePerson Conversational Cloud account.
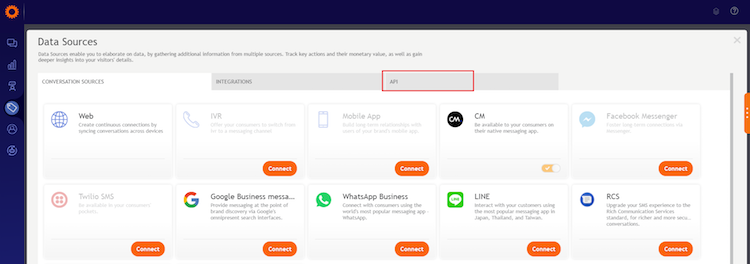
2. Go to Campaign Builder → Campaign Footnote → Data sources
3. Go to API tab → Add new API key
4. Under Administration, choose the Working Hours API
Then, simply choose the permission needed out of:

- Read - to access (read) all Workdays or Special Occasions defined on your account.
- Write - to create/edit/delete Workdays or Special Occasions defined on your account.
- Edit skill working hours - to create/update/delete skill’s Workdays or Special Occasions field.

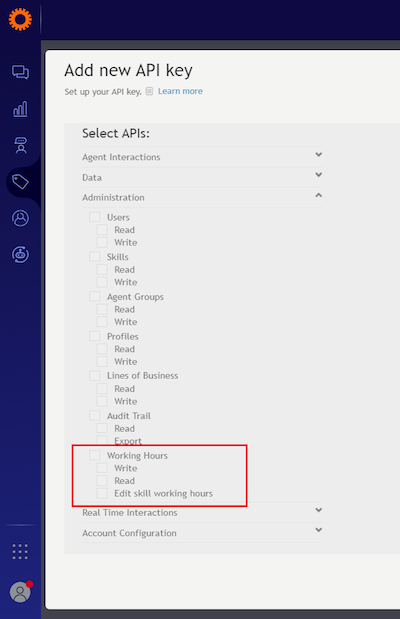
5. Click Save. The Authentication details will now be displayed. Use it to access the API.
For additional info on creating API keys - LivePerson APIs and SDKs documentation in the LivePerson Developer Center.
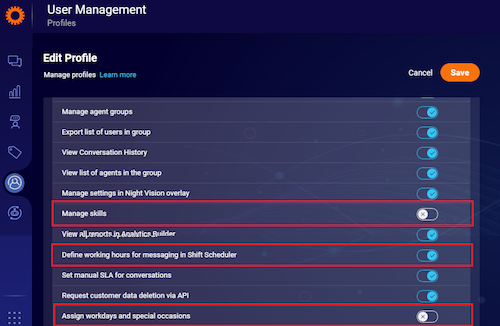
Profiles and permissions
Permission: Configure skill workdays and special occasions
- New permission has been added to Administrator and Agent Manager roles: “Configure skill workdays and special occasions”
- Permission default states:
- ON by default for Administrators
- OFF by default for Agent Managers
- Users with this permission set to “Off” will not be able to edit any skills’ workdays or special occasions.
- The following profile configurations are incorrect and not supported:
- Administrator:
- Set the “Skill administration” permission as OFF but keep the “Configure skill workdays and special occasions” permission ON
- Agent manager:
- Set the “Edit skill” permission as OFF but keep the “Configure skill workdays and special occasions” permission ON
- Administrator:
Permission: Configure account Shift Scheduler
- The existing permission “Configure Shift Status” has been renamed to “Configure account Shift Scheduler”
- This permission is available both for Administrator and Agent Manager and set to ON by default.
- Users with this permission enabled will be able to edit the account Workdays as well as Special Occasions.

Missing Something?
Check out our Developer Center for more in-depth documentation. Please share your documentation feedback with us using the feedback button. We'd be happy to hear from you.