Automatic Conversation Distribution
Balancing the agent workload
Accepting conversations manually is not always the most efficient way to manage your contact center operations. It has the potential to cause a number of issues, such as customers experiencing long wait times, an imbalance of workload between agents, and high rates of conversation abandonment.
To avoid these problems, LivePerson’s Automatic Conversation Distribution (ACD) helps brands manage agent workload more effectively by intelligently routing conversation requests and balancing the workload among the pool of available agents. For brands using messaging, ACD also works to distribute conversations intelligently between messaging agents.

How Automatic Conversation Distribution (ACD) works
LivePerson’s ACD algorithm routes conversation requests to available agents according to their workload. The ACD algorithm takes into consideration how many conversations an agent is allowed to take, i.e., their maximum concurrency, as well as how many conversations the agent is currently handling. For brands using messaging, ACD also works to distribute conversations intelligently between messaging agents.
For information on the routing of messaging conversations, please refer to the Routing logic for messaging documentation.
Accepting a conversation
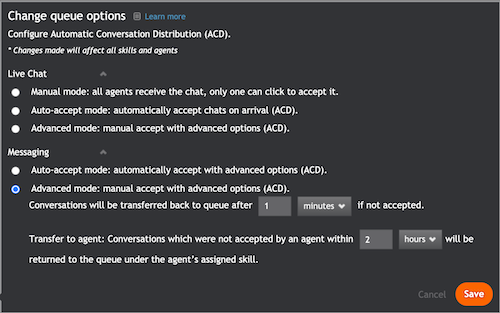
Agents can accept conversations manually or automatically, depending on which of the following ACD modes has been configured:
- Auto-accept: conversations are automatically routed to the most available agent. The conversation window opens automatically, a new incoming conversation notification appears on the bottom of the screen, and an audio alert sounds.
- Advanced: conversations are routed to the most available agent who can then manually accept the conversation. If the agent has not answered the conversation within a set amount of time, then the visitor is routed back to the queue to wait for the next most available agent.
How to Configure ACD
ACD settings can be configured in the Night Vision overlay if enabled on the account. Settings are configured once for all the agents and skills in the account:
- Click the Night Vision button at the top of the screen.
- Click Edit.
- The Change queue options window opens. Select one of the queue options.
- Select the time interval before the conversation is sent back to the queue.
Missing Something?
Check out our Developer Center for more in-depth documentation. Please share your documentation feedback with us using the feedback button. We'd be happy to hear from you.