Salesforce Widget Installation guide
The Salesforce widget allows brands to provide a highly personalized customer experience by collating a 360 view of the customer and all relevant cases from Salesforce inside the Agent workspace itself.
For brands that currently use Salesforce as their preferred CRM platform, this solution offers an out-of-box integration and empowers agents with meaningful context. With this solution, brands can save agents time by reducing the need for dual maintenance and updates of notes in the CRM. Brands can also lower overall operational costs by driving automation of the flows from the customer interactions with the agents to updates in the CRMs. This will allow brands to streamline the process so that the relevant teams can focus on cases based on the inputs from the agent interactions with the customer. The complete chat transcript can be synced to Salesforce and related to the specific case for context.
This guide provides an overview of the tasks that should be completed to enable the Salesforce widget in the Conversational Cloud.
Prerequisites
In order to perform the following steps, you will need the following:
- Salesforce Account with administrative privileges
- LivePerson Account with administrative privileges
The LivePerson Salesforce Widget uses OAuth 2.0 JWT Bearer Flow for Server-to-Server Integration as an authorization scheme in Salesforce.
You need the following information to set up the account using the Salesforce Widget setup wizard in Integration Hub:
- Salesforce Authorization server URL (formatted like this: https://xyz.abc.my.salesforce.com)
- Salesforce OAuth Key (called Client ID in the setup wizard)
- The generated secret key
- Salesforce Username of the System User (used for chat transcript sync & potentially access to the data within SF, called “CRM ID” in the setup wizard)
Step 1: Key & Certificate generation
1 - Generate key
With openssl installed, open a shell and generate a new RSA private key. You can choose to encrypt the key file, but be aware that you need to submit the decryption passphrase during the Salesforce Widget setup process.
Use the following command to generate a new key without a passphrase
$ openssl genpkey -algorithm RSA -pkeyopt rsa_keygen_bits:4096 -out private-key.pem |
or the following command to create a passphrase AES-encrypted key. After you press the Enter key you need to enter the passphrase for the encryption. There won't be a prompt for this, only a newline and you need to confirm by pressing Enter again.
$ openssl genpkey -algorithm RSA -pkeyopt rsa_keygen_bits:4096 -aes256 -pass stdin -out private-key.pem |
LivePerson does not recommend deviating from these steps (e.g. providing the passphrase inline in the second command). Make sure that you keep a copy of the passphrase. Keep the private key in a safe place and do not reveal it to anyone else. |
After key creation, you can validate its integrity using this command. It will ask for the passphrase if you provided one earlier.
$ openssl rsa -in private-key.pem -out /dev/null |
2 - Generate a certificate
Create an X.509 certificate using the newly generated private key.
A self-signed certificate, valid for 365 days (this is adjustable in the command), can be created like this (update the subject according to your company information):
$ openssl req -new -x509 -sha512 -key private-key.pem -subj '/C=Country/ST=State/L=City/O=Company_Name/OU=Department_Name/CN=Canonical_Name' -days 365 -out certificate.crt |
3 - Validate certificate
After you create the certificate, review its contents using this command.
$ openssl x509 -in certificate.crt -text -noout |
Step 2: Setting up connected Salesforce Application
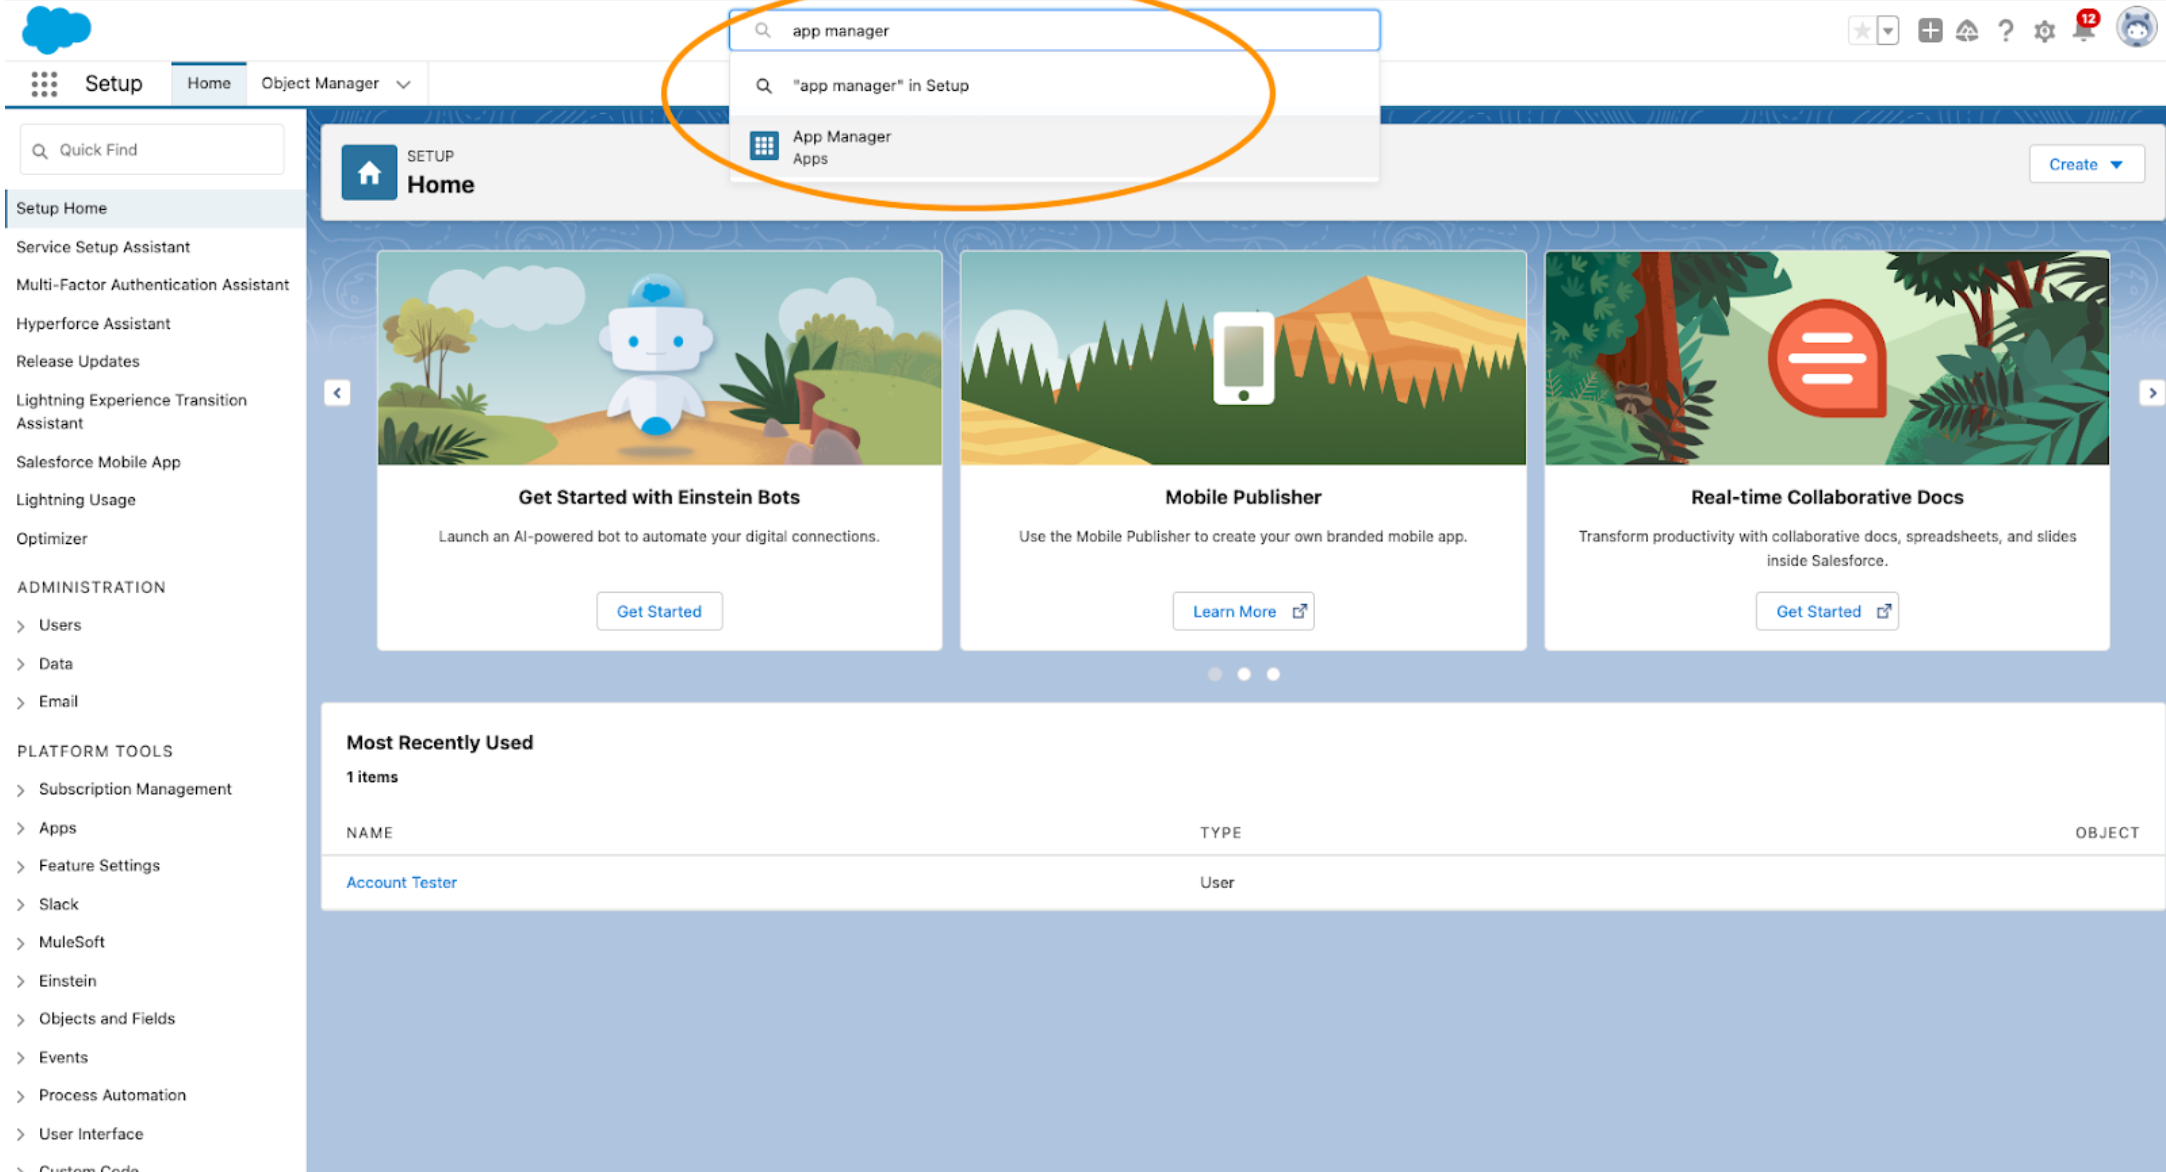
Sign in to your Salesforce account. Open the App Manager.

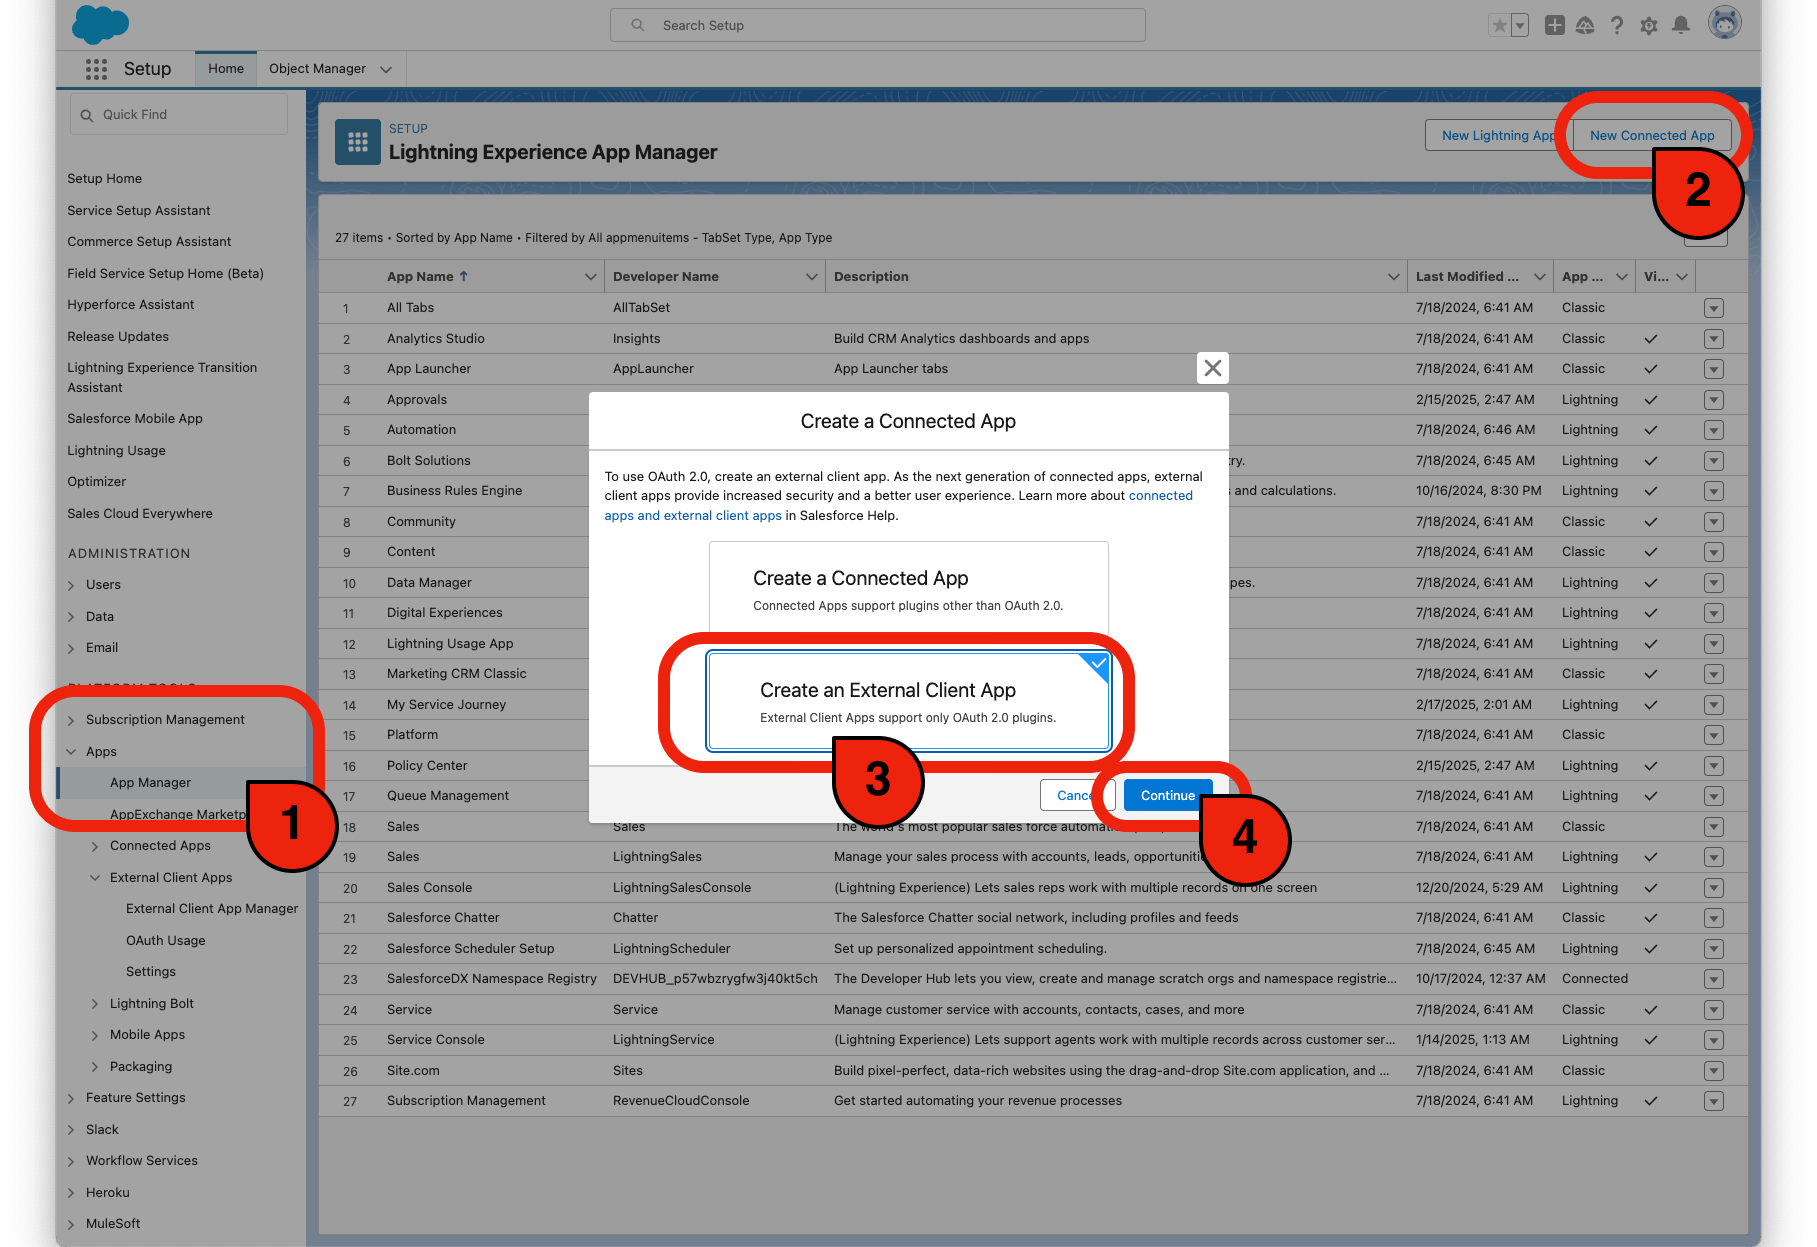
Create a new connected app. Select "Create an External Client App".

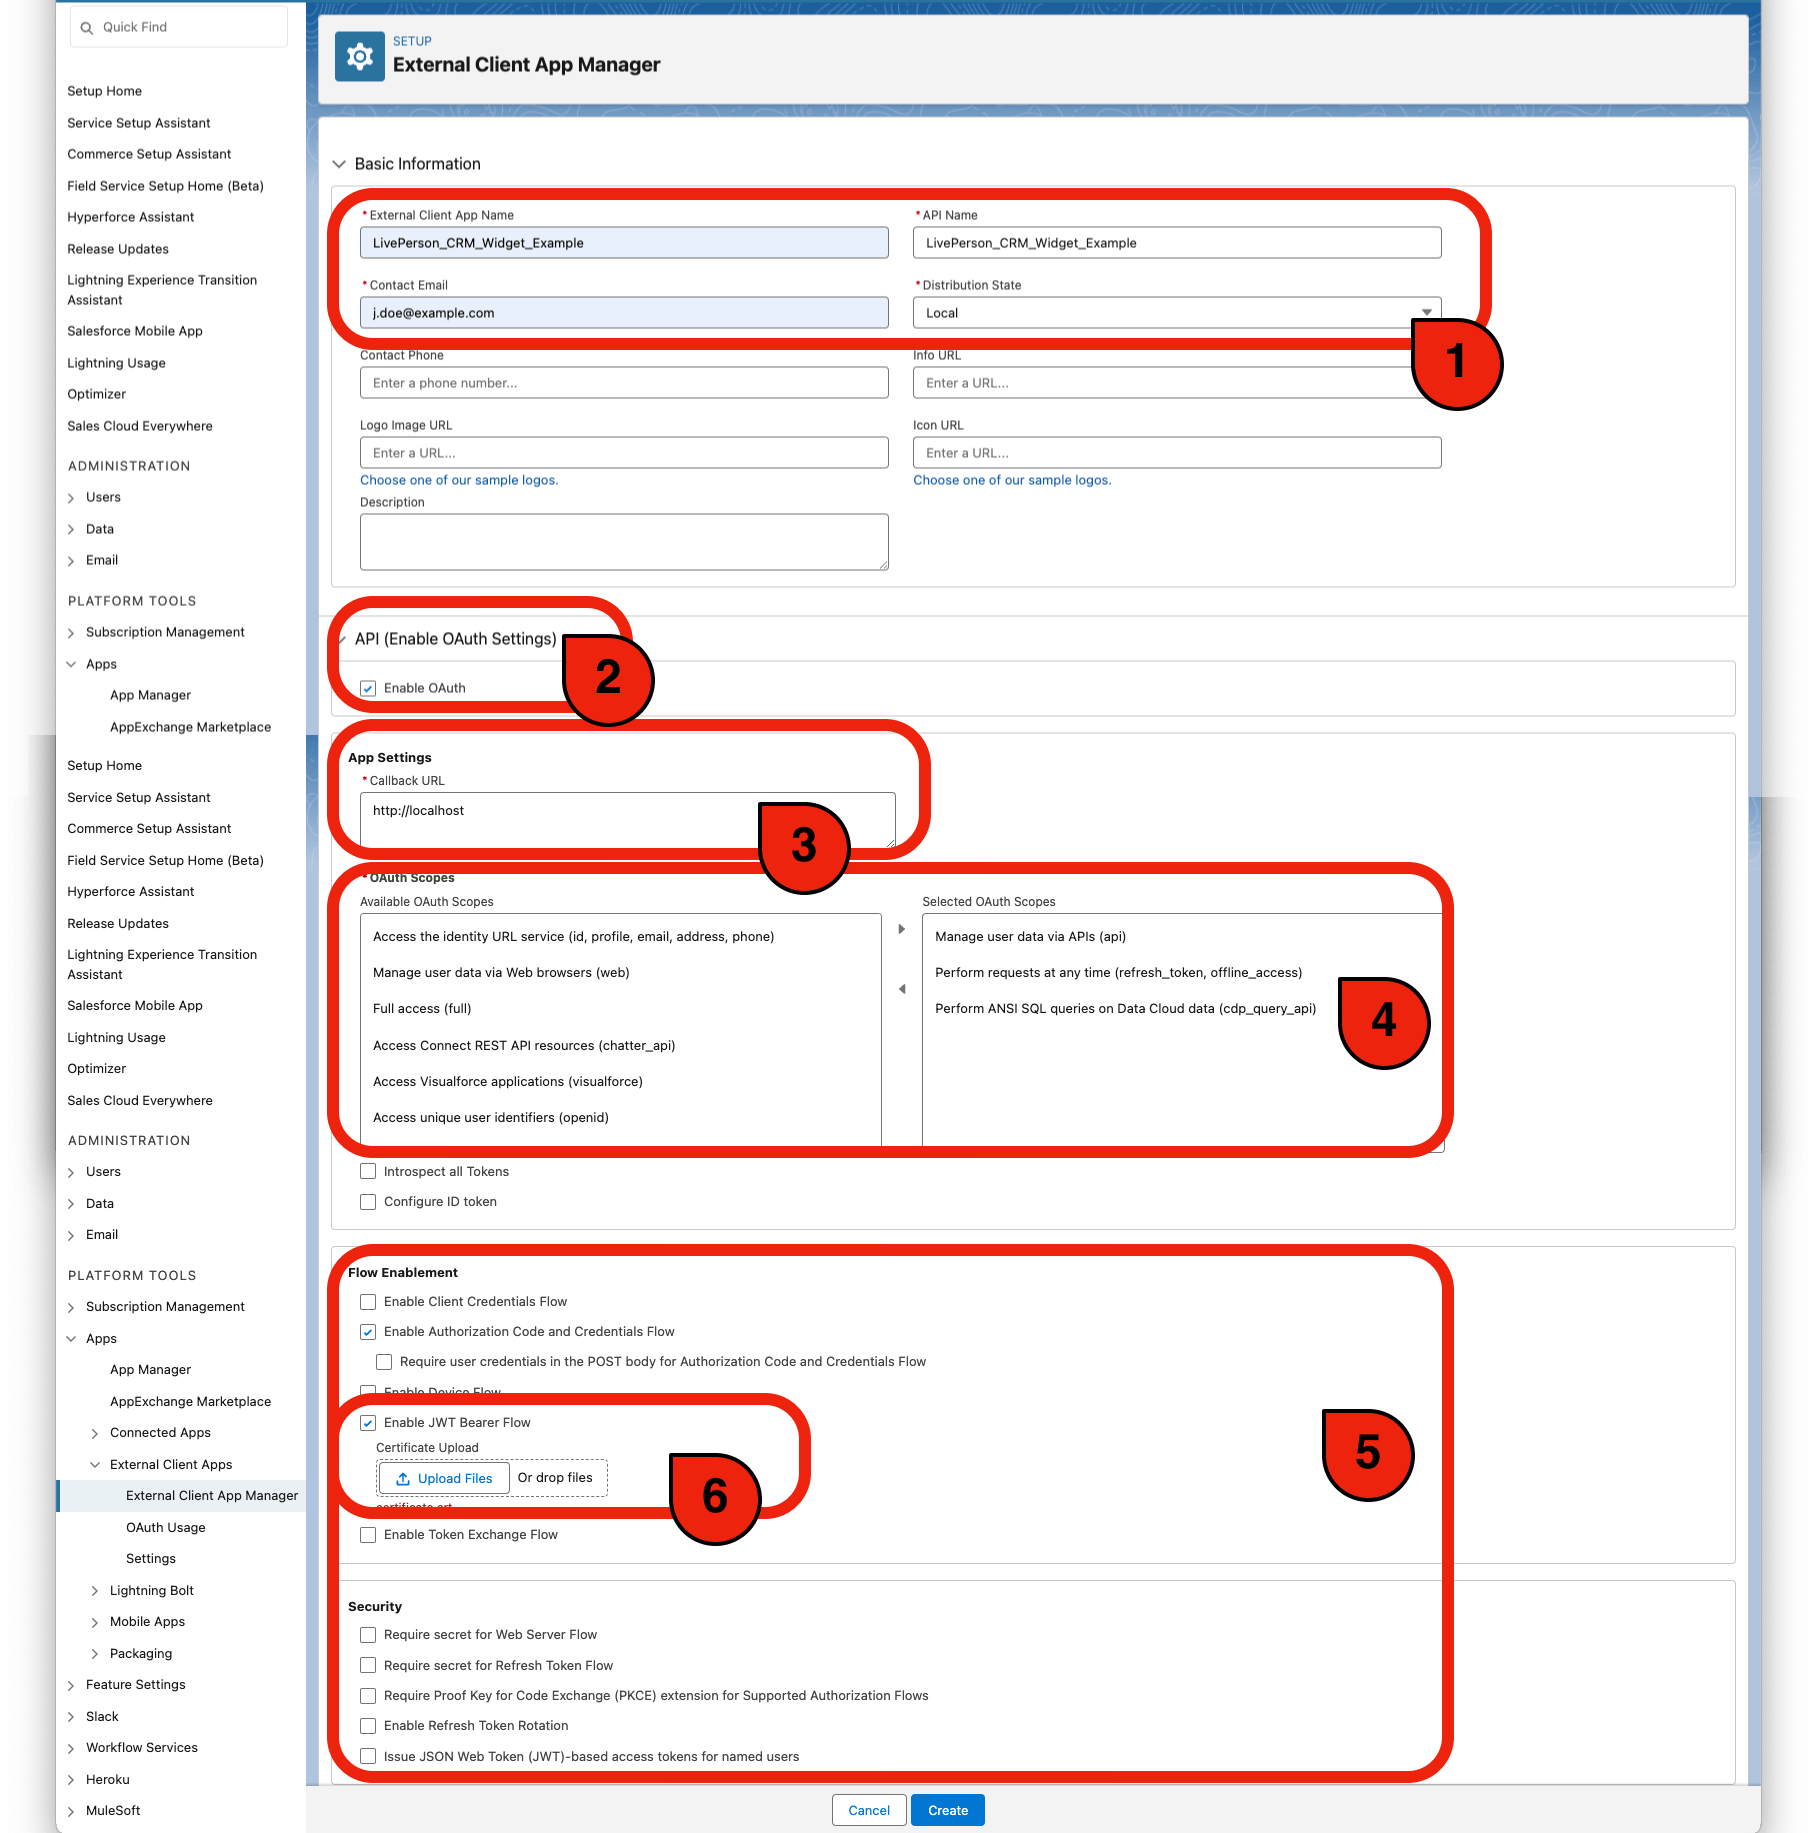
Set the basic information, enable OAuth Settings, provide a callback URL (not used, you can use a localhost address), enable use digital signature and upload the X.509 certificate from the previous step (see #6 on the screenshot). Select these scopes:
- Manage user data via APIs (api)
- Perform ANSI SQL queries on Customer Data Platform data (cdp_query_api)
- Perform requests at any time (refresh_token, offline_access)
Check the checkboxes according to this screenshot.

Save the new Connected App by clicking on the Create button. Update the Policies section of your App as shown on the screenshot, enabling the admin pre-authorization of users and adding the user profiles that should be able to interact with the widget. You also need to update the IP address restriction settings as shown in the screenshot.


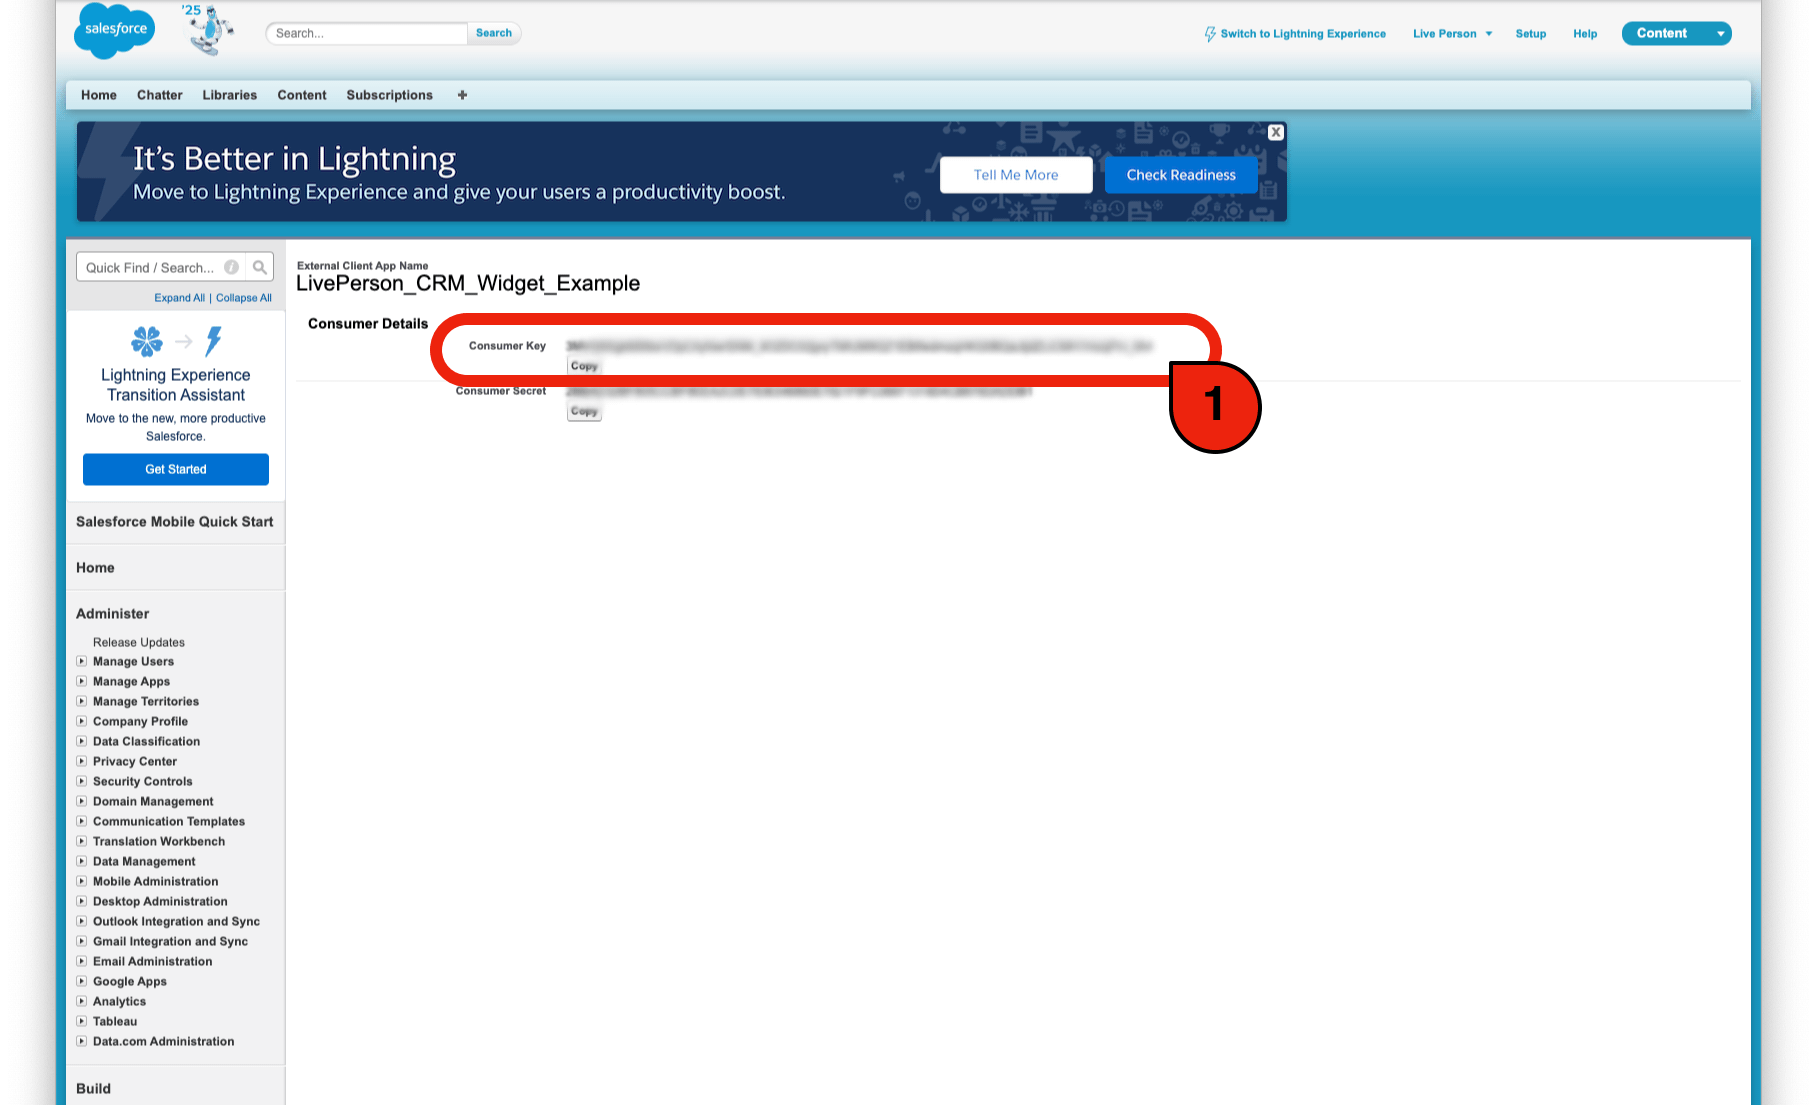
Save your changes and navigate to the Settings tab to reveal the Consumer Key by clicking the button.

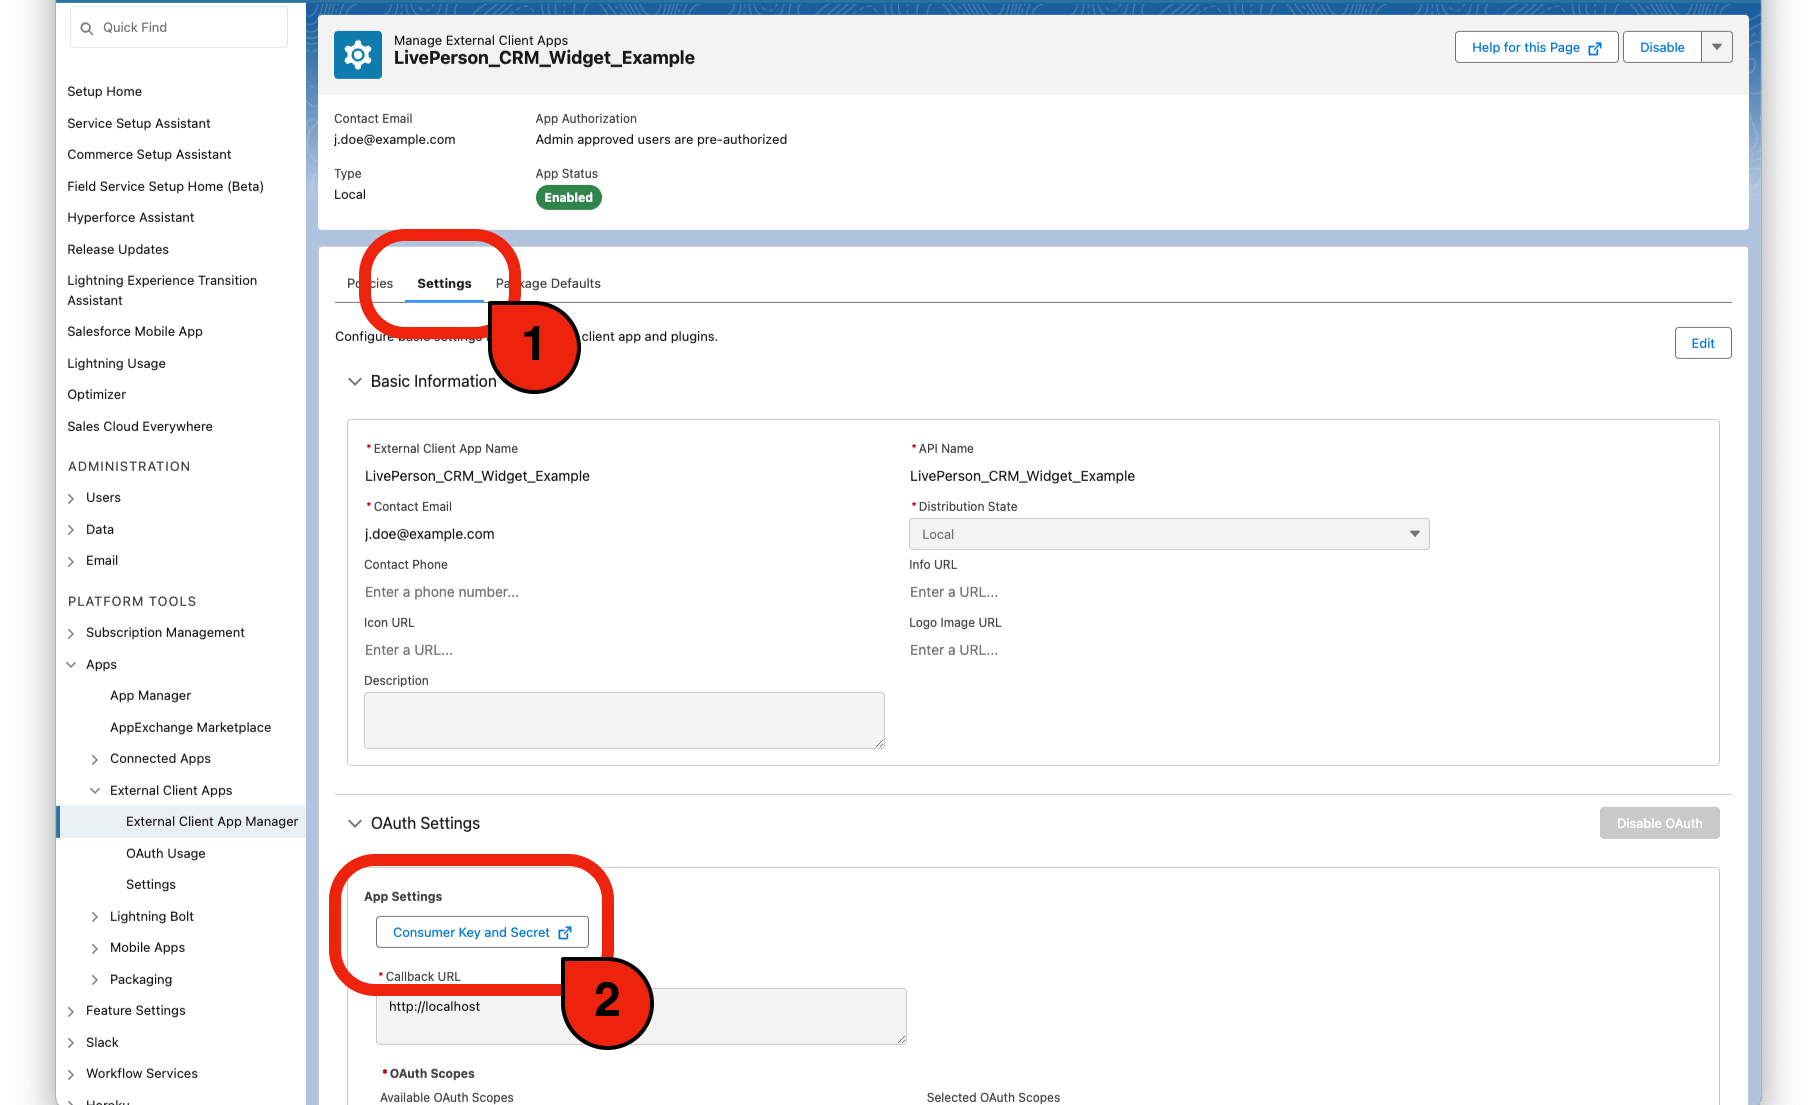
Copy the Consumer Key for the next steps.
You can now install LivePerson's Salesforce package to add the LivePersonConversation type to your Salesforce account. If the Salesforce Widget for Conversational Cloud is configured with this type selected, conversation transcripts will be stored there.
Navigate to https://login.salesforce.com/packaging/installPackage.apexp?p0=04tDn000000JTvi, sign in to your Salesforce instance and proceed with the installation as depicted below.

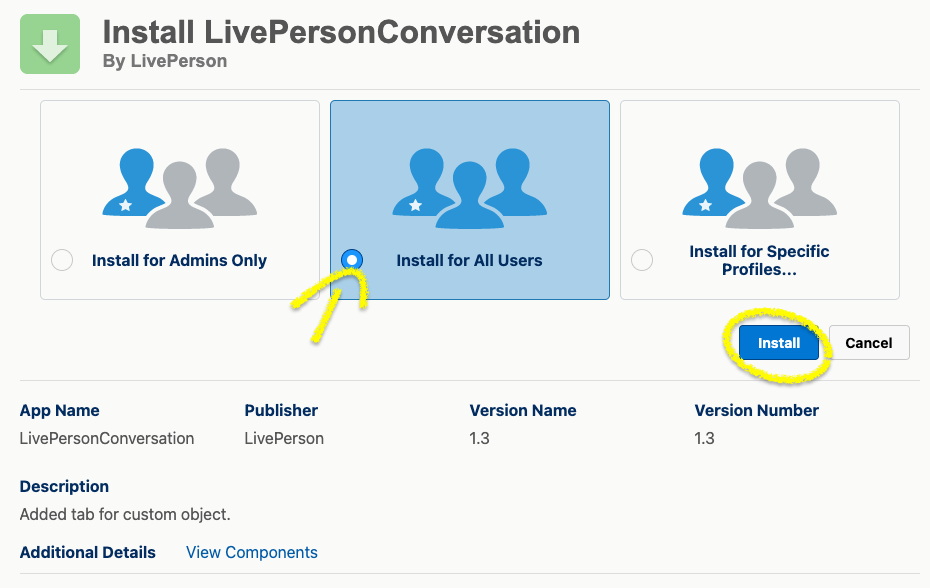
Select to install the package for all users and click "Install"
Step 3: Widget Configuration in iHub
Now you have all the necessary information for the Widget configuration steps documented here.
Missing Something?
Check out our Developer Center for more in-depth documentation. Please share your documentation feedback with us using the feedback button. We'd be happy to hear from you.