Salesforce Widget for Agent Workspace - Advanced configuration
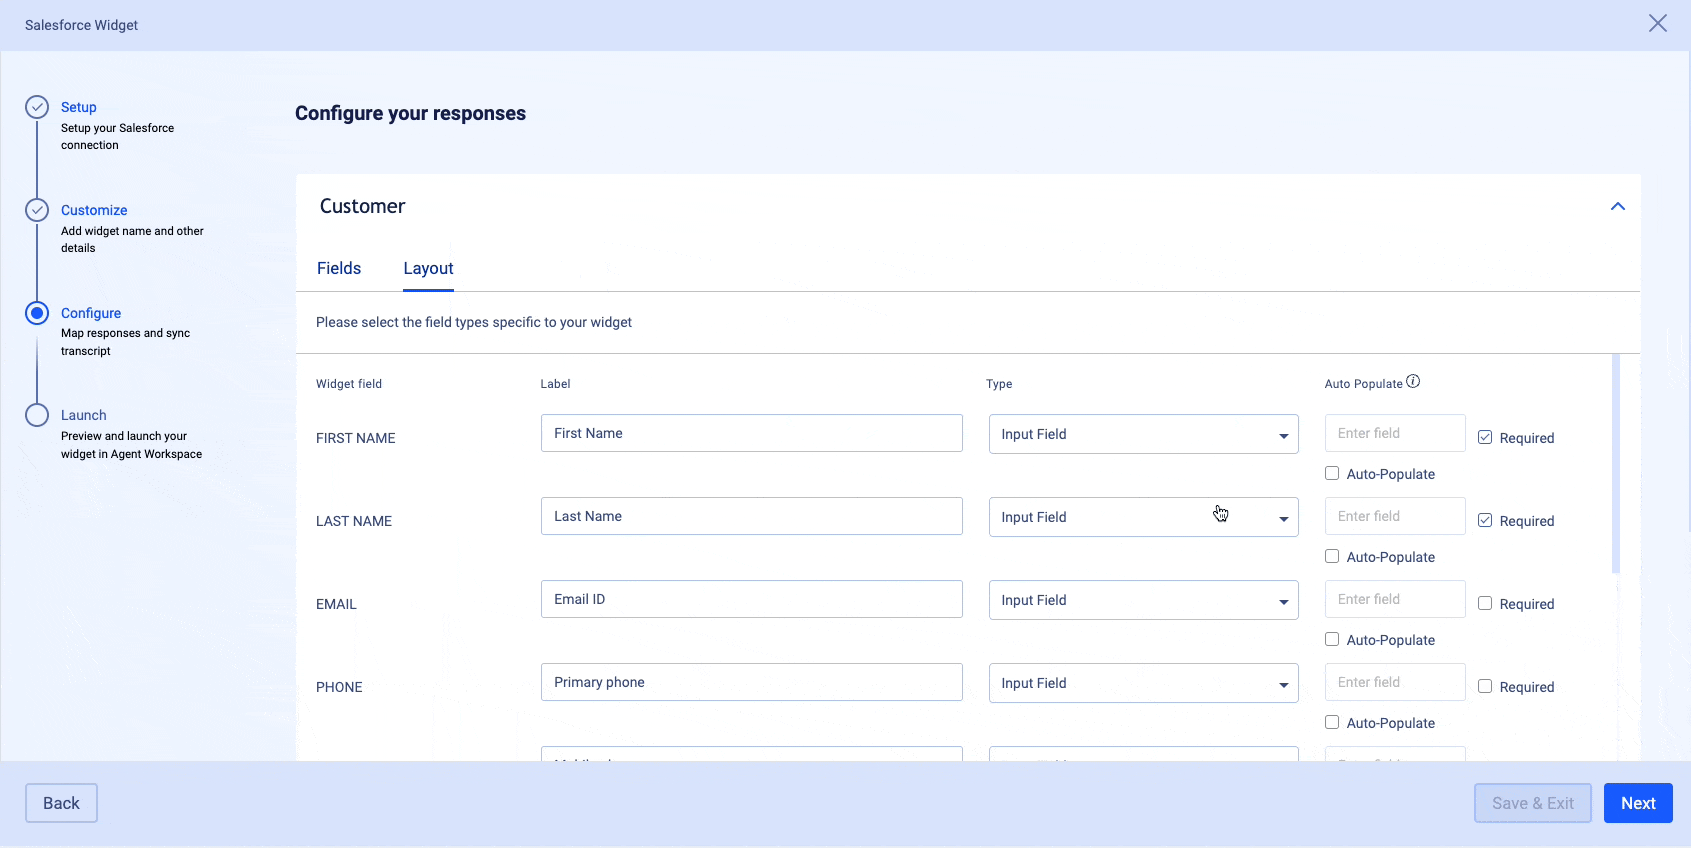
Setup of Auto Populate within the Salesforce Widget for Agent Workspace feature
This feature works on Structured Date Elements of conversations. To determine the value of SDEs of a conversation, you can follow the steps laid out here.
To view your SDE object while the widget is open in the Agent Workspace, perform the following:
- Select a conversation in which you would like to display the SDEs.
- Open the developer console (e.g. for Google Chrome on MacOS Option + Command + J (⌥-⌘-J), or Control + Shift + J on your keyboard on Windows)
- Paste the following command into the command line at the bottom of the console tab and hit Enter:
javascript:
JSON.stringify(infra.store.state.widgetStore.init.publicModel.SDE);This command will display the SDE object, allowing you to inspect its structure and data to retrieve the needed path.
You’ll get a result similar to this:
javascript:
{
   "SDE":{
      "customerDetails": [
            {
                "balance": "$-400.99",
                "currency": "USD",
                "customerId": "someCustomerId",
                "socialId": "someSocialId",
                "imei": "someImei",
                "userName": "lpuser",
                "companySize": 500,
                "accountName": "bank corp",
                "role": "broker",
                "storeZipCode": "20505",
                "storeNumber": "123345",
                "lastPaymentDate": "15 Oct. 2014",
                "registrationDate": "23 May. 2013",
                "serverTimeStamp": 1714383691648,
                "status": "cancelled",
                "type": "vip"
            }
        ],
        "personalInfo": [
            {
                "name": "John Doe",
                "gender": "Male",
                "company": "company",
                "language": "en-US",
                "age": 34,
                "contactInfo": [
                    {
                        "email": "myname@example.com",
                        "phone": "+1 212-788-8877",
                        "phoneType": null,
                        "address": null,
                        "preferredContactMethod": null
                    }
                ],
                "serverTimeStamp": 1714383691649,
                "firstname": "John",
                "lastname": "Doe",
                "birthday": "15 Apr. 1980"
            }
        ],
   },

}
Knowing the contents of your conversations' SDEs, you can now specify the paths for the Auto Populate feature.
The input you will be providing should be a string that describes how to reach a particular data point within a structured entity. Here are some guidelines on how to construct a path:
- Nested Objects:
- Use dots (.) to navigate through nested objects.
- Example: To access the email in contactInfo in personalInfo in the SDE object, the path would be "personalInfo.contactInfo.email".
- Example 2: To access the firstname in personalInfo in the SDE object, the path would be "personalInfo.firstname".
- Arrays:
- Our system automatically selects the first element in any array encountered along the path.
- If you need to specify that a property is within an array, simply follow the property path as if it is a singular object.
- Example: If personalInfo is an array, to get the firstname you just input "personalInfo.firstname". The system handles the array and retrieves the firstname of the first element.
Usage Examples
- Example 1: Getting the age in personalInfo array:
- Path: "personalInfo.age"
- Returns: The age from the first element in the personalInfo array.
- Example 2: Getting email from contactInfo array:
- Path: "personalInfo.contactInfo.email"
- Returns: The email from the contactInfo of the first personalInfo entry.
Tips for Path Specification
- Ensure your paths do not include array indices as the system defaults to the first element of any array.
- Double-check your paths for typos to ensure accurate data retrieval (Even capital letters matter).
- Use the exact field names as they appear in the data structure (Best to copy and paste to avoid errors).
Limitations
- The system currently does not support dynamic array indexing; it automatically accesses the first element of arrays.

Missing Something?
Check out our Developer Center for more in-depth documentation. Please share your documentation feedback with us using the feedback button. We'd be happy to hear from you.