Displaying chat engagements
Once you’ve created your engagements you can easily manage them within the Conversational Cloud. The following functionalities make it possible to control your engagement’s behavior.
1. Control groups
To evaluate the effectiveness and performance of campaigns (and your account as a whole), a control group needs to be set up.
A control group is a random number of visitors to your website who do not receive any type of engagement from a campaign. The activity of these visitors in the control group, for example, sales purchased and defined goals reached, is then compared to the activity of visitors who were exposed to campaigns. The difference between the control and exposed groups provides information on the effectiveness of your campaign. This data can be seen in select metrics listed in the data bar and data dashboard. To learn more about setting up your control groups, click here.
2. Button refresh
There are three states for a chat engagement: Online, Busy and Offline. Each state is related to the status of the agents, as well as the maximum wait time. When consumers are browsing between several windows, pages can remain static for long periods without being refreshed. This can affect the state of your engagements.
With button refresh, brands can refresh the state of the engagement at configurable intervals, ensuring the engagement on the page accurately reflects the availability of the agents. The default setting for this feature is disabled. When enabled, the default setting is 120 seconds. Brands can configure the engagement to refresh at the following interval settings: 60, 90, 120, 150, 180, 240, and 300 seconds.
Note:
- Refresh engagement is not available for proactive/offsite/messaging engagements.
- The refresh process will never remove engagements from a page. It will only change its state, e.g., offline to online and vice versa.
- As this feature is constantly checking the availability of the engagement, when the availability changes, this could cause the engagement to flicker.
- This feature does not apply if the engagement does not have an offline or busy state.
3. Multiple engagements on the same page
Consumers may be targeted by more than one engagement on the same page, at the same time, although the Conversational Cloud may not necessarily display all the engagements to the consumer. In such cases, the Conversational Cloud uses a decision mechanism to determine the engagements that will be displayed, considering the following factors: campaign priority, web engagement zones, and agent status. To learn more about running campaigns with multiple engagements, click here.
4. Busy State
The Conversational Cloud offers a variety of creative engagements to communicate to consumers when no agents are online (during off-hours) and during busy times when they have no capacity and long wait times are expected. In this way, consumer expectations are managed and potential frustration is avoided. The busy state indicates that at least one agent is online but with no capacity to handle consumers as the expected wait time is longer than the maximum wait time for the skill. Click here to learn more about the busy state and how it is configured.
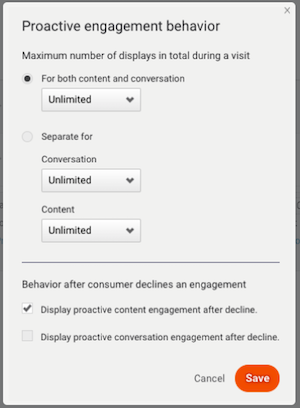
5. Proactive engagement behavior
Proactive engagements offer a rich, hard-to-miss experience for consumers and are available in a variety of formats including overlay, toaster, and peeling corners. To ensure the experience is both engaging and non-intrusive, LivePerson offers the following settings:
Number of displays
This setting allows you to limit the number of times a proactive engagement is displayed in total during a visit. When the limit is reached, no other proactive engagements will be displayed in that visit. You can select from one, two, or three times, or unlimited; the default setting is unlimited. You can also choose to select different settings for conversation and content engagements.
Invite after decline
This setting allows you to define the behavior after a consumer declines a proactive engagement, by selecting whether or not other proactive engagements can thereafter be displayed. For example, you can decide to display a proactive conversation engagement for one Line of Business, even if a proactive conversation engagement for a different Line of Business was previously declined.
By default, after declining a proactive content engagement, other content engagements can be displayed; after declining a proactive conversation engagement, conversation engagements cannot be displayed.

6. Offsite engagements
Offsite engagements allow brands to offer chat from any location by creating a URL that consumers can click to begin a private chat conversation. This URL can be embedded to offer chat from social media sites, digital advertisements, email, and more. Learn more about offsite engagements below.
7. Optimizing the mobile experience
To enhance your visitors’ chat experience on mobile, use the Embedded Engagement window and optimize your website for mobile.
To optimize your web experience, tag all of your web pages:
- Ensure that your website conforms to HTML standards (e.g. one header and one body per page).
- (Recommended) Add the viewport meta tag (as shown below) to the page code.
<meta name="viewport" content="width=device-width,
initial-scale=1.0,
minimum-scale=1.0, maximum-scale=1.0, user-scalable=no"/>
Offsite engagements
Offsite engagements offer brands the opportunity to expand their availability to consumers by providing chat from any location and through any media including:
- Social media
- SMS messages (triggered by IVR)
- Digital advertising
- Printed media
- TV
- And many more…
When setting up an offsite engagement, you will create a URL that will refer your consumers to a private chat with one of your agents. You can use this link anywhere you want to engage with your consumers.
Offsite engagements are also helpful for brands wanting to use an IVR deflection solution, that will send chat invite links to voice callers. For more information, refer to our IVR Engagement API documentation for chat and SMS.
Enhancing the consumer experience
Offsite engagements allow you to reduce the cost of your contact centers and increase consumer satisfaction by deflecting calls to chat instead of letting consumers wait on hold. For example, to improve service and offer immediate support, you can add a QR code to the monthly bills you send out and consumers can scan this to chat with your agents.
Boost sales and revenue
Offsite engagements allow you to increase sales and create new leads by engaging with consumers via a variety of touchpoints, such as digital advertising, emails, and catalogs. For example, you’re promoting your climbing gear this week and you want to bring consumers to chat via your ad in the popular online climbing magazine, climb-extreme.cn. Your agents have been briefed to drive sales for the gear. The same goes for ads in all the locations that you are advertising. You can invite them to engage with your agents even if they’ve never visited your site.
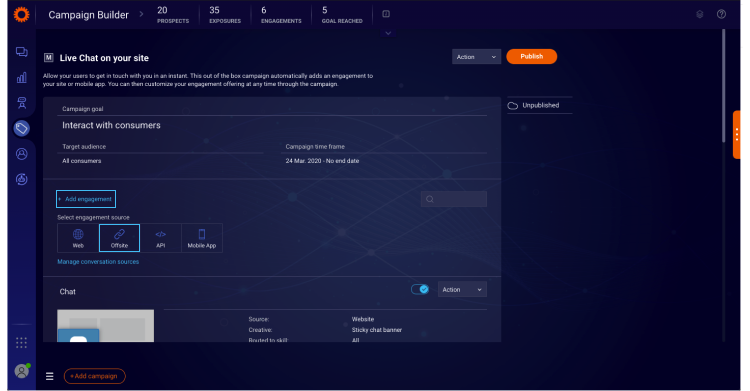
How to create a new offsite engagement
1. Create a Campaign and fill in the campaign details (name, target audience, and timeframe).
2. Click Add engagement. From the menu, select “Offsite” engagement source:

3. The engagement settings page will open.
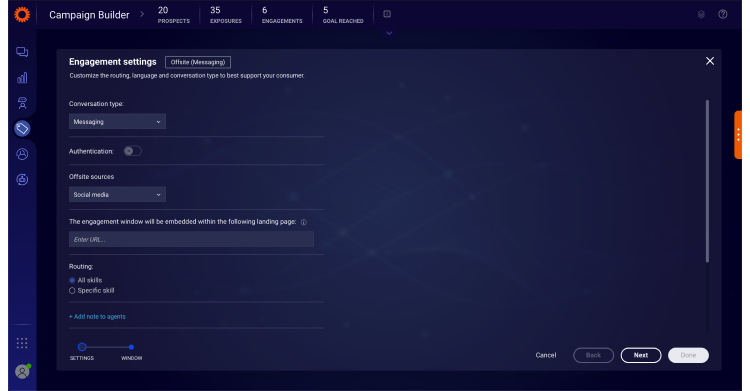
4. Select the Offsite Source; this is the source from which you want to engage with your consumer (e.g. email, social media).
5. Enter the URL of the page where you want to embed the chat window. This is the URL to which your consumers will be redirected when clicking the Engagement URL.
6. Select the skill the engagement should be routed to. To route to all skills, select ‘All skills’ (selected as default); to select a specific skill, select the ‘Specific skill’ option and choose from the dropdown menu.
7. Add an agent note if you wish. This is a note regarding the engagement which will be visible to all agents. For example “As part of our summer sale, consumers arriving from this engagement can be given an extra 5% discount."
8. Select the engagement language.
9. To set the engagement to display as ‘available’ when at least one agent is online, regardless of the duration of the wait time, you can select the ‘Ignore max wait time’ checkbox at the bottom of the page
10. Click next.
11. The Engagement Window library will open. For guidance on customizing an engagement window, click here.
12. Click done.
13. When you’ve finished creating the engagement, enable it and publish its campaign.
14. Copy the engagement URL and use it in your selected touchpoint.

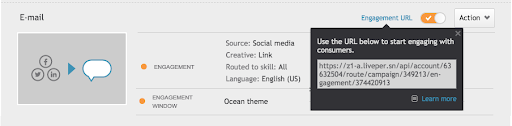
Publishing the engagement
Once you’ve finished creating your engagement, follow these steps to publish it:
- From the Campaign Builder page, copy the engagement URL.
- Choose how and where you want to publish the URL. You can:
- Create a shortened URL and publish the link. You can use a website such as [https://bitly.com] shorten the links
- Create a QR code. Use one of the QR code generator services such as QRcode-monkey.
- Enable your engagement and publish the campaign.
- Publish the link/QR code where you want to engage with your consumers.
The target audience for offsite engagements
As opposed to onsite engagements in which LivePerson servers evaluate consumer eligibility for an engagement before the engagement is displayed, for offsite engagements, eligibility evaluation is performed after consumers click the engagement URL. If consumers are not eligible, they will receive the Offline Survey configured in the Engagement Window.
For example, if you have set up a campaign targeting UK consumers only and a consumer from France clicks the Engagement URL, they will be redirected to the offline survey you configured in the Engagement Window.
Offline surveys for offsite engagements
If you have distributed the engagement URL to your consumers, but one of the below scenarios is true, your consumers will be redirected to the offline survey that you configured in the Engagement Window:
- The URL is distributed before the Campaign begins
- A consumer clicks the Engagement URL outside of business hours
- There are no available agents to accept the chat
- A consumer who is not part of the campaign’s target audience clicks the offsite engagement URL
Disabling or deleting an offsite engagement
When an engagement is disabled, consumers will be redirected to a default offline survey. You can also choose to redirect them to a customized survey you create, or to a landing page of your choice.
If and when you re-enable your engagement, consumers will be directed to the URL you configure on the Engagement Details page.
How to set up inactive engagement behavior
1. From the Campaign Builder footnote, click inactive engagements.


2. Choose a survey from your existing offline surveys or enter a URL to which consumers will be redirected when clicking any inactive engagement. These can include engagements that have been disabled or deleted, and campaigns that have expired, been deleted, or unpublished.

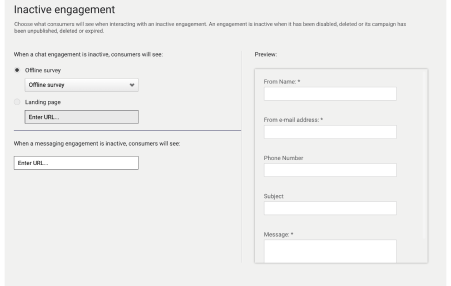
3. Save your selection.
Missing Something?
Check out our Developer Center for more in-depth documentation. Please share your documentation feedback with us using the feedback button. We'd be happy to hear from you.