Data Transporter User Guide
Overview
The Data Transporter application connects you with the suite of Conversational Cloud Data APIs. Users benefit from the power and agility of the Conversational Cloud open platform without the need to develop on top of our API based sources. Brands can now easily and securely integrate LivePerson data feeds with internaltools on recurrent schedules.
Data Transporter allows you to:
- Choose from a rich catalog of raw data or formatted report exports
- Schedule or use “Just Once” exports from your Conversational Cloud account
- Securely deliver your exports to: SFTP, LP Cloud, Amazon S3, Google Cloud, and Email
Report Catalog
Here you will find a complete list of Data Transporter reports and sample files:
| HISTORICAL BUSINESS REPORTS | These are exports from historical interaction data sources that have been transformed into in a flat-file (tabular) format and may be exported to CSV for easy import into BI tools, such as Excel, Tableau, or Power BI, for example. These reports may also contain additional derived metrics during the transformation phase. |
| HISTORICAL RAW DATA | These are exports from historical interaction data sources that have not been altered from their underlying data source and are usually received in a structured JSON format and may generally require some post-processing once the file is received to transform into the desired format. |
| WORKFORCE MANAGEMENT RAW DATA | These are exports from realtime data sources that have not been altered from their underlying data source and are usually received in a structured JSON format and may generally require some post-processing once the file is received to transform into the desired format. |
| WORKFORCE MANAGEMENT BUSINESS REPORTS | These are exports from realtime data sources that have been transformed into a flat-file (tabular) or other format required for the business, useful for Workforce management use-cases. |
| ACCOUNT CONFIG | These are exports from account configuration data sources, such as Users, Agent Groups and Skills, for example |
How to enable Data Transporter
There are two ways to enable Data Transporter:
1) Brand account admins can enable the tool in the Management Console. This allows brands to start using limited functionality without any assistance from LivePerson.
2) The LivePerson account team can also enable feature access.
Enabling via the Management Console
- Select Management Console via Conversational Cloud
- Click on Customize & Extend or you can also type Data Transporter in the search bar
- Select Data Transporter
- You will be alerted on the right hand side of the screen if the feature is or is not included in your plan. In the screenshot below, the feature is included but is not currently active. In order to activate, click on the “Click to activate” button.

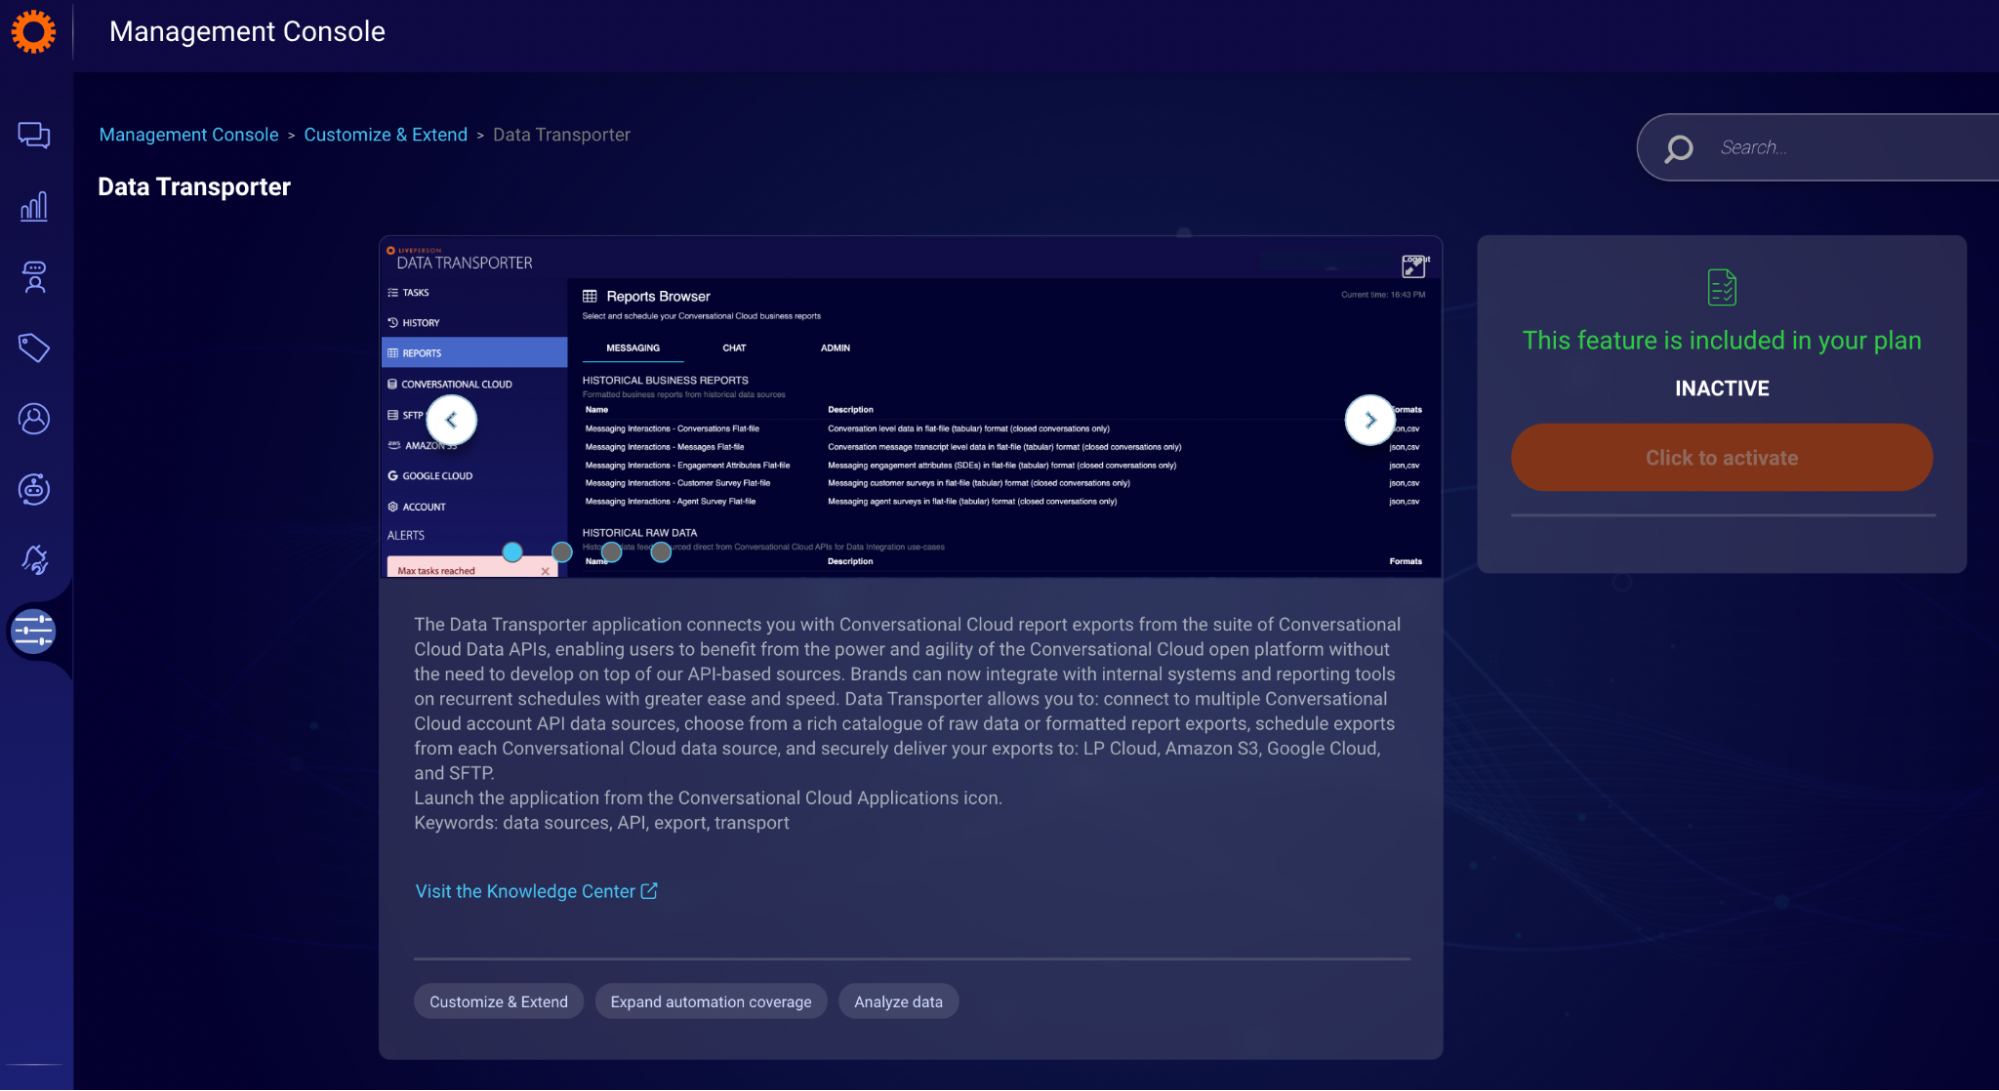
Image 1
5. Once the feature has been activated, you’ll see the word ACTIVE in green.

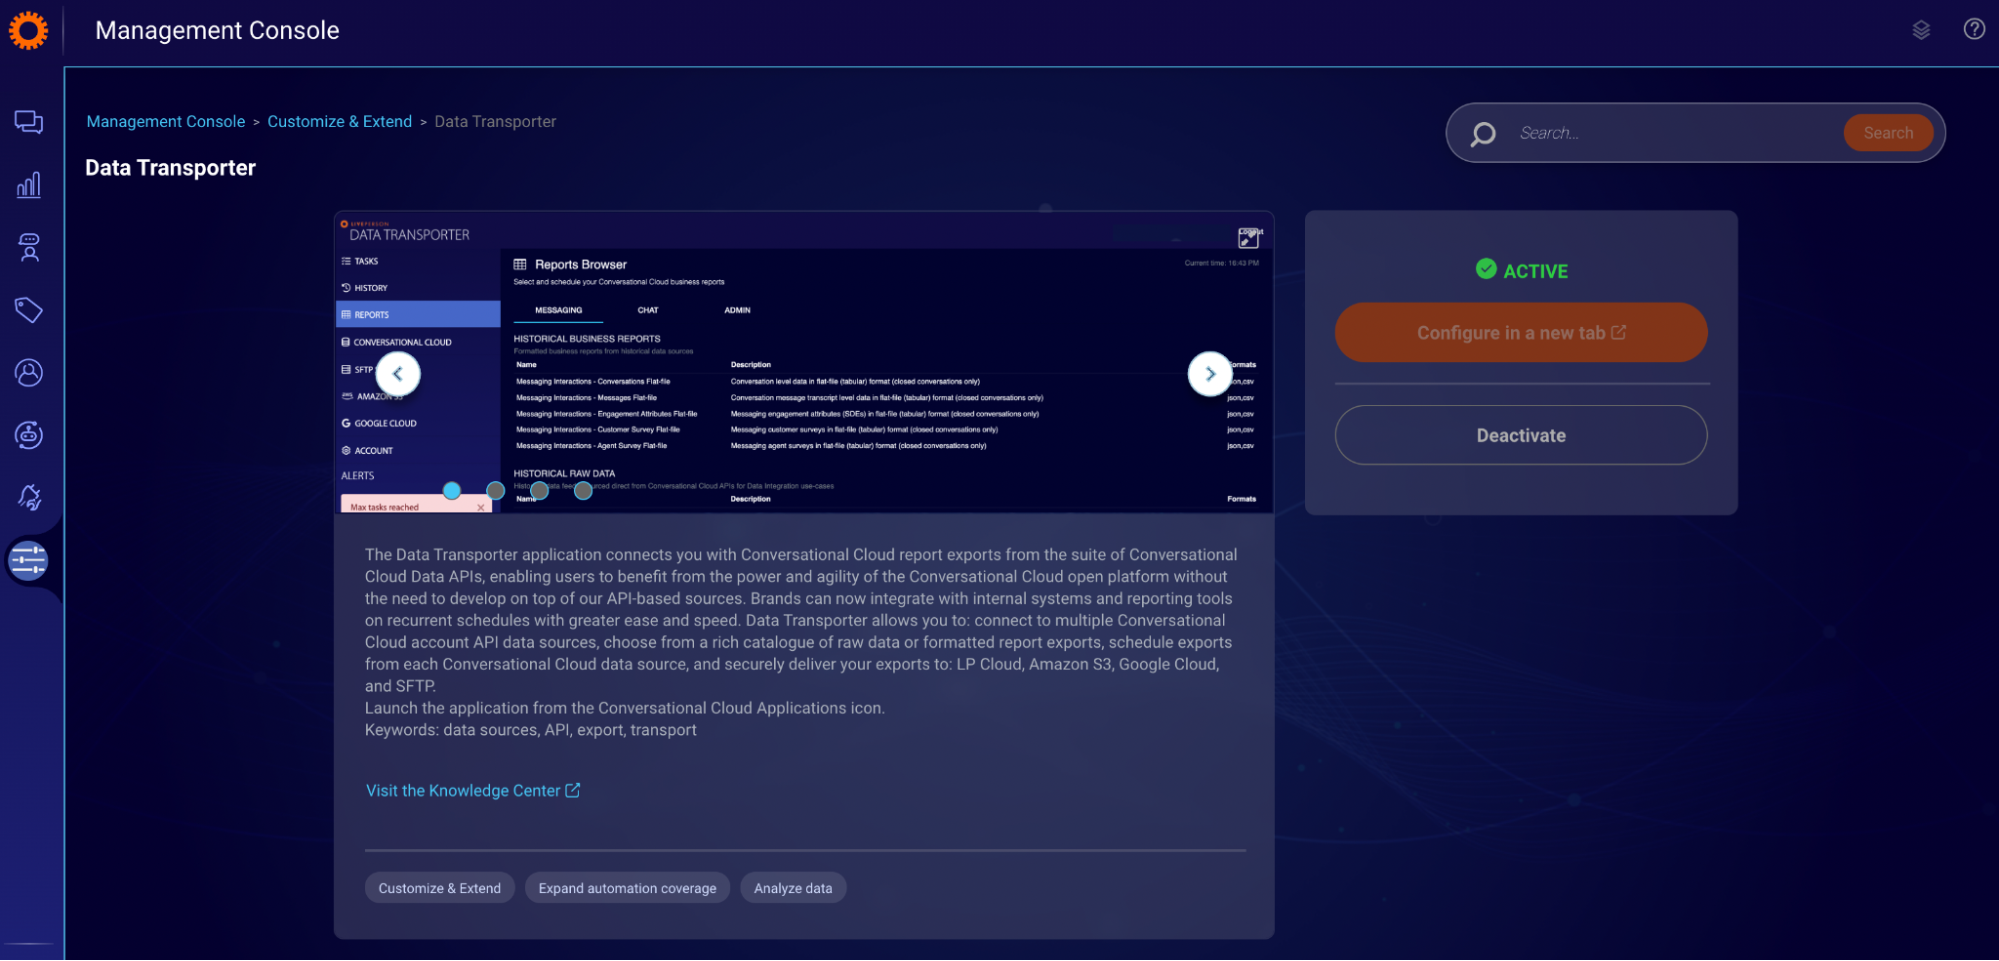
Image 2
How to access Data Transporter
Once your account is enabled, you can begin by logging in via https://transporter.liveperson.net/login.
In addition, you can also access the tool via the Conversational Cloud In the Sidebar under optimize.


Image 3
Getting Started in Data Transporter
The Data Transporter is now available to use for free (in a limited capacity) for all Conversational Cloud brands. Brands that have not purchased the Advanced AI and Analytics Conversational Cloud package will now be able to activate the Data Transporter (via the Management Console) and utilize some Data Transporter functionality which includes:
- Ability to create Tasks with a “just once” frequency (selecting a start date/time with a range of 24 hours only)
- Ability to download the Task report data from LP Cloud via the Data Transporter UI
The following features are not available unless the Advanced AI and Analytics package is purchased:
- Ability to create and set data destinations other than LP Cloud for tasks (SFTP, Email, HTTP post, Amazon and GCP destinations are not available)
- Ability to create tasks with a frequency other than “Just once” (recurring tasks that generate data every interval, day, or week are not available)
Initial Configuration
On first login, you will be presented with the Reports landing page which contains all of your recurring and one-time report tasks, including a list of historical runs (successful and unsuccessful).
In addition to the reports landing page, the following Settings tabs can be accessed from the left-hand-side:
- General for configuring interface timezone, email notification distribution options and UI theme.
- Data Connections for setting up your Data Source (Conversational Cloud API) and Data Destinations (SFTP, Amazon S3, GCP,HTTP post,LP Cloud or Email).
- File Encryption for creating a Public/Private key pair (or for providing your own). For security reasons, Data Transporter encrypts reports before transmission to your selected destination. As such, encryption must be activated by generating a Public/Private key-pair (or bring your own). See encryption section below for more details.
- File Formatting for optional customization of task files
- Metadata Header for optional customization and inclusion of a header within your reports
Feedback allows the user to report a bug (defect) and/or make feature/enhancement requests. You will be directed to complete a short form to report a bug or make a feature request and these will be reviewed by the Data Transporter team.
Alerts are displayed below the menu. They prompt the user to complete the setup or inform them about problems. For example:
- Setup Timezone
- Setup Encryption
- Setup Data Source
- Max Tasks Reached

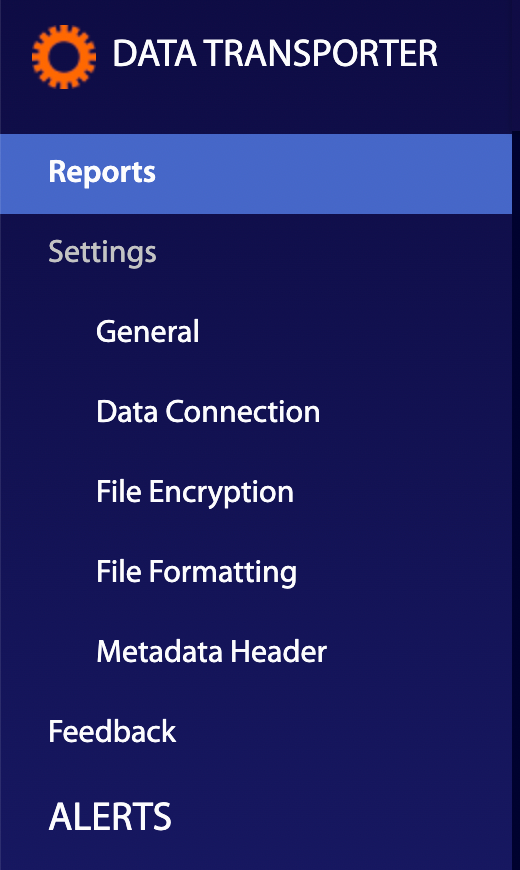
Image 4
In order to create a new task, please review and complete the following sections under Settings: General, Data Connection, File Encryption, File Formatting, Metadata Header. Please see below for more details on each section.
Settings > General
Setting Timezone - Scheduling information will be displayed in this timezone. Search by city and select the desired timezone.
Note - The files are sent based on the set interval and starting time, which will ignore daylight timezone changes. So for example, if a file is scheduled for every 6 hrs it will be sent every 6hrs without disruption from DST (e.g. once a year spring forward 1hr and once a year fall back 1hr). This is for the sake of integrations and data availability.
Select Task Notification - There are three options for this dropdown: None, Notify on fail, Notify every time. It is recommended to select “Notify on fail” which will send an email (to the email address provided in the Setting Email box) when the task fails. This email will alert you to go to the UI and try to restart the task or contact LivePerson Support. Notify every time will send an email (to the email address provided in the Setting Email box) when a task runs successfully or fails. If None is selected, an email will not be sent if a task is successful nor if it fails.
Setting Email - Enter an email address that will be used for alerts (if notify on fail or notify every time was selected above for task notification). Please note only one email address can be entered in the box.
Theme - Choose Dark or White, based on your preference.
Settings > Data Connection
Data Connection is composed of two sections - Data Source and Data Destination.
Data Source
To add a new data source, click on “Add New Source” and complete the following fields:

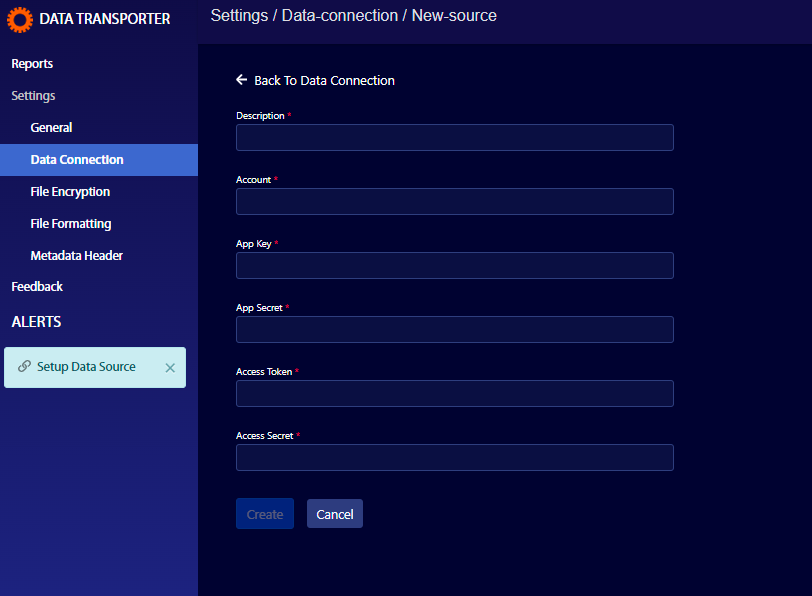
Image 5
Description - Please enter a few words to describe this connection
Account - Enter the brand’s account number (site id)
App Key, App Secret, Access Token, Access Secret - To extract report data from Conversational Cloud, a set of API keys must be configured from the Conversational Cloud console. Follow the instructions provided below to configure a new set of API keys:
- Login to Conversational Cloud
- Select Manage Campaigns and Engagements (far left hand side)
- Select Data Sources (in settings box)
- Click on the API tab
- Click on Add New
- Application Details - Enter any Application Name
- Developer Name - Enter any Developer Name
- Select APIs: Under data, check all of the boxes

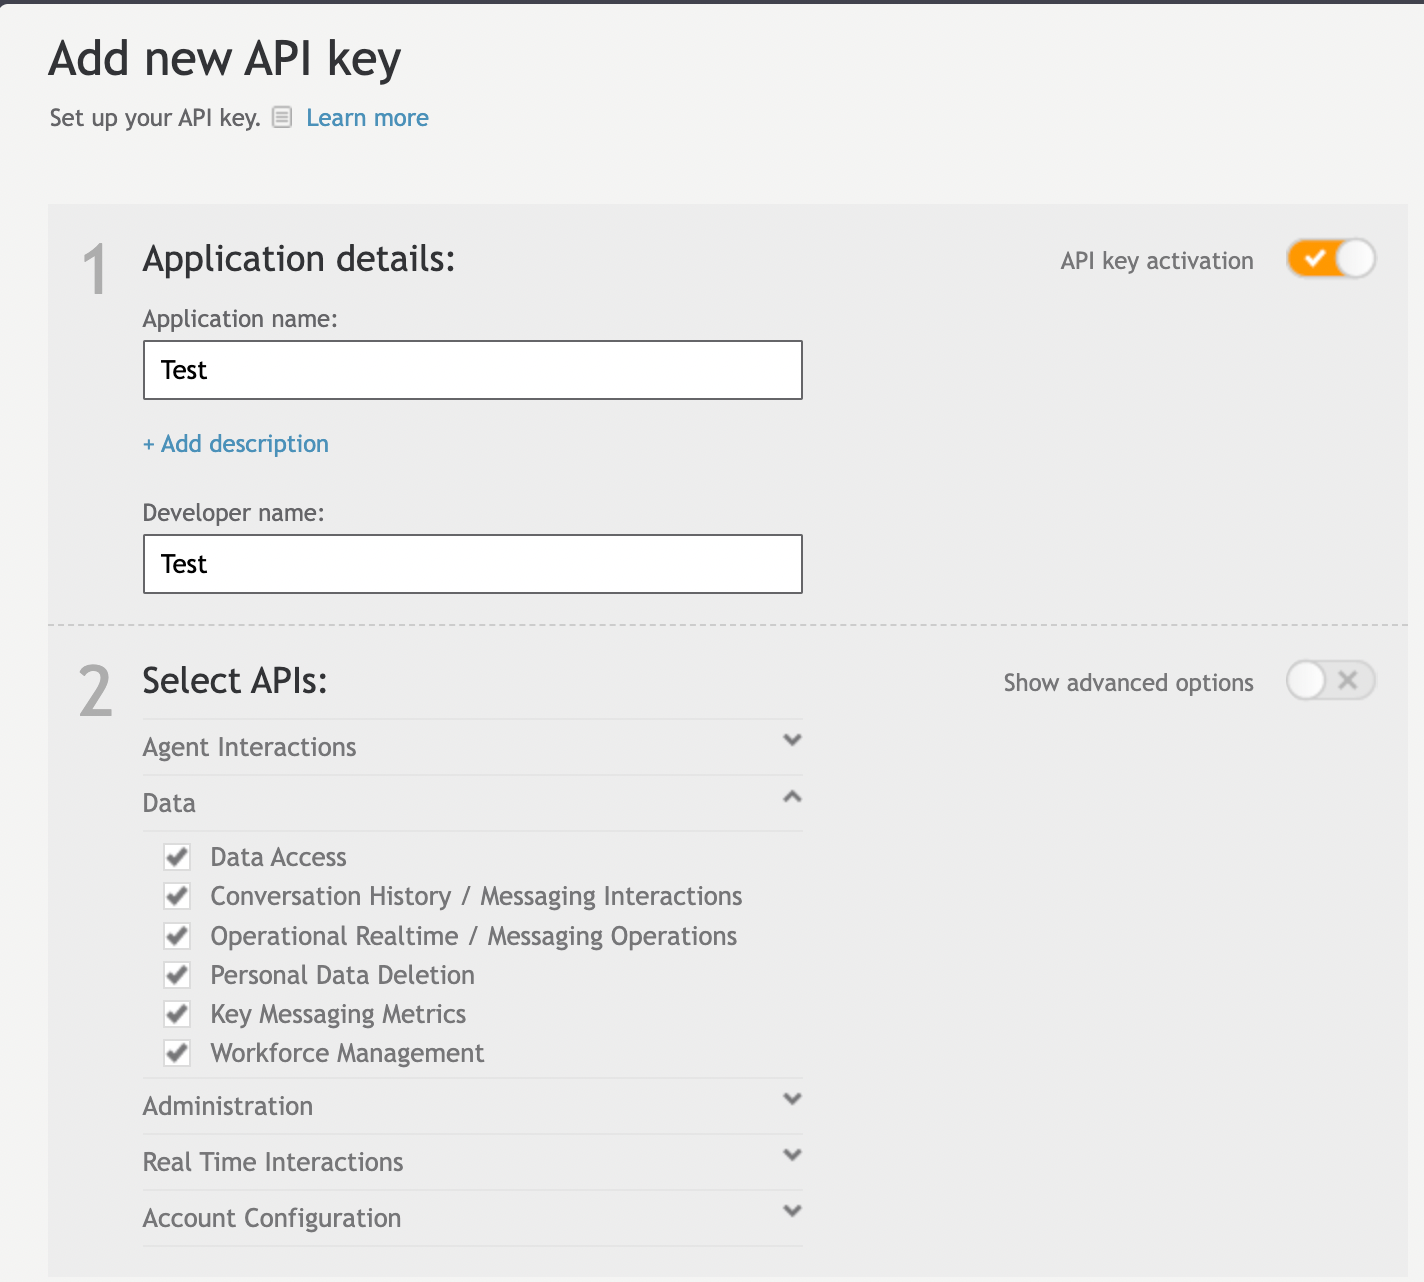
Image 6
- For the Account Config exports - under Administration, check users, skills and agent groups

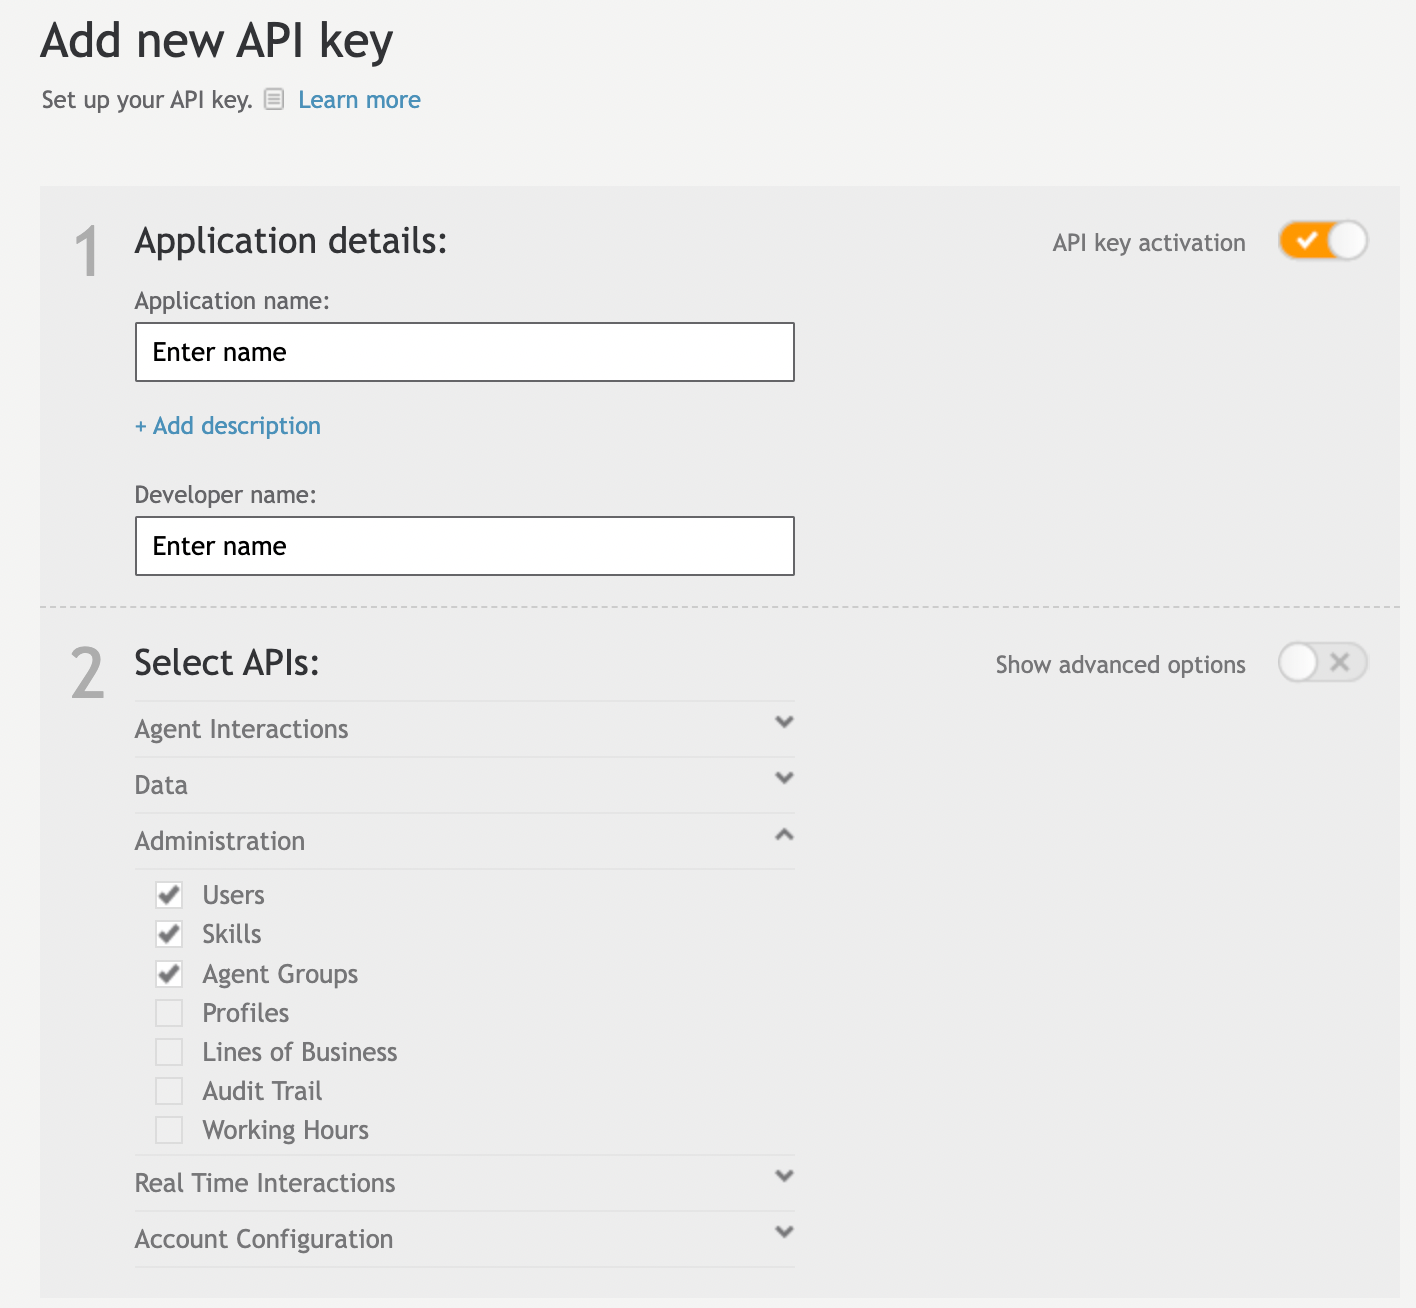
Image 7
- Save
- Once it’s saved, you will find the API key listed under your Conversational Cloud API Keys
- Click on the 3 little dots and the App Key, App Secret, Access Token, Access Secret will populate. Copy this information over into Data Transporter.
Data Destination
To add a new Data Destination, please click on “Add New Destination” and complete the following fields:
Description - Please enter a few words to describe this destination
Application - Please select one of the following task destinations from the drop down menu:
- Amazon S3 - AWS S3 bucket storage (you provide IAM keys)
- Google Cloud - Google Cloud Storage (you provide IAM keys)
- SFTP - Securely deliver to your own SFTP server (you provide a restricted username/password or username/SSH private key (RSA)/passphrase)
- HTTP Post - Custom HTTP endpoint (You provide remote URL, and HTP method).
The headers and URL Parameters should be in JSON format
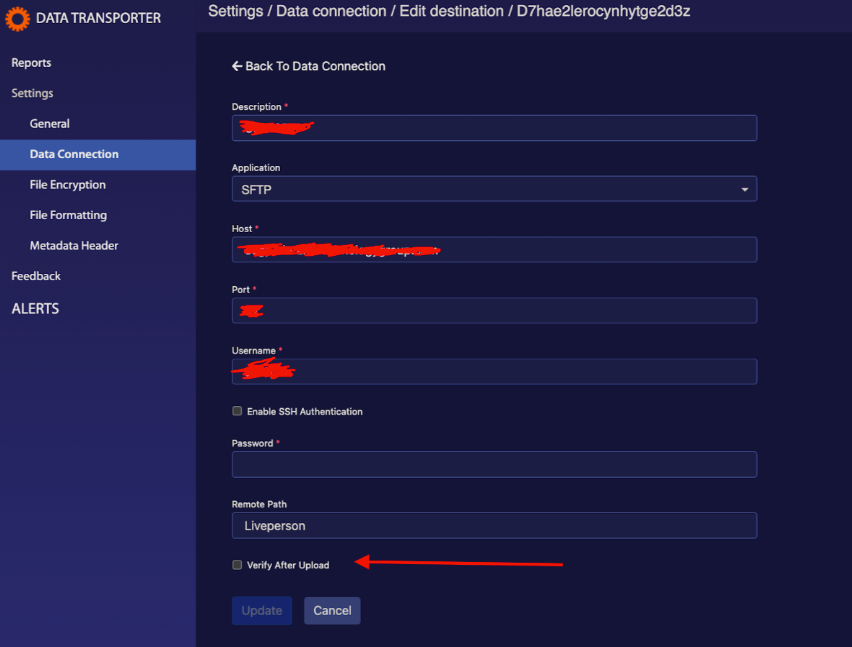
Note - Regarding the SFTP server connection option.
There is an option ‘Verify After Upload’ - this setting ensures that after we send the file, we check if it's on the other side.
This behavior of this setting could break If the SFTP user doesn't have "read" permission then the "verify after upload" option should be disabled.
And additionally to that downloading files from the history table in UI won't work.

- Email - Receive an email when the data is ready to collect
- LP Cloud - Secure storage on LP servers (provided for you)
Amazon S3 / Google Cloud - Securely upload files to your AWS S3 or Google Cloud Storage bucket. Important: For these destinations, when providing your authorization credentials in the relevant section of Transporter, LivePerson strongly recommends to use IAM (Identity & Access Management) based authorization keys.
SFTP - This option allows you to securely save files to your own SFTP server having provided the server details and restricted user credentials as one of:
- username/password
- username/SSH private key (RSA).
Email - Email option allows users to generate data via Tasks and have an email sent when the data is ready to collect. Users can customize the subject, body, temporary URL expiry date, “to”, “cc”, “bcc” and other options when configuring this destination. For security reasons, files delivered using the Email Destination are not attached directly to the distributed email; instead, an optional link will be contained within the email allowing the recipient(s) to download the file(s) after clicking the link. Users can opt to receive the email without generating the temporary URL, and access the file in the Data Transporter UI.
LP Cloud - This option allows you to securely save files to our existing LP servers - to retrieve files saved here, you must login to Transporter and download the completed reports from the HISTORY section - files saved to this destination will be automatically removed after 28 days.
HTTP Post - this option allows you to send the file to your custom HTTP endpoint
Settings > File Encryption
For security and data protection, reports are encrypted. Data Transporter supports PGP/GPG based encryption which conforms to the OpenPGP standard.
To generate a Public Key and Private Key pair, please enter a Passphrase (located below the Private Key box) and click Generate Key. The passphrase must be at least 10 characters long. The Generate Key box will remain grayed out until the passphrase entered is acceptable.
Once your keys are generated, your Public Key will be saved to your account, and you will be prompted to securely store your Private Key and Passphrase (these will not be saved). If you do not save your Private Key and/or Passphrase offline, you will not be able to decrypt your completed reports.
To decrypt the reports, you will need to download a free piece of software (GPG Suite for MacOS or GPG4Win for Windows). For MacOS, download and install GPG Suite (https://gpgtools.org/). Copy the entire key (public and private parts) to the clipboard, then open GPG Keychain.app. It should automatically offer to save and store the key from the clipboard. After this is completed, simply double-clicking the GPG files will decrypt them (if they were encrypted with one of the keys stored in the Keychain). For Windows, use equivalent software (GPGWin).
Notes about Encryption:
- Files are never unencrypted until either the user decrypts the encrypted file directly OR the user enters their private key into the Data Transporter UI and then clicks download (on download the file is decrypted)
- Keys will be generated with an RSA key size of 2,048 bits (alternatively, if you bring your own, they must also be 2,048 bits)
- There are a variety of free and paid tools you may used to store your Public/Private key offline, and allow for 1-click encryption/decryption of GPG/PGP-based files
- GPG Tools / GPG Suite (Mac OSX) (free)
- GPG4Win (Windows) (free)
Settings > File Formatting
There are several options available for file formatting:
- Filename Editor - Use the default, or customize by selecting up to four elements to construct your file name.
- Data Concatenation Delimiter - Use the default, or customize how certain data will be delimited when concatenation occurs.
- CSV Delimiter - Select the delimiter to use to separate data fields in all CSV exports.
- CSV Double Quotes - Provides the option to toggle double quote wrapping for all CSV field values
- Force Column Headers - Provides the option to toggle column headers to always display for eligible reports
Settings > Metadata Header
Metadata Header Options - The following field options are available to be added to the metadata header on selected tasks:
- Record Count - number of rows (for flat formats) or high level entries for nested formats.
- End Date - the date (or time, depending on the settings) of the end of data range. Mostly corresponds to the scheduled execution time.
- File Part - if the scheduled report execution generates more than one file due to size or report logic, then this number identifies the individual file in the set.
- Total Parts - if the scheduled report execution generates more than one file due to size or report logic, then this number identifies the total number of files in the set.
Reports - How to Create a New Task
After the initial setup is complete (all settings have been created and selected), a new task can be created by selecting “Create Task” on the Reports landing page.
Alternatively, you can click on the copy button to duplicate an existing task.
Description - Provide a 2-3 word description about the report / task
Data Source - Select API keys configured in “Data Connection” tab
Data Category - Select Messaging or Admin from the drop down
Report Type - Select one of the reports pre-filtered by Data Category selection. Refer to the Data Transporter Report Catalog for a complete list of reports (including sample reports). Please reach out to your LivePerson account team for the link to this report catalog.
Reports are broken down into the following categories:
HISTORICAL RAW DATA: These are reports based on Engagement History / Messaging Interactions APIs and provide a raw feed of the source data (in JSON format)
HISTORICAL BUSINESS REPORTS: These are reports that have been formatted to be more immediately useful for business use-cases, such as for import into Excel or other reporting tools that accept flat-file structures
WORKFORCE MANAGEMENT RAW DATA: These are reports based on the Operational Realtime / Messaging Operations APIs and provide a raw feed of the source data (in JSON format)
WORKFORCE MANAGEMENT BUSINESS REPORTS: These are workforce management oriented reports that have been formatted for simple ingestion into business WFM tools
ACCOUNT CONFIG - These are exports from account configuration data sources, such as Users, Agent Groups and Skills, for example
Report Frequency - Select the desired frequency: Just Once, Weekly, Daily or Interval
- For weekly, also choose the day and time to run (timeframe = last 7 days)
- For daily, also choose the time of day to run (timeframe = last 24 hours)
- For interval, also choose the time frequency to run (timeframe will include the same amount of time as the time frequency selected)
Start generating report from - Set in the future to determine when the first iteration should start and every next iteration will continue onwards from that point with selected interval. For eligible reports, set in the past to immediately start generating intervals from selected time until the "End generating report on" or continue onwards if "End generating report on" is left empty.
End generating report on (optional) - if you need the report to stop iterating after reaching a point
Delay report generation by (optional) - Select the desired option from the drop down. In some cases, the API source data may be delayed in its completeness - where data completeness is strictly important, choose an option to delay the report from executing.
For example, you may select:
- Daily at 12:00am with a delay of 6 hours: In this case, your report will run at 6am each day and include the data from 12:00am to 11:59pm of the previous day
Report Version - Select the version; Only the latest version is allowed for new reports. Editing a task allows you to upgrade if the version is not the latest. Note - Version upgrade cannot be reversed, and might include new fields
Format - Select the desired format
- JSON - available for all reports
- CSV, XLSX, XML - available depending on a report
Data Destination - Select the data destination from the drop down
Enable Metadata Header - Check the box and click configure to select from the list of metadata header options
After all options are completed, click “Create task” to save the task. The task will begin running at the next scheduled time.
Editing Report Tasks
After you have selected your options, your report will be created and will run at the next scheduled time according to the frequency you selected.
To edit an existing report, from either the TASKS section, or from where you created the report, find the task you’d like to edit and click the pencil icon.
The interface will show that you are currently editing the task - update any of the available options and click Update task. In addition to editing the task, you may also:
- Disable the task using the toggle switch
- Select many tasks and disable or delete them
- Find that tasks’ history via the history icon
- Reset the scheduling options and status as if the report was just created
Task History
Downloading tasks from Data Transporter
After a report task has completed, you can view the history from the Reports section via the Navigation menu.
To download the report to your browser, just click the download icon.
The HISTORY is also the location where you can find and retrieve reports delivered to LP Cloud - note that files saved to LP Cloud will automatically be removed within 28 days.
If you see a lock next to the download icon, this means you have not entered and verified your Private Key during this browsing session. Whilst your Private Key is not needed to download the encrypted file, if it is not provided, then after download, the file will not be decrypted and you will need to decrypt it yourself.
Email Delivery and Pre-Authentication Requirement
When receiving an authenticated URL via email to download a report, users must first authenticate with their SSO provider and access the Data Transporter UI before the download can proceed.
Important Note: Please be aware that "Email delivery" requires pre-authentication in the Conversational Cloud prior to downloading the file. The files are also sent to LP Cloud as a secondary location, so you can collect the files from the Data Transporter interface regardless of the other settings.
Steps to Download the Report:
- Authenticate with your SSO provider and log into the Conversational Cloud.
- Access the Data Transporter UI.
- Click the URL from the email again to initiate the download.
Data Transporter Limitations
- Delivered files will mostly be encrypted - it is up to the user to decrypt these files with their Private Key (there are many options to decrypt using PGP/GPG software; see ENCRYPTION section of this guide).
- There is an arbitrary maximum of 15 tasks for premium brands per account and 3 tasks for a particular report. If more tasks are required, a brand can make a request and it will be reviewed by the Data Transporter team. Please refer to the Data Transporter Report Catalog for a complete list of reports, which includes the task limit per report.
- From time to time, new LP APIs or new features in existing LP APIs become available - these new APIs or features may not be immediately available via Data Transporter. Contact us to request enhancements.
- Some non-standard text characters (long-hyphen, back-tick, etc) may not be correctly decoded with UTF-8 resulting in, for example, results such as â€" instead of long-hyphen –
- Reports from the Data Transporter catalog cannot be modified other than the options revealed during Task configuration. Reports are designed to provide as much of the data available as possible for brands to then disseminate appropriately. Feature requests are regularly considered and incorporated into future versions of existing reports, or new reports entirely.
- Brands that “upgrade” their report version in existing tasks, agree that the layout or logic of the data can change, and new fields might be added.
Data Handling and File Management
Data Volume Limits
Data Transporter delivers full data for every interval regardless of the volume. However, to optimize back-end processing for large volumes, the data can be split into multiple files for the same interval. Depending on the report, it can be split into different volumes. Currently, the report categories in this respect are:
- Does not split by volume
- Splits by the number of conversations, where 10k conversations is a max per file
- Splits by the number of conversations, where 20k conversations is a max per file
In the future, these values or the splitting mechanism can change for optimization, but this will not impact data completeness when all parts are put together.
If reports are split into parts, the filename gets appended automatically with a prefix indicating the number of a given part and how many parts should be expected in total.
Examples:
- Without parts:
7vzFWB9zCRjkWyUib9W1o5_1_22103_21-07-2020.zip.gpg - With parts:
7vzFWB9zCRjkWyUib9W1o5_1_22103_21-07-2020_part1of2.zip.gpg
This affects both:
- Global default filename format in
Settings -> File Formatting - Customized filenames per task in the "Customise File Name" option
Additionally, if the "Metadata Header" feature is used, it can also contain information about the part number and total parts.
Enhanced Permissions
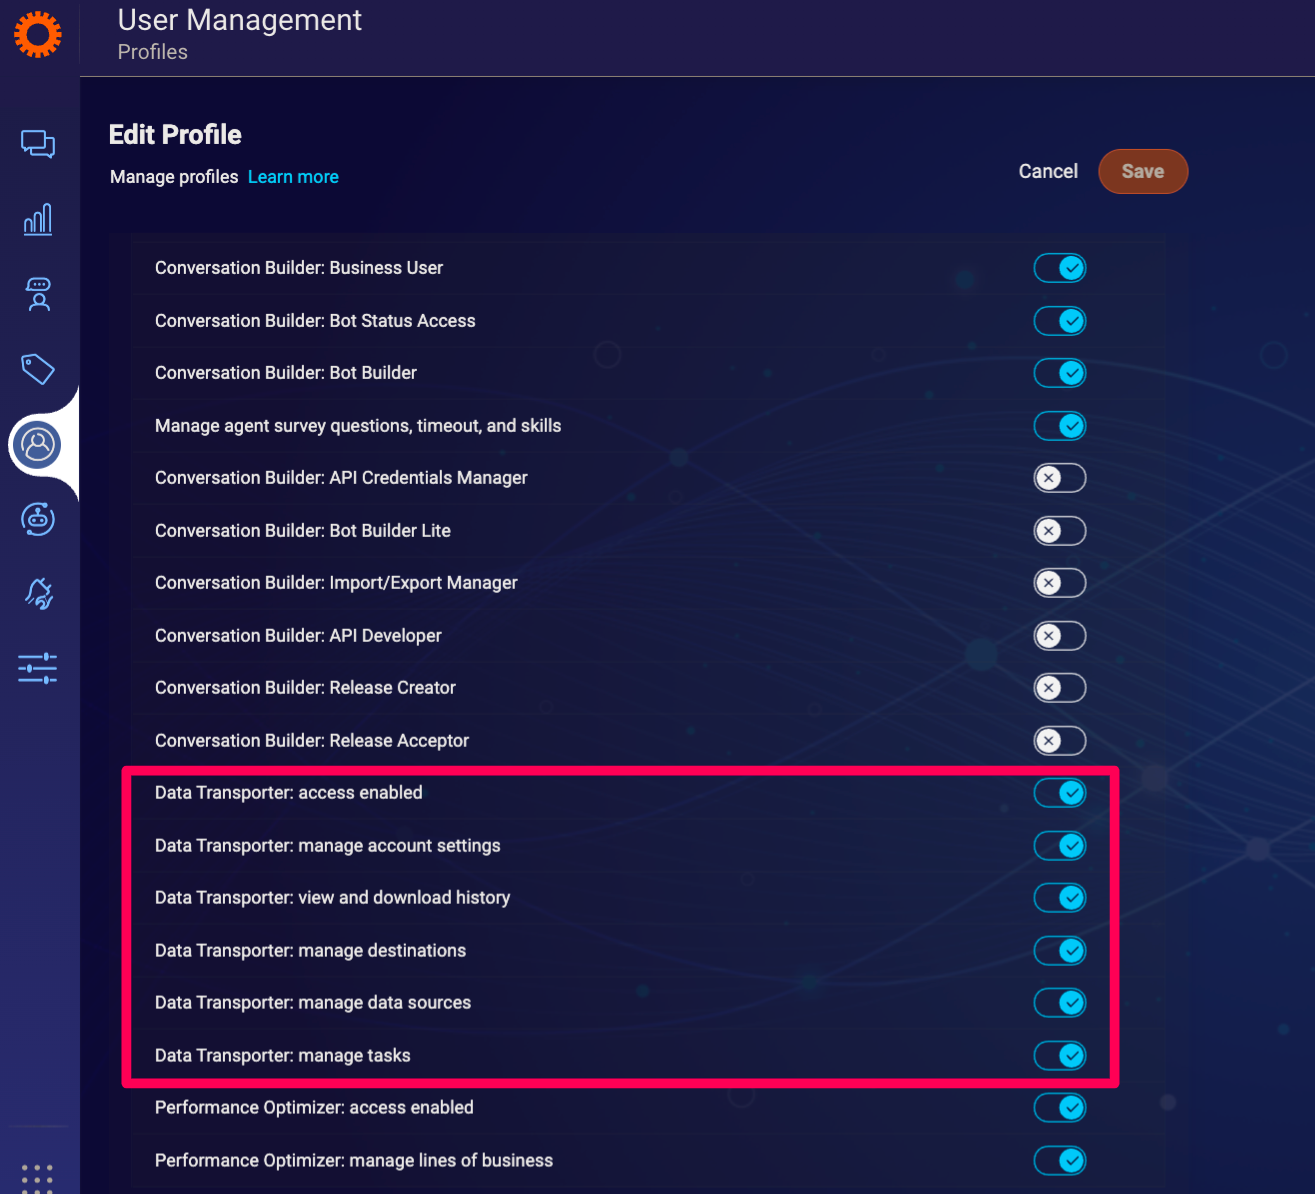
Privileges can be assigned to a user via Conversational Cloud (Manage users and skills > User Management > Profiles section). Each profile created in Conversational Cloud is assigned with a set of UI / API permissions. Profiles usually have a set of default permissions which can be customized; or an entirely new profile can be created with unique permissions for every user assigned to that profile.
The brand has to have the Data Transporter feature enabled for the related permissions to appear. These permissions allow non-admin users to have access to parts or whole Data Transporter functionality. These permissions are available for profiles based on the following roles: "Administrator", "Agent Manager", or "Campaign Manager". The permissions are not available for profiles based on the "Agent" role.

| Permission | Description |
| Data Transporter: access enabled | User can access Data Transporter Note - this is prerequisite to all other settings |
| Data Transporter: manage account settings | User can edit Data Transporter Account settings Refers to DT account level settings: Settings: General Settings: File Formatting Settings: Metadata Header |
| Data Transporter: view and download history | User can view and download historical reports |
| Data Transporter: manage destinations | User can create, update, and delete destinations |
| Data Transporter: manage data sources | User can create, update, and delete data sources |
| Data Transporter: manage tasks | User can create, update, and delete tasks |
Missing Something?
Check out our Developer Center for more in-depth documentation. Please share your documentation feedback with us using the feedback button. We'd be happy to hear from you.
Missing Something?
Check out our Developer Center for more in-depth documentation. Please share your documentation feedback with us using the feedback button. We'd be happy to hear from you.