Time frame
Defining your campaign time frame allows you to set the days and hours in which your campaign will be considered active, and the engagements defined on the campaign will be displayed to your consumers as they navigate through your website or mobile app. When a consumer visits your website or mobile app, engagements from campaigns that are defined as active may be displayed to the consumer while engagements from inactive campaigns will not be displayed to the consumer at all.
This configuration allows you to define several campaigns, each with its time frame, and display different engagements to your consumers based on your working hours. It gives call centers added flexibility and helps brands to target users effectively.
Accessing the time frame page
1. From the campaigns list, select a specific campaign.
2. In the Campaign Builder, hover over the Campaign time frame and click Edit.

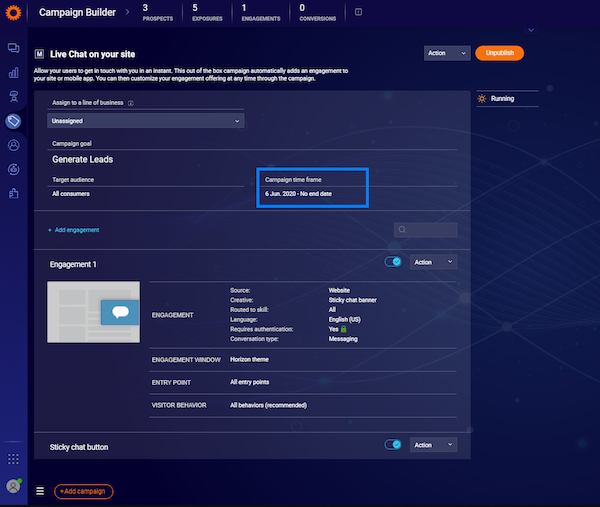
3. The Campaign time frame page will open.
Defining the active time frame
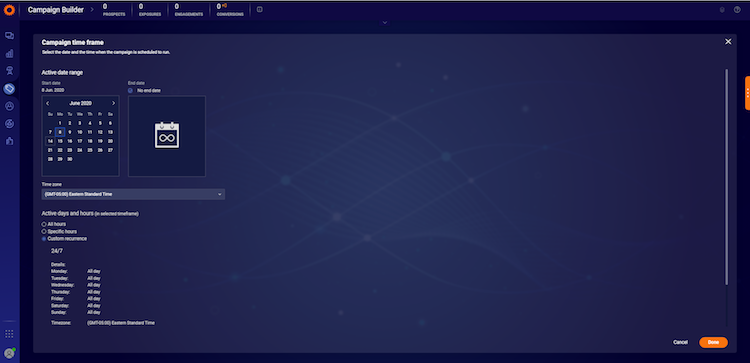
Campaign date range
On the campaign time frame page, under Active date range:
- Choose the Start date.
- Choose the End date. You may also define the End date as No end date so that that campaign will stay active until it is manually changed.
- Configure the Time zone: Choose the Time zone from the dropdown list during which you wish your campaign to be active.
Campaign active days and hours
On the campaign time frame page, below Active days and hours (in selected timeframe), define the days and hours in which your campaign will be active in the defined date range.
You may choose from the following options:
- All hours: The campaign will be active all day (12:00 a.m. - 11:59 p.m.) on all days within the defined date range.
- Specific hours: Fill in the specific hours in which your campaign will be active for all days within the defined date range. The time format should be hh:mm am/pm, e.g: 05:45 pm
- Custom recurrence: Use different campaign activation hours for different days of the week.
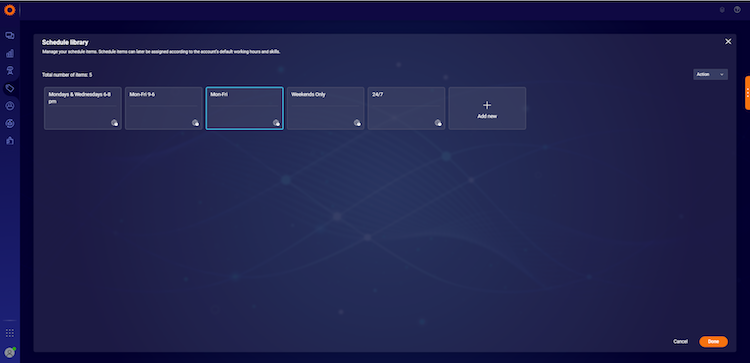
- Under Custom recurrence, click the Set days and hours button to access the schedule library
- Click Add new or edit an existing library item
- Fill in the Schedule item name, description (optional), and Time zone
- Define the campaign’s hours of operation for each day of the week


You may choose from:
- All hours (default) - If a campaign is set for all hours it will be considered active on this day from 12:00 a.m. until 11:59 p.m.
- Custom - For custom hours, manually input the active campaign hours for the day. The input must be in the following format: HH:MM am/pm and in 5-minute intervals only. The only exception is 11:59 pm, which can also be defined to define a shift that lasts until midnight.
- Off - If set to off, the campaign will be considered inactive on this day from 12:00 am until 11:59 pm.
Defining multiple shifts per day
You can define multiple shifts for a single day of the week by doing the following:
1. Click the +Add button to split the day’s active hours and add the shift’s hours.
2. Save the page.
3. The new scheduling item will now appear in the Schedule library. Click it to choose it for your current campaign.


4. Click Done.
5. The campaign timeframe page will be presented again. Under Custom recurrence, a summary of the chosen schedule will appear.
Special occasions per campaign
A special occasion is used when there is an exception to the campaign's typical hours of operation. To configure a special occasion, do the following:
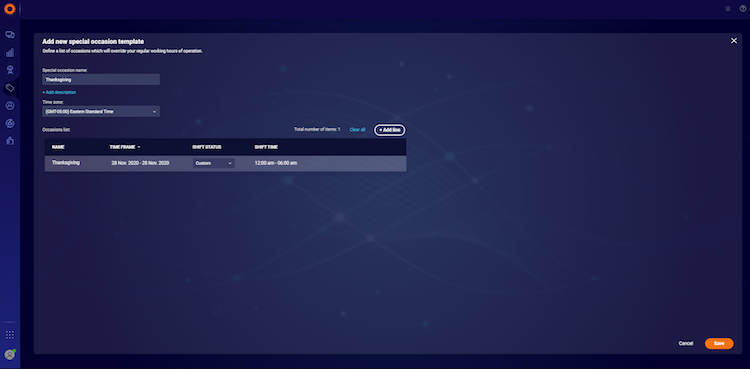
1. Under Special occasions, click the Set special occasions button to access the special occasion library.
2. Click Add New, or edit an existing library item.
3. Fill in the Special occasion item name, description (optional), and Timezone
4. To add new occasions to the list, click the “Add line” button
5. A new occasion line will be added to the table. Fill in the occasion name, timeframe, shift status, and shift time.
You may choose from:
- Off (default) - When set to off, the occasion will be considered inactive from 12:00 a.m. until 11:59 p.m., in its defined timeframe.
- All hours - If set to all hours, the special occasion will be considered active from 12:00 a.m. until 11:59 p.m., in its defined timeframe.
- Custom - manually type the activation hours of the day. The input must be in the following format: “HH:MM am/pm” and in 5-minute intervals only.
- Multiple shifts per occasion: You may also define multiple shifts per occasion. Simply hover over the occasion line, then click the +Add button to split the occasion activation hours, and add the shift's hours.

6. Save the page.
7. The new special occasion item will now appear in the Special Occasion library. Select this special occasion to choose for your current campaign.
8. Click Done.
9. The Campaign time frame page will be presented again. Under “Special occasions”, a summary of the chosen special occasion will appear.
Saving the campaign with new settings
After defining the campaign’s date range, active days, hours, and special occasions, make sure to click done (for an unpublished campaign) or publish (for a published campaign) to save all-new settings.
Missing Something?
Check out our Developer Center for more in-depth documentation. Please share your documentation feedback with us using the feedback button. We'd be happy to hear from you.