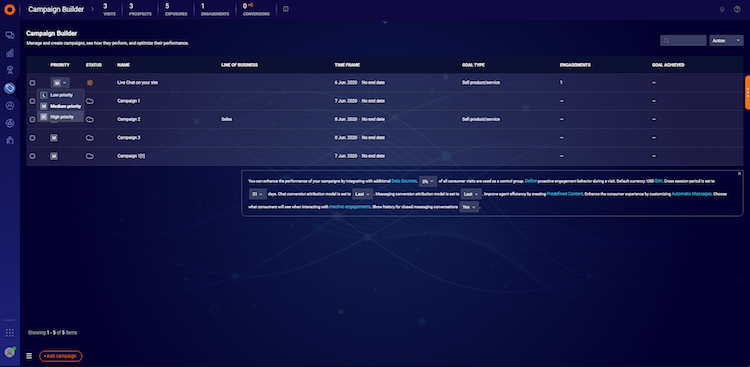
Managing campaigns
You can create many different campaigns on your account, each with as many different buttons, or engagements as you need. All of the campaigns and engagements you create with the Conversational Cloud can be managed within the Campaign Builder.
Multiple campaigns and priorities
When running multiple campaigns, it is good practice to have campaigns cover a particular topic or initiative. For example, you can have a campaign for ‘sales’ with engagements on the shopping cart or product pages, and a different campaign for ‘service’ with engagements on the account page or login area.
Setting campaign priority
From the Campaign Builder, you can set your campaigns to different priorities (high, medium, or low), by selecting from the options under the priority column. If multiple engagements target a user simultaneously, and to ensure that users still have a chance to be exposed to all engagements, the platform will choose which engagement to display according to the following logic:
- The probability that engagements belonging to High Priority campaigns will be displayed is 70%
- The probability that engagements belonging to Medium Priority campaigns will be displayed is 20%
- The probability that engagements belonging to Low Priority campaigns will be displayed is 10%

Measuring success using control groups
To evaluate the effectiveness and performance of campaigns (and your account as a whole), a control group needs to be set up.

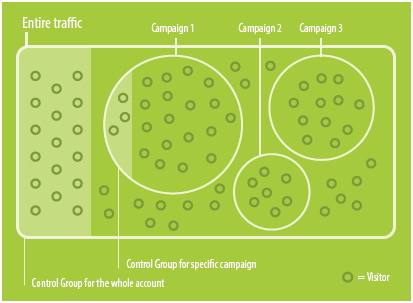
A control group is a random number of visitors to your website who do not receive any type of engagement from a campaign. The activity of these visitors in the control group, for example, sales purchased and defined goals reached, is then compared to the activity of visitors who were exposed to campaigns. The difference between the control and exposed groups provides information on the effectiveness of your campaign. This data can be seen in select metrics listed in the data bar and data dashboard.
A control group can be set per account or campaign to any integer between 0% to 25%. Increasing the percentage means fewer visitors will be exposed to campaigns, however, the data is more statistically accurate. 0% means that the control group feature is switched off.
Per account: This means the selected percentage of control group visitors will not be exposed to any type of engagement from any of the campaigns. This enables you to evaluate the performance of the whole program. This setting is in the Campaign Builder. (Default value is 5%).
Per campaign: This means the selected percentage of control group visitors will not be exposed to any type of engagement from the specified campaign but may be exposed to another campaigns’ engagements. This enables you to evaluate the performance of specific campaigns. This setting is on the campaign summary page. (Default value is 10%).
Each time you create a campaign, select the size of your control groups to reflect your most important business goals. To accurately test the effectiveness of a campaign, select larger samples (higher values). To maximize exposure, at the cost of accuracy, select smaller samples (lower values). Select zero (0%) only when you are not interested in testing the effectiveness of a campaign at all.
Busy state
LivePerson’s platform offers a variety of creative engagements to communicate to consumers when no agents are online (during off-hours) and during busy times when they have no capacity and long wait times are expected. This helps to manage consumer expectations and prevent frustration.
For chat, there are three statuses available: online, offline, and busy. Each state is related to the status of the agents, as well as the maximum wait time:
- Offline - when no agents are online
- Online - agents are online and available; the expected wait time is shorter than the maximum wait time
- Busy - at least one agent is online but with no capacity to handle consumers as the expected wait time is longer than the maximum wait time for the skill
The default setting for the busy state is off. In this case, if ignore max wait time is enabled (now repositioned from engagement settings), consumers will be directed to a survey if agents are offline or offered chat if agents are online. If the offline state is also disabled, consumers will only see a creative when agents are online. The busy state can be enabled, and its behavior fully configured, in the Engagement Studio.
- Once enabled, a busy state will mean that when at least one agent is online but has no capacity, the busy state creative will be displayed to the consumer.
- By default, this will be the offline creative, but a new creation can be configured by the campaign manager.
- Clicking on the busy creative will lead to an offline survey by default.
- The campaign manager will have the option to change the busy state’s default behavior and allow visitors to enter the queue, by selecting ‘ignore max wait time’.
The busy state is available for all engagements except overlay, offsite and messaging engagements. The number of busy state exposures is available in the Campaign Manager BI dashboard, in the campaign grid view.
Configuration
- Go to the Campaign Builder page and select an existing Campaign.
- Click Add Engagement.
- Choose a creative in the Engagement template gallery and click Next.
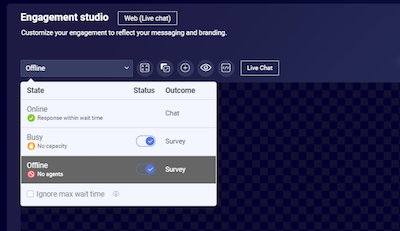
- In the Engagement Studio, click ‘Online’ in the top left corner, and a menu with configurations for the three chat states will dropdown.
- Choose which states to enable and disable - a full explanation of the conditions and outcomes of each state is provided in the table below.
- Click Next and continue with the setup of the engagement, selecting Done when you have finished.
This table provides a summary of the conditions and outcomes of each of the three states:
| Ignore Max Wait Time | Busy | Online | Offline |
| X | Disabled | State: Agents availableOutcome: chat | State: No agents online / No capacityOutcome: Offline survey |
| X | EnabledState: No capacityOutcome: Offline survey | State: Agents availableOutcome: Chat | State: No agents onlineOutcome: Offline survey |
| ✓ | Disabled | State: Agents available / No capacityOutcome: Chat | State: No agents online / No capacityOutcome: Offline survey |
| ✓ | State: No capacityOutcome: Chat with long wait time | State: Agents availableOutcome: chat | State: No agents onlineOutcome: Offline survey |
1. Default state - busy state disabled


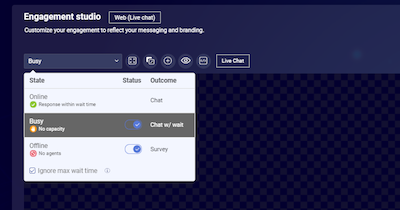
2. Busy state enabled

3. Busy state disabled, ignore max wait time enabled

4. Busy state enabled, ignore max wait time enabled

Publishing and unpublishing campaigns
Turning your campaigns on and off is simple. When you finish creating your campaign, toggle the ‘publish’ button. You will see the status of the campaign in the list of your campaigns:

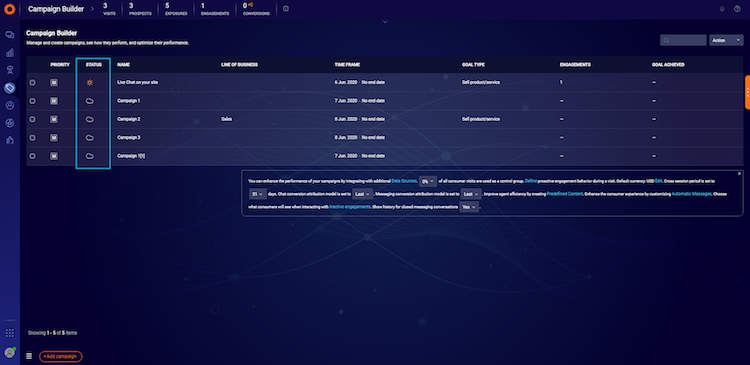
A campaign can be active and still not displayed to your consumers if the campaign is no longer within the time frame that you defined.
Engagement zones
Consumers may be targeted by more than one engagement on the same page, at the same time, although the platform may not necessarily display all the engagements to the consumer. In such cases LivePerson uses a decision mechanism to determine the engagements that will be displayed, considering the following factors:
- Campaign priority
- Web engagement zones
- Agent status
An engagement zone is a defined area on a web page where engagements can be displayed. Each type of engagement is mapped to a specific zone. Although only one engagement can be displayed in a specific zone at any given time, multiple engagements can be displayed simultaneously in different zones. Every 10 seconds the platform checks whether there is an engagement to display and whether the zone the engagement is mapped to is available (in other words, no other engagements are currently displayed in that zone).
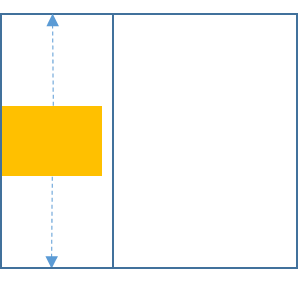
Left zone
Engagement types:
- Slide-out engagements
- Sticky engagements
Note: Only one of these can be displayed simultaneously in this zone.

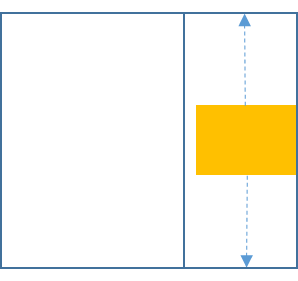
Right zone
Engagement types:
- Slide-out engagements
- Sticky engagements
Note: Only one of these can be displayed simultaneously in this zone.

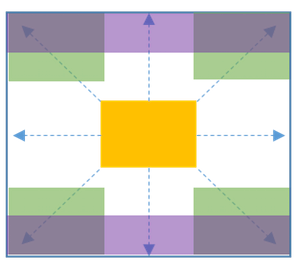
Proactive zone
Proactive engagements:
- Overlay banners
- Toaster banners
- Peeling corner banners
Note: Only one proactive engagement can be displayed at any given time.

Embedded zone
Engagement types:
- Embedded buttons (created with <div> tags)
Note: You can display an unlimited number of embedded buttons on a page, as long as each <div> tag has a unique ID.
Agent status
When more than one engagement qualifies to display in the same zone at the same time, the platform generally displays an online chat engagement. If agents are not available, the platform generally displays a content engagement. If no content engagements are configured, an offline chat engagement will be displayed. Web Messaging engagements will be displayed regardless of the agent status.
Additional Rules
To provide a rich, yet non-intrusive engagement experience, LivePerson employs the following rules per consumer session:
- Once an engagement is displayed, other engagements will not display in the same zone until the consumer navigates to a different page.
- When two or more engagements are mapped to the same zone, whether they belong to the same campaign or different campaigns of the same priority, only one engagement will display, selected at random.
- If engagements are mapped into different zones, multiple engagements may be displayed on the same page.
- The platform checks consumer attributes (target audience, entry point, and behavior) every 10 seconds. Therefore a consumer may see one engagement when landing on a specific page (due to entry point-based targeting) and 10 seconds later the consumer may see an additional engagement on the same page (due to behavior-based targeting). For example, the consumer will see a sales engagement on arrival to the sales page, based on the entry point. An additional engagement, configured based on the time the consumer has spent on the entry point, will also appear on the page after the configured time has passed, offering the option to connect with an agent.
- If a consumer closes an engagement, it will no longer be displayed in the current session.
- LivePerson’s platform allows you to limit the number of times a proactive engagement (overlay, toaster, and peeling corner) is displayed per consumer session. When the limit is reached, no other proactive engagements will be displayed in the session, regardless of engagement priorities.


- For proactive engagements, you can configure an engagement to “follow” a consumer for a certain amount of time or a specific number of pages, from the engagement settings page. Proactive engagements are always prioritized for display ahead of other engagements mapped to the same zone.
- If an online chat button is displayed and then 10 seconds later there are no longer any available agents, the button will not be replaced with an offline button.
Use Cases for Multiple Engagements
Using multiple engagements in a campaign helps you facilitate your consumers’ journeys and attain your business goals. Here are some examples of how multiple campaigns and engagements can be used:
- Use one campaign to target all consumers and specific consumers: Create an embedded button engagement in the campaign for general inquiries. Set this engagement to display to all consumers on every page or section of your website. In the same campaign, create an overlay engagement that displays to consumers who remain on a specific page or section for a certain amount of time.
- Redirect consumers from chat to content: You can configure two toaster banners, one for chat and one for content, and set both banners to target the same audience, entry point, and behavior. When agents are available, the chat engagement will be displayed, and when no agents are available, the content engagement will be displayed.
- A/B testing: You can configure two different engagements, mapped to the same zone, each belonging to a different campaign (for example, a Sticky Conversation button on the top left and a Slide-out Conversation button on the bottom left). The platform will randomly display one of the engagements in each consumer session. Looking at the campaign reports you will be able to tell which of the two engagements drove better results.
Inactive engagements
This setting allows you to choose what consumers will see when interacting with an inactive Off-Site engagement. An engagement is inactive when it has been disabled, deleted or its campaign has been unpublished, deleted, or expired. You can choose to display an offline survey or a landing page.
Troubleshooting
Engagement not displaying as expected
If the engagement isn’t displaying to a consumer as expected, check the following:
- Online Agents: Verify that there is at least one agent online and that he/she is assigned to the skill defined in the engagement.
- Control Groups: Your control group settings (Account level and Campaign level):
- Set control groups to 0% at both the account and campaign levels, and retest the engagement.
- Campaign Settings:
- The campaign is published and running.
- The engagement is saved and/or enabled.
- Your Campaign Targeting Settings:
- Make sure that you belong to the campaign’s target audience.
- Make sure that you are testing from a targeted web page location.
- Make sure that you are exhibiting the targeted behavior.
- Overlapping Engagements: Engagements can not physically overlap each other on the webpage. If you've configured overlapping engagements, the visitor will see only one of them.
- Web Tag: Verify that the tag is deployed on all your web pages.
If you’ve checked all the above options and you still don’t see your engagement, contact LP Support.
Missing Something?
Check out our Developer Center for more in-depth documentation. Please share your documentation feedback with us using the feedback button. We'd be happy to hear from you.