Add Web Messaging to your website
Brands can better target their consumers by adding engagements to their website that invite consumers to start messaging. By creating and managing these buttons and banners through LivePerson’s platform, they can choose what users to target based on engagement attributes or entry points and route them to the desired skill. For an overview of campaigns in the Conversational Cloud and their terminology, click here.
1. Planning & thought starters
(should be completed by contact center manager, project manager or program manager)
Answering these questions will help you prepare and streamline your campaign creation process:
- Do you want one messaging button available on all pages of your website?
- Is there a dedicated place on your website that you’d like the button to display?
- Will you offer to message only to a specific audience? How will you target this audience?
- What skills will be answering your messaging? How will you do the routing? Based on the location of the app? The type of customer?
- Are you offering service transactions? Will you need to authenticate the conversations?
- Will you utilize messaging for sales? Specific campaigns? Do you expect to track the conversations made over messaging?
2. Add code & conversion tracking to your website
Web Tag
If you are already using the Conversational Cloud for chat, the original code snippet you implemented on your website will apply to Web Messaging as well - no additional action is needed.
If you’re adding Web Messaging for the first time, you’ll need to grab the web tag and ask a developer to incorporate it into every page of your website. For more information on how to do this, click here.
Engagement attributes
Engagement attributes help brands collect more in-depth information about visitors, such as products viewed, errors encountered, and more. To collect visitor information from your web engagements, you first need to configure your engagement attributes. For more information on individual engagement attributes, you can refer to the Developer Center.
3. Review Conversation History length (for unauthenticated messaging)
When a consumer starts an unauthenticated Web Messaging conversation, a random token is generated, representing the identity of the consumer. As long as this token is valid, the thread of the conversation can continue.
While the engagement window is open, the token is automatically refreshed. Once the engagement window is closed, either by ending the conversation or by closing the tab of the website (or the entire browser), the conversation becomes idle.
When deciding on the right idle time, the brand should consider the SLA of the agents when responding to consumers, so the conversation stays active enough to leave enough time for agents to respond. The idle time should be longer than SLA.
Brands can configure the maximum time a conversation can stay idle, during which the consumer can return to the thread and see the previous conversation. Once the defined idle time has passed, the token expires. When the same consumer starts a conversation, a new token will be generated and a new conversation will start. The previous conversation cannot be accessed from the consumer side. Your LivePerson Account Team will help you with setting the right idle timeframe for your needs. Learn more about setting time frames in Dynamic Capacity skill settings.
4. Sales & conversion tracking
If you are planning to create messaging campaigns tailored for tracking sales and conversions, ensure you define the following settings (can be found in the Campaign Builder footnote).
- Define your currency: You can define what currency you would like to track your sales and conversions in. This currency will reflect in your reports. For more info, click here.
- Cross session period: Often your consumers will not purchase on the first visit to your website. You can define how long a ‘cross session’ applies. For example, a cross-session of 2 weeks means that if a consumer visited your site, had a messaging conversation, and came back to purchase 2 weeks later - that sale will be attributed as a conversion following that specific conversation.
- Conversion Attribution model: In the case that more than one agent or bot handled the conversation, define who should get the conversion. First agent? Last agent? Split?
5. Creating a campaign
Before you can start creating your buttons or banners, you need to set up your campaign. In the Conversational Cloud, engagements can be added to either new or existing campaigns via the Campaign Builder.
To create a new campaign, click “Add campaign” at the bottom of the Campaign Builder.
When creating a campaign, you first need to define the following:
Click on each of these links for a more in-depth explanation. Once these items have been defined, you can begin creating your web engagement.
6. Designing the buttons & window
You can now begin creating banners or buttons to add to your website. These elements are created in the engagement studio, where an engagement wizard will guide you through the process.
To add a new web engagement to your campaign, click “Add engagement” and select Web as the engagement source. This will open the template gallery within the engagement wizard. There are six stages for creating a web engagement: Gallery, Settings, Studio, Window, Entry Point, and Behavior.


Engagement Template gallery
The Engagement template gallery page allows you to choose the format of your engagement and whether you are trying to create a messaging button or content banner. Learn more about choosing your engagement format here.
Engagement settings
From the Engagement settings page, you can define the conversation channel, authentication, and routing. You can also customize your Automatic Messages and Predefined Content on this page.

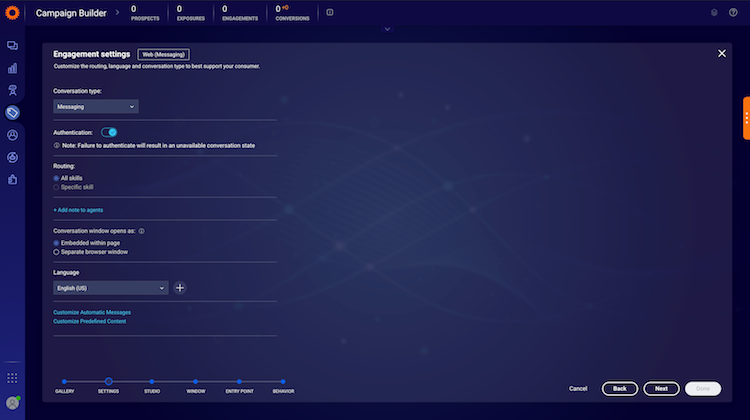
Conversation channel
Select if you want the engagement to lead to a messaging conversation. From the Conversation type drop-down, select Messaging.
Authentication
You can select one of these security methods for your conversation:
- Authenticated: Conversations can have a layer of security, or authentication, for brands looking to add messaging to pages within the logged-in area of their website. By configuring your buttons for authenticated pages, they can be fully branded and responsive for both desktop and mobile.
- Unauthenticated For unauthenticated engagements, disable the toggle. Unauthenticated engagements will display on both authenticated and unauthenticated pages.
Routing
Under routing, you may select the skill that your engagement should be assigned to. To route to all skills, select ‘All skills’ (default), to select a specific skill, select the ‘Specific skill’ option and choose from the dropdown menu.
Conversation window opens as
Select how the messaging window will be presented to the consumer, either embedded in the page or a separate browser window. Note that if the consumer is using third-party cookie blockers that the messaging window will open as a separate browser window regardless of this setting.
Language
The engagement language selected in this step will only affect items in the Agent Workspace - namely Automatic Messages and Predefined Content - during an active conversation.
Engagement studio
The engagement studio page is where you can modify your button or banner to suit the look and feel of your website. By clicking on your button or banner you can adjust the text, style, and design. You can modify the size and placement, the background, and add elements. You can also preview your elements before publishing your campaign. To learn more about designing engagements, click here.
Engagement window library
The engagement window studio allows you to customize the messaging conversation window to match your site. You can click on different parts of the window to change their design, and add additional elements. Once your settings are complete, click Next. For more information on the conversation window design, click here.
Entry point library
You will now reach the entry point library. An entry point is a section within your website where the engagement will be displayed. You can choose the engagement entry point from the existing items, or click “Add new” to define a new entry point. When you are finished defining your entry point, click Next. For further information on creating a new entry point, please refer here.
Behavioral targeting library
Show targeted engagements that display only when a consumer's behavior matches specific conditions. For further information on creating a new targeted engagement, please refer to the behavioral targeting documentation.
When selecting the condition, look for a globe icon next to the word “Supported,” which indicates that this engagement attribute is applicable for web engagements.
7. Publishing your campaign
Your new web engagement is now complete. From the Campaign Summary page, you can give your engagement a name, edit all aspects of the engagement, enable or disable the engagement and publish. To learn more about publishing and unpublishing campaigns, click here.
Displaying your engagements
Advanced banner display settings
Test click rates through control groups
To evaluate the effectiveness and performance of campaigns (and your account as a whole), a control group needs to be set up. A control group is a random number of visitors to your website who do not receive any type of engagement from the campaign. The activity of these visitors in the control group, for example, sales purchased and defined goals reached, is then compared to the activity of visitors who were exposed to campaigns. The difference between the control and exposed groups provides information on the effectiveness of your campaign. For more control information, groups click here.
Display multiple engagements on the same page
Consumers may be targeted by more than one engagement on the same page, at the same time, although the Conversational Cloud may not necessarily display all the engagements to the consumer. In such cases, the Conversational Cloud uses a decision mechanism to determine the engagements that will be displayed, considering the following factors: campaign priority, web engagement zones, and agent status. To learn more about running campaigns with multiple engagements, click here.
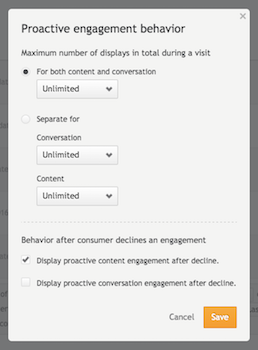
Fine-tune proactive engagements
Proactive engagements offer a rich, hard-to-miss experience for consumers and are available in a variety of formats including overlay, toaster, and peeling corner. To ensure the experience is both engaging and non-intrusive, the Conversational Cloud offers the following settings:
Number of displays
This setting allows you to limit the number of times a proactive engagement is displayed in total during a visit. When the limit is reached, no other proactive engagements will be displayed in that visit. You can select from one, two, three, or unlimited times; the default setting is unlimited. You can also choose to select different settings for conversation and content engagements.
Invite after decline
This setting allows you to define the behavior after a consumer declines a proactive engagement, by selecting whether or not other proactive engagements can thereafter be displayed. For example, you can decide to display a proactive conversation engagement for one Line of Business, even if a proactive conversation engagement for a different Line of Business was previously declined.
By default, after declining a proactive content engagement, other content engagements can be displayed; after declining a proactive conversation engagement, conversation engagements cannot be displayed.

Display engagements based on a scheduler (using shift scheduler)
The Conversational Cloud enables you to define your account’s working hours, to set the most accurate expected response time for your consumers during a messaging conversation. You have the option of setting working hours manually or using the automatic scheduler. For more information on configuring the shift scheduler, click here.
Optimize the mobile experience
To enhance your visitors’ messaging experience on mobile, use the embedded engagement window and optimize your website for mobile.
To optimize your web experience, tag of all your web pages:
- Ensure that your website conforms to HTML standards (e.g. one header and one body per page).
- Add the viewport meta tag (as shown below) to the page code. (Recommended)
<meta name="viewport" content="width=device-width, initial-scale=1.0,minimum-scale=1.0, maximum-scale=1.0, user-scalable=no"/>
Missing Something?
Check out our Developer Center for more in-depth documentation. Please share your documentation feedback with us using the feedback button. We'd be happy to hear from you.