Taxonomy guide
Taxonomy overview
Taxonomies are used to group and organize the topics in your transcript data. Once these groups are created in Insights, you can leverage their organizational structure to filter and create different views of your dashboard. These topic views will allow you to track your conversational data over time, and also to answer ad hoc questions that may arise in your business. There are two main types of data in your Insights program, structured (grouping conversations based upon the structured data associated with them) and unstructured (grouping conversations based upon what is discussed in them).
Creating a taxonomy
Note: You may find it helpful to first run an NLU (also known as machine learning is designed to automatically analyze large textual datasets and discover topics and themes.) model against the verbatim type that you wish to create a taxonomy for. This will allow you to understand the types of words and phrases that appear in the verbatim before actually modeling. It is helpful in terms of identifying areas that you may want to focus your attention in creating taxonomy categories.
- Go to the advanced menu and click on taxonomies.

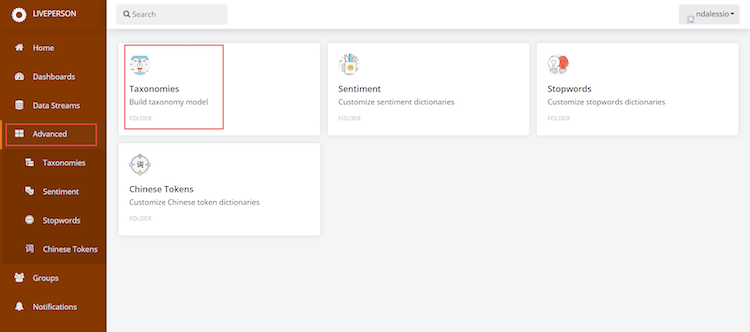
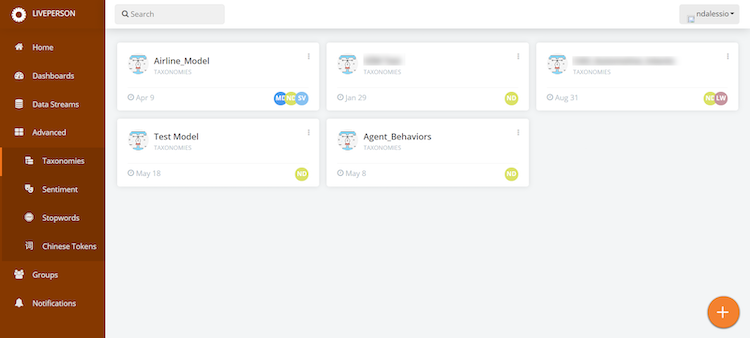
- Here, all of the taxonomies that have been created and are shared with the user can be found here. Note: if someone else on your account has made a taxonomy but has not shared it, you will not see it by default. You will have to ask them to share it with you.

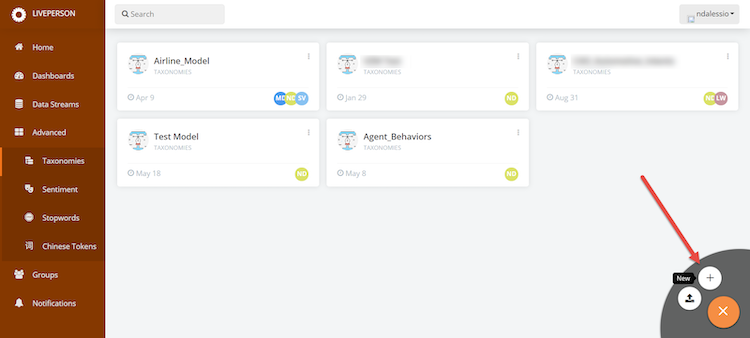
- Click on the plus button at the bottom right hand side of the screen, and add a new taxonomy. This will open the taxonomy editor.
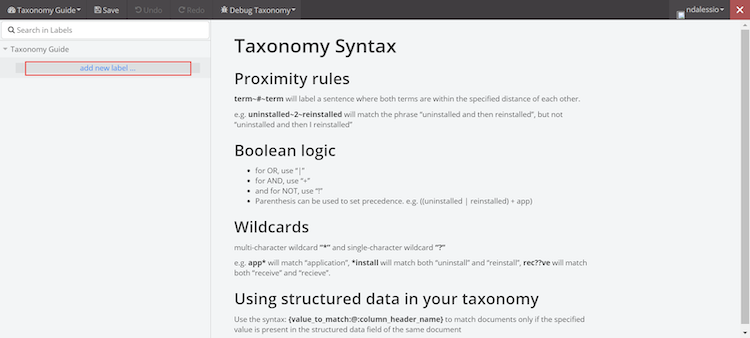
- Add new labels and define rules in the editor
- Add a label
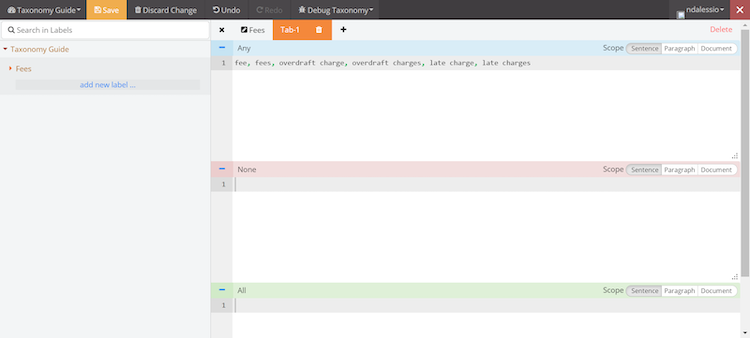
- Define your rules. In this case, the user is looking for any mentions of Fees:
When you have finished adding and creating rules, click save.
Syntax and rule structure
The way to specify rules is important. Rules are set up as a combination of ANY/OR/AND/ NONE/ ALL conditions.

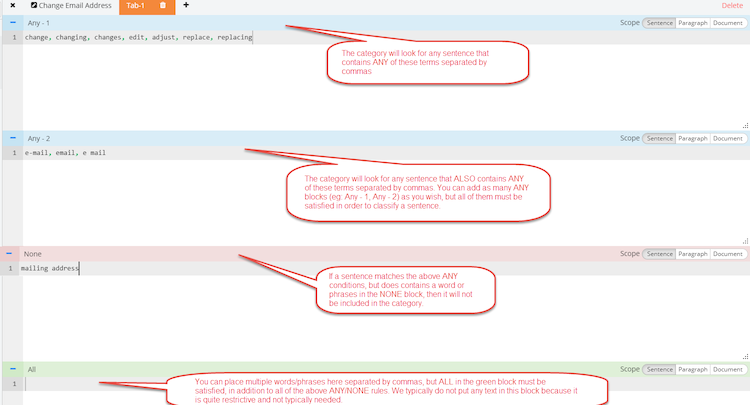
ANY: at least one of the rules listed in the box is matched
NONE: a document can not be labeled based on the rules listed in this box.
ALL: only when all the rules are matched can the document be labeled.
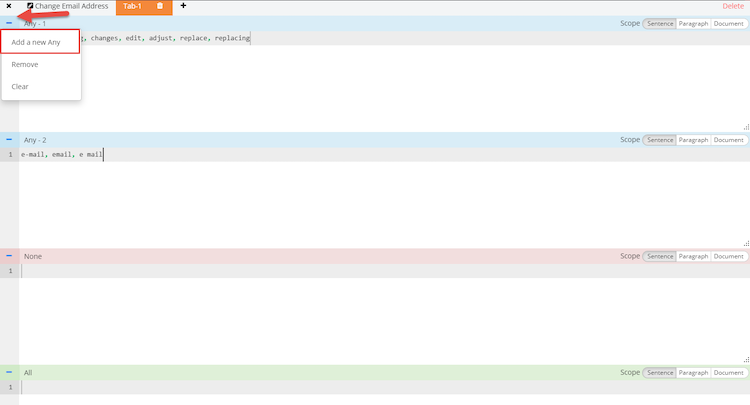
You can add a new ANY condition by hovering over the “-” next to Any - 1 and clicking “add new any”. You can also clear the contents or remove a condition here
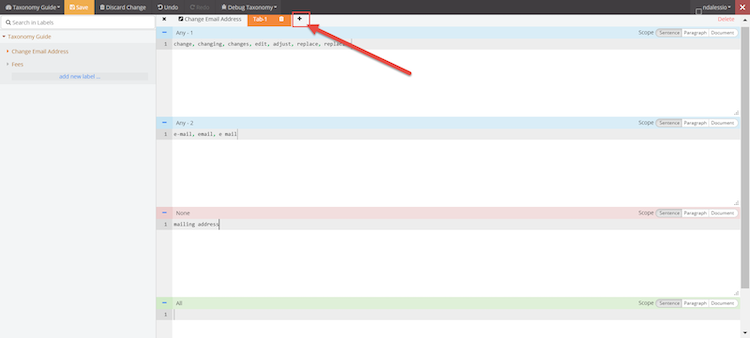
Each one of these blocks searches for the conditions to be met at the sentence level. You can change the scope at the individual block level. We default to only searching the sentence level. In rare occurrences, you may find that you are looking for sentences where a customer mentions a particular thing, but anywhere else in the document they referenced something else. This is where document scope is helpful. For chat and messaging, paragraph and document scope are the same. You can also create multiple tabs of rules within one category. The tabs are convenient to use if you have used multiple ANY or restrictive NOT conditions and want to add additional rules that will not match all conditions that you have included on the first tab. To do so, click the + button next to Tab 1 and a new Tab will be created.
Syntax
Commas - Commas are needed between each word and phrase and it is treated like an “or” rule
Quotes - Quotes are not needed around phrases, but they do not hurt if they are in there.
Proximity rules - term~#~term will label a sentence where both terms are within the # range of each other. e.g. uninstalled~2~reinstalled will match the phrase “uninstalled and then reinstalled”, but not “uninstalled and then I reinstalled”
Wildcards - Multi-character wildcard “” and single-character wildcard “?” e.g. app will match “application”, *install will match both “uninstall” and “reinstall”, rec??ve will match both “receive” and “recieve”.
Other Rules for OR, use “|” for AND, use “+” and for NOT, use “!” Parenthesis can be used to set precedence. e.g. ((uninstalled | reinstalled) + app)
How to interpret rules:
The system will look for whenever someone says “employment verification” AND “checking”, or “employment verification” AND “check”, or“employment verification” AND “did you receive”, or “employment verification” AND “can you confirm” in the same sentence.
Auditing Models
There are two ways to audit models from within the taxonomy viewer using the Debug Taxonomy drop down feature.
Method 1:
Run single test: this will allow you to type in a sample phrase and see if it would be categorized by that rule, if it were present in the data. It is a hypothetical test to see if your rules work as expected.
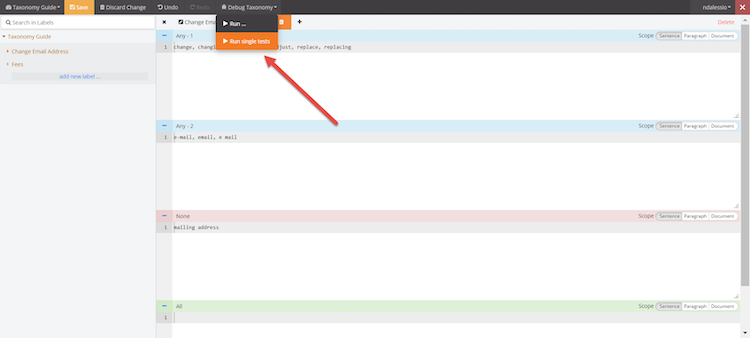
Type your sample phrase and click run. If your sample phrase does fit the rule structure, then it will appear below with green underlines. The underlines identify the keywords that match the rule. If no matching results are found, then it will continue to say No Matching Results Yet.


Method 2:
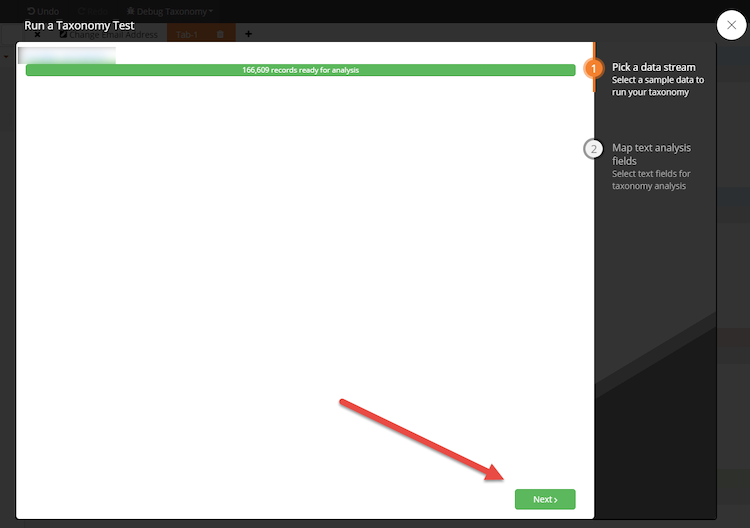
Run. This option allows you to run your rules against a sample of actual data.
- Click run
- Pick a stream (you will only see data streams that have been shared with you)
- Click next

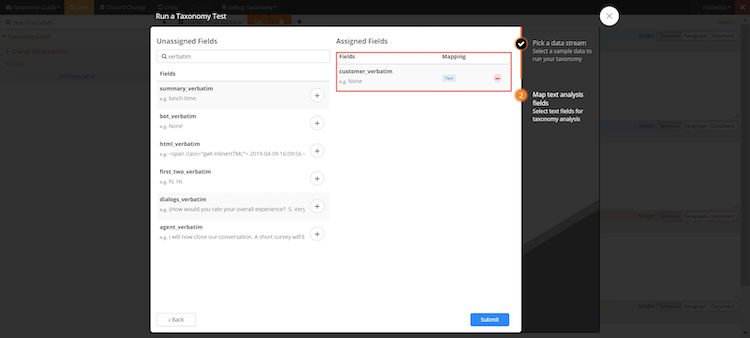
- Choose text field. This will either be customer or agent verbatim and then choose it as text field.
- Click the “text” option, and it will show up to the right as an Assigned Field
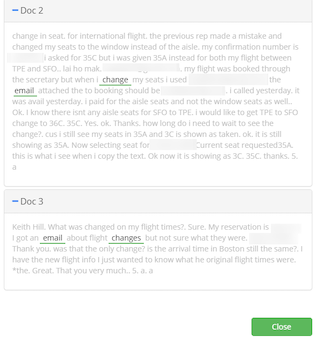
- Any sentences that match the rules from the sample drawn will show up on the next screen. The results are a sample.

Deploying a taxonomy to a dashboard
Up to this point, you have created a taxonomy, but have not yet applied it to a dashboard. In order to apply it to a dashboard, you will have to open a dashboard that contains the stream you want to classify against.
- Click on the data stack icon on the left-hand side of your dashboard and then the 3 dots.
- Click on Edit
- Select Deploy New Model

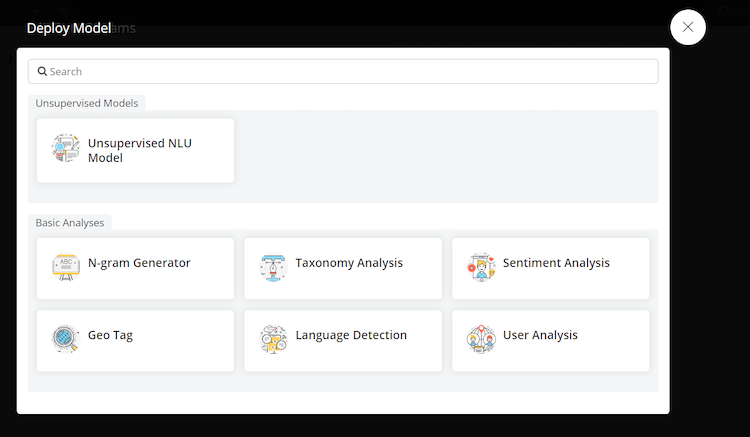
Choose Taxonomy Analysis
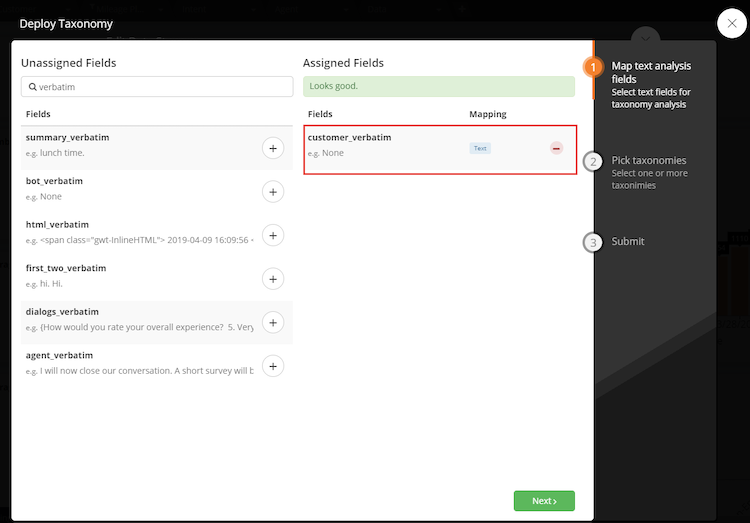
- Choose the field from the left hand side that you want to process rules against, and select it as your text field. You will need to choose either agent, customer or bot verbatim. Click next.

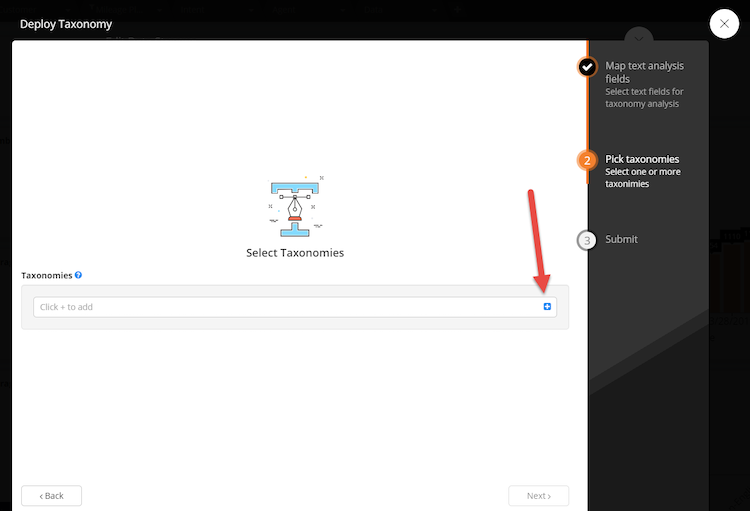
- Click the blue + button to select the taxonomy to use:

- Select taxonomy from this list and click apply
- Name taxonomy and click submit
- Once model starts processing, it will say “1 model processing”
Making incremental changes to your taxonomies
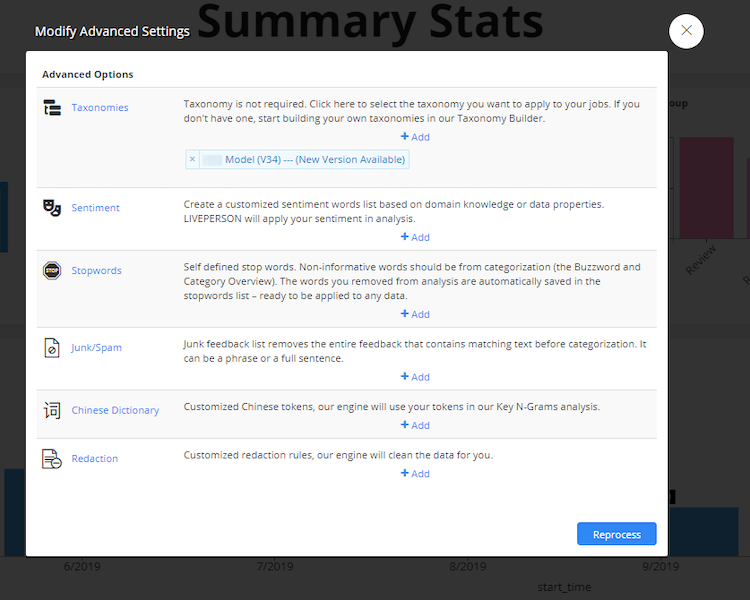
If a model was already deployed, but incremental changes need to be made, you can do so by opening your taxonomy from the advanced menu and making your changes. There are two ways to reprocess a taxonomy:
Method 1:
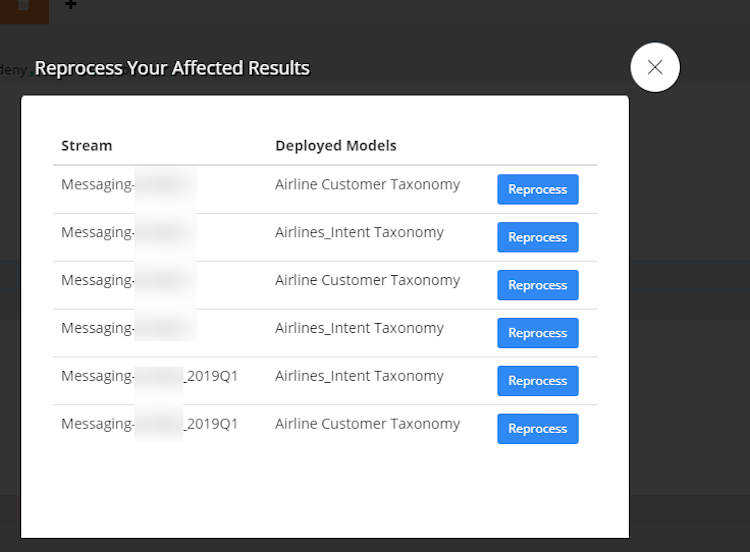
Once you have made your changes and click save, you will be shown this pop up menu, which shows all of the analyses that the taxonomy was used in, it is a good rule of thumb to reprocess against all data streams that you are currently using regularly. Once you select reprocess and the system queues up the reprocess function, you will see the green check.

Method 2:
- Go to the dashboard you want to implement change. On the left side you will see an orange pencil. Orange pencil means that a model needs to be reprocessed.
- Click on the orange pencil and find the model that needs to be reprocessed and click “Reprocess”

- Click “Reprocess” again Best practice: close the dashboard and come back later to check if it is done. Time will vary by the size of the project.
How to edit a taxonomy whilst having the Unsupervised NLU Model open:
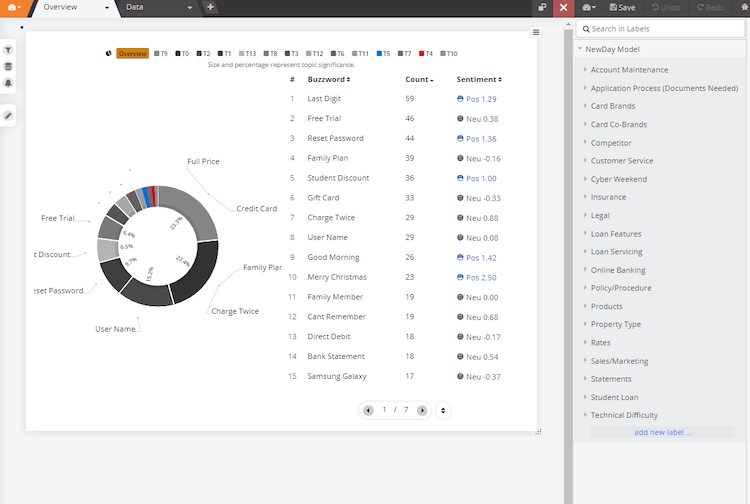
It is helpful to use Unsupervised NLU model to tune your models. The word cloud in NLU can show common word themes that either customer, agent or bot uses.
- Go to the top left side and choose Tools

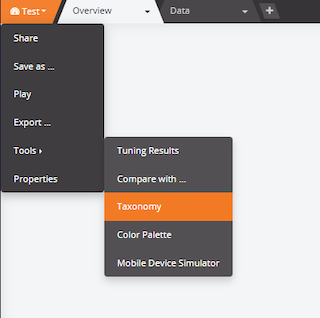
- Choose Taxonomy
- You will see a list of taxonomies that either you created or it was shared with you

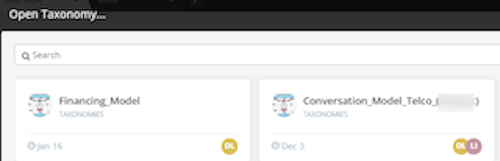
- Select the taxonomy to edit
- You can now see the dashboard and taxonomy side by side. You can filter in your dashboard and edit taxonomy at the same time. By looking at the word cloud, it can show some of the themes that you would want to add. You can either edit an existing node or add a new node in the model.

Missing Something?
Check out our Developer Center for more in-depth documentation. Please share your documentation feedback with us using the feedback button. We'd be happy to hear from you.