Lines of business
The Conversational Cloud platform is designed to reflect and support your brand goals and business structure as closely as possible. By creating individual Lines of Business (LoBs) within one single account, each with its own campaigns and engagements, brands are better able to track campaign success and engagement impact on each area of their business.
Each Line of Business will be set up with unique and siloed campaigns and reports. Campaigns will be assigned to a particular LoB, meaning that campaign managers will have access to all campaigns, with the ability to filter campaign lists and reports by LoB.
The following global entities can be shared across the account and its LoBs:
- Users
- Skills
- Campaign libraries
- Engagement attributes
- Predefined content and automatic messages
In addition, the following dashboards and reports will now reflect LoBs:
- Engagement History
- Campaigns Databar and dashboard
- CM BI dashboard
- Goal Tracker report

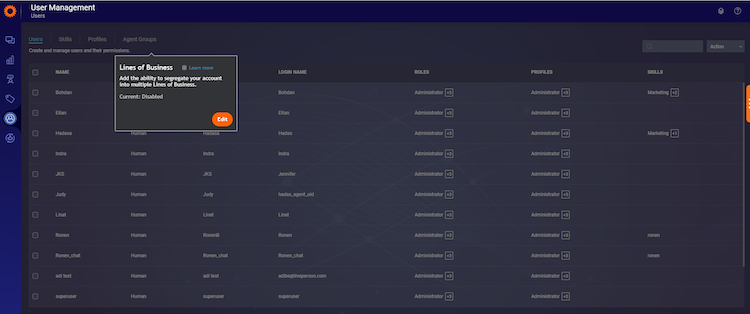
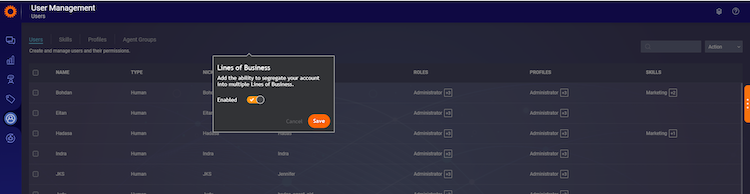
To enable Line of Business:
- In the Users area, select the Night Vision view.
- Select Line of Business and switch the toggle to Enable. Click Save.
- Once the page is refreshed a new tab for Line of Business will appear in the Users area.

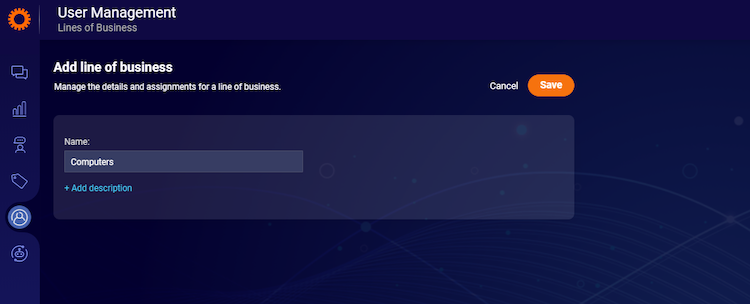
To add a Line of Business:
- In the Users area, on the Line of Business tab, click Add Line of Business.
- Give the LoB a name and add a description if required.
- Click Save.

To assign a campaign to a Line of Business:
- In the Campaigns tab, click Add Campaign.
- Select from the LoBs available in the drop-down menu. Please note:
- Campaigns can be assigned to one LoB only.
- Unassigned Campaigns can be assigned to a LoB.
- Once assigned to a LoB, the Campaign cannot be reassigned.
- Click Assign.
- Give the Campaign a name and a description if required.
- Each Engagement created under the Campaign will also be assigned to the same LoB.
- Click Publish.


To assign unassigned Campaigns to a LoB:
Unassigned Campaigns are those that were created before LoBs were introduced. It is possible to retrospectively assign a LoB to these Campaigns, in order to include them in reporting and analytics for specific LoBs.
- In the Campaigns tab, click on the Campaign you wish to assign.
- Under the option to ‘Assign to a line of business’, select a LoB from the drop-down menu. Please note:
- Campaigns can be assigned to one LoB only.
- Once assigned to a LoB, the Campaign cannot be reassigned.
- Click Yes if you are sure you want to assign the Campaign to the selected LoB.
- The page will automatically update to show the LoB.
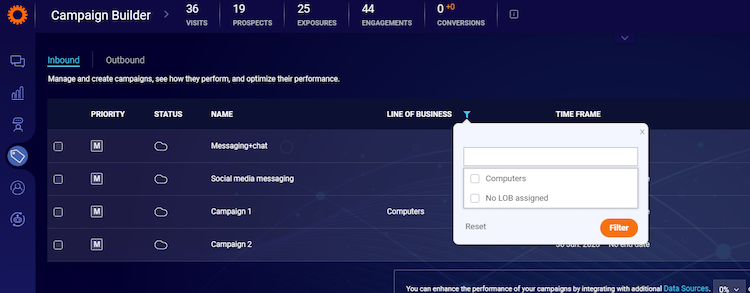
To filter Campaigns by LoB:
- In the Campaigns tab, click the filter button on the Line of Business column.
- From the drop-down menu, select the LoB you wish to filter by. Please note:
- More than one LoB can be selected from the drop-down list. However in order to view Campaign data in the dashboard, only one LoB can be selected.
- If no filters are added, the page will display all account-level data, including both assigned and unassigned Campaigns.
- Click Filter.
- The page will now display the Campaigns assigned to the LoB you selected; the dashboard will reflect the data for these Campaigns.

To filter entities by LOB:
On accounts with a large number of entities (such as users, skills, etc.), it can be very easy for users to accidentally edit the wrong entity. The ability to filter entities by LOB means users can only view and edit those entities designated to the LOBs already assigned to them.
For example, users assigned to the Sportswear LOB will only be able to view and edit the skills, predefined content etc, of that LOB. They will not be able to view or edit entities of other LOBs, such as the Homeware LOB, unless those LOBs are also assigned to them.
The following entities can be assigned to LOBs:
- Users (multiple LOBs per user)
- Skills (multiple LOBs per skill)
- Predefined content (multiple LOBs per predefined content)
- Campaigns (one LOB per campaign)
Once a user assigned to a specific LOB logs in to LiveEngage, the relevant tables will be pre filtered according to his assigned LOBs.
To view LoB in reporting:
The Campaigns dashboard and BI dashboard can display data at an account level or by individual LoBs. Data for aggregated LoBs cannot be displayed.
- Filter the Campaigns by LoB as above, selecting the LoB you wish to view the data for.
- Click the Campaigns dashboard icon to display the dashboard.
- Select the date range you wish to view the data by. The dashboard will display the data for the selected LoB during that period.
- To view the BI dashboard, click the BI button on the left of the page.
- The dashboard will display the data for the selected LoB over the set time period.
- To change the filtering options, click the LoB filter icon and select the LoB you wish to filter by.
Missing Something?
Check out our Developer Center for more in-depth documentation. Please share your documentation feedback with us using the feedback button. We'd be happy to hear from you.