Restricted LPA access
For brands that require the approval of access to each individual to their account (for example due to regulatory requirements), an option to restrict LPA user access is available by request. Under this option, the control of administrative access moves from LivePerson to your brand by enabling you to manually approve specific LivePerson employees for access. This option also enables brands to control the permissions assigned to these users, as well as control if and when to revoke all access.
Note: this option limits LivePerson's ability to provide technical support and will affect our ability to meet SLAs for support turnaround time, as special requests will have to be made and approved to troubleshoot and analyze issues.
Brands wanting to configure specific permissions for LPA users on their accounts can create customized profiles within each user role (agent, agent manager, campaign manager, and admin). Permissions can be enabled or disabled within each profile as required, to create a custom profile suitable for the LPA user.
Once enabled, these profile(s) will automatically be assigned to LPA users upon log-in, meaning they will then only be able to perform actions within the permission settings assigned to them by the brand.
For greater transparency, when a profile has been assigned to an LPA, this will be displayed on the edit screen for the profile. For example, ‘Assigned to 3 users and LPA’.

Creating custom LPA user profiles
For greater flexibility in assigning relevant permissions to LPA users, we recommend creating customized LPA user profiles within each role.
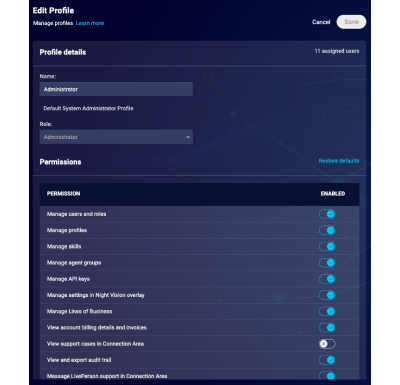
- In the User tab, select add profile. The edit profile screen will appear.
- Give the profile a name, e.g. LPA user, and add a description (optional).
- Select the role the profile will sit within: agent, agent manager, campaign manager, or admin.
- The permissions assigned to the role will appear automatically enabled or disabled.
- Switch the toggles on or off to enable or disable individual permissions.
- To return the profile to the default permissions set, click restore defaults.
- Save the profile.

How to assign LPA user profiles
- On the profiles tab, click the administrator profile responsible for assigning the LPA user permissions.
- On the edit profile page, enable the permission: ‘LPA profiles assignment’.
- Click save and log out of the account for the permissions to refresh.
- After logging in again, on the profiles tab click the night vision icon.
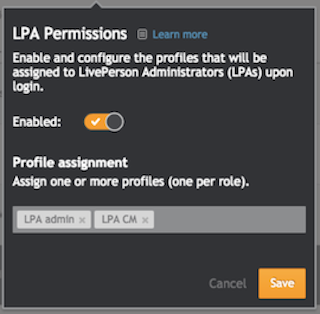
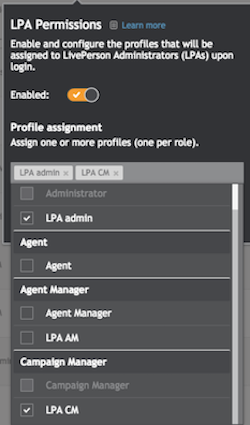
- Under LPA permission, click edit.
- In the edit screen, the permission can be enabled or disabled (by default the permission will be disabled).
- When the permission is enabled, profiles can be assigned to the LPA user, by selecting from the dropdown menu.
- Click 'save'.

Missing Something?
Check out our Developer Center for more in-depth documentation. Please share your documentation feedback with us using the feedback button. We'd be happy to hear from you.