Create and manage users
It’s possible for brands to create profiles - customized permissions sets within roles, for additional user management flexibility. For further information on customizing profiles and permissions sets, see profiles (permissions).

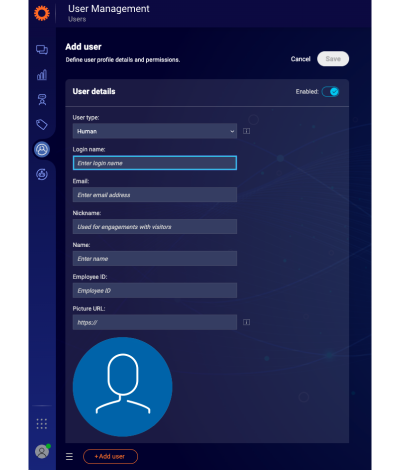
Adding a user
- On the 'users' list, click 'add user' at the bottom of the page.
- Type in the user’s details.
- The username field accepts the following characters:
- alphanumeric characters
- Special characters:
- Underscore (_) character
- Plus (+) character
- Minus (-) character
- Dot (.) character
- Exclamation mark (!) character
- Number sign (#) character
- Dollar sign ($) character
- Single-quote (') character
- Caret (^) character
- Grave accent (`) character
- Tilde (~) character;
- At sign (@) character
* No other characters/symbols are allowed.
** Once saved, the login name cannot be changed.
- Enter the name as it appears in the Conversational Cloud.
- The nickname is the name that will be displayed to the visitors in the chat.
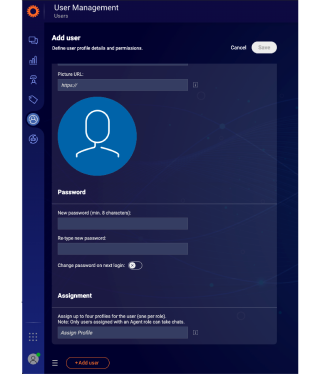
- Set a password with a minimum of eight (8) characters. Click 'save'.
- To set a change password prompt to appear when the user next logs in, toggle the password prompt to on.
- Under assignment, select the profile(s) that apply to the user. Up to four profiles can be selected, but only one from within each role.

For users with an agent profile you’ll need to define additional settings:
- Set the maximum number of chats that the user can accept at any given moment. Consider your agent’s capabilities, the number of agents available, etc.
- If your brand is enabled with the messaging feature, set the maximum number of messaging conversations.
- To give a user with the agent profile the status of AWAY by default, configure the maximum number of both chats and messages as "zero" in their User Details.
There are two options for this setting:
a) You can set it to inherit it from the account level setting that can be configured through the footnote in the Users tab. Any change to the account level setting will impact all agents defined with the setting.
b) You can custom set it, meaning any change to the account level setting won’t change it for users set with the custom setting.
For visitors to be routed to the appropriate agent when they initiate a chat, assign the user a skill:
a) Select a skill from the menu by clicking the skills field and selecting an existing skill, or
b) Create a new skill by typing in the name of the skill in the skills field.
To edit a user
- On the 'users' list, click the user you would like to edit.
- Edit the user details.
- Click 'save'.
To duplicate a user:
- On the 'users' list, select the user’s checkbox.
- Click the action menu and select duplicate.
- A new user page will open for editing, with the following fields already populated:
- Picture
- Assigned profiles
- Skills
- Groups
- Max. number of chats
- Max. number of messaging conversations
To enable/disable a user
- On the 'users' list, click the user.
- Click the enable button.
- Click 'save'.
For more information, click here.
To delete a user:
- On the user list, select the user’s checkbox.
- Click the action menu and select delete.
- Click delete to confirm.
Once a user has been deleted, it will still be possible to view their conversations in the conversations list (Open Conversations, All Conversations, and Web History).
Bulk user operations
Account users, with user management permissions enabled, can make certain bulk changes to users with an agent profile instead of having to make changes one by one.
Users can make the following configurations in bulk (up to 1,000 users at a time):
- Skill assignment - this will allow the user to assign, or unassign, skills to multiple users
- Concurrency setting - this will allow the user to edit the maximum number of live chats or the maximum number of messaging conversations assigned to multiple users
To assign an action to users in bulk
1. Select the users you wish to make the changes to. You can select users individually, or you can select the checkbox in the top left corner to select all users on a page.
2. From the action menu, you can select one of the following actions to apply changes to all selected users:
a) Set concurrency - leaving a field blank in the concurrency settings box will mean the current settings will be retained.
b) Assign/remove skills - you are able to assign skills in bulk to all selected users and remove commonly assigned skills as well.
3. Once you have made the changes to the settings, click 'save'. The changes will be applied to all selected users.
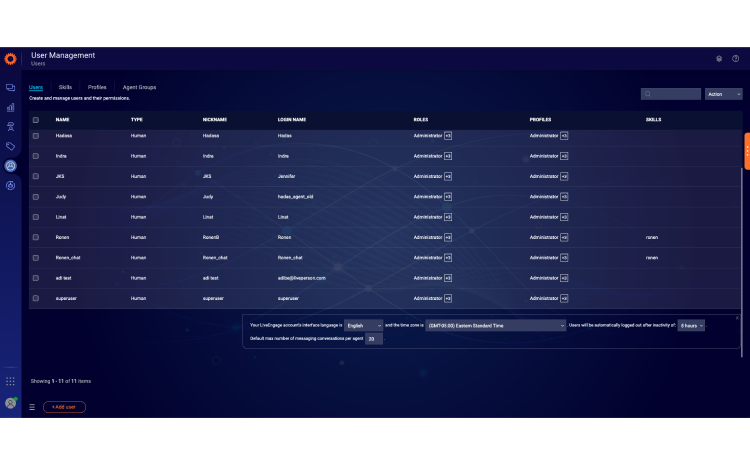
Search for users
You can easily search for users and their information according to their name, nickname, email address, permission set, and/or group. Just type in the search box the target word/name and all results will be returned in the list.
In the following example, the term “agent” was input into the search box and all users with either agent or agent manager permission sets have been returned as the search result.

Change password on next login
Safeguarding the privacy of user passwords is an important part of maintaining the security of LivePerson Conversational Cloud accounts. When editing a user, account administrators can set a prompt to appear for the user to change their password when they next log in. In this way, if the admin has set a default password for a new user, or has reset the password on a user’s account, they can ensure that the user will have to change the password to one of their choosing when they next log in.
Export users
The 'users' lists can be exported as a zipped file containing individual CSV files for the following entities:
- Users
- Skills
- Profiles
- Agent groups
- Lines of Business (LOB)
To export users:
- From the 'users' tab, select 'export' all from the action menu.
- The zipped file will appear in the 'downloads' folder on your computer.
Automatically log out users after inactivity
At the bottom of the 'users' view, you will find several account-wide settings.
See the setting "Users will be automatically logged out after inactivity of: ___"
Change this to your desired amount of time.
Missing Something?
Check out our Developer Center for more in-depth documentation. Please share your documentation feedback with us using the feedback button. We'd be happy to hear from you.